
This post contains affiliate links. This means that when you purchase through one of these links we will receive a small commission at no additional cost to you. Thank you for supporting Rich Texture Crochet!
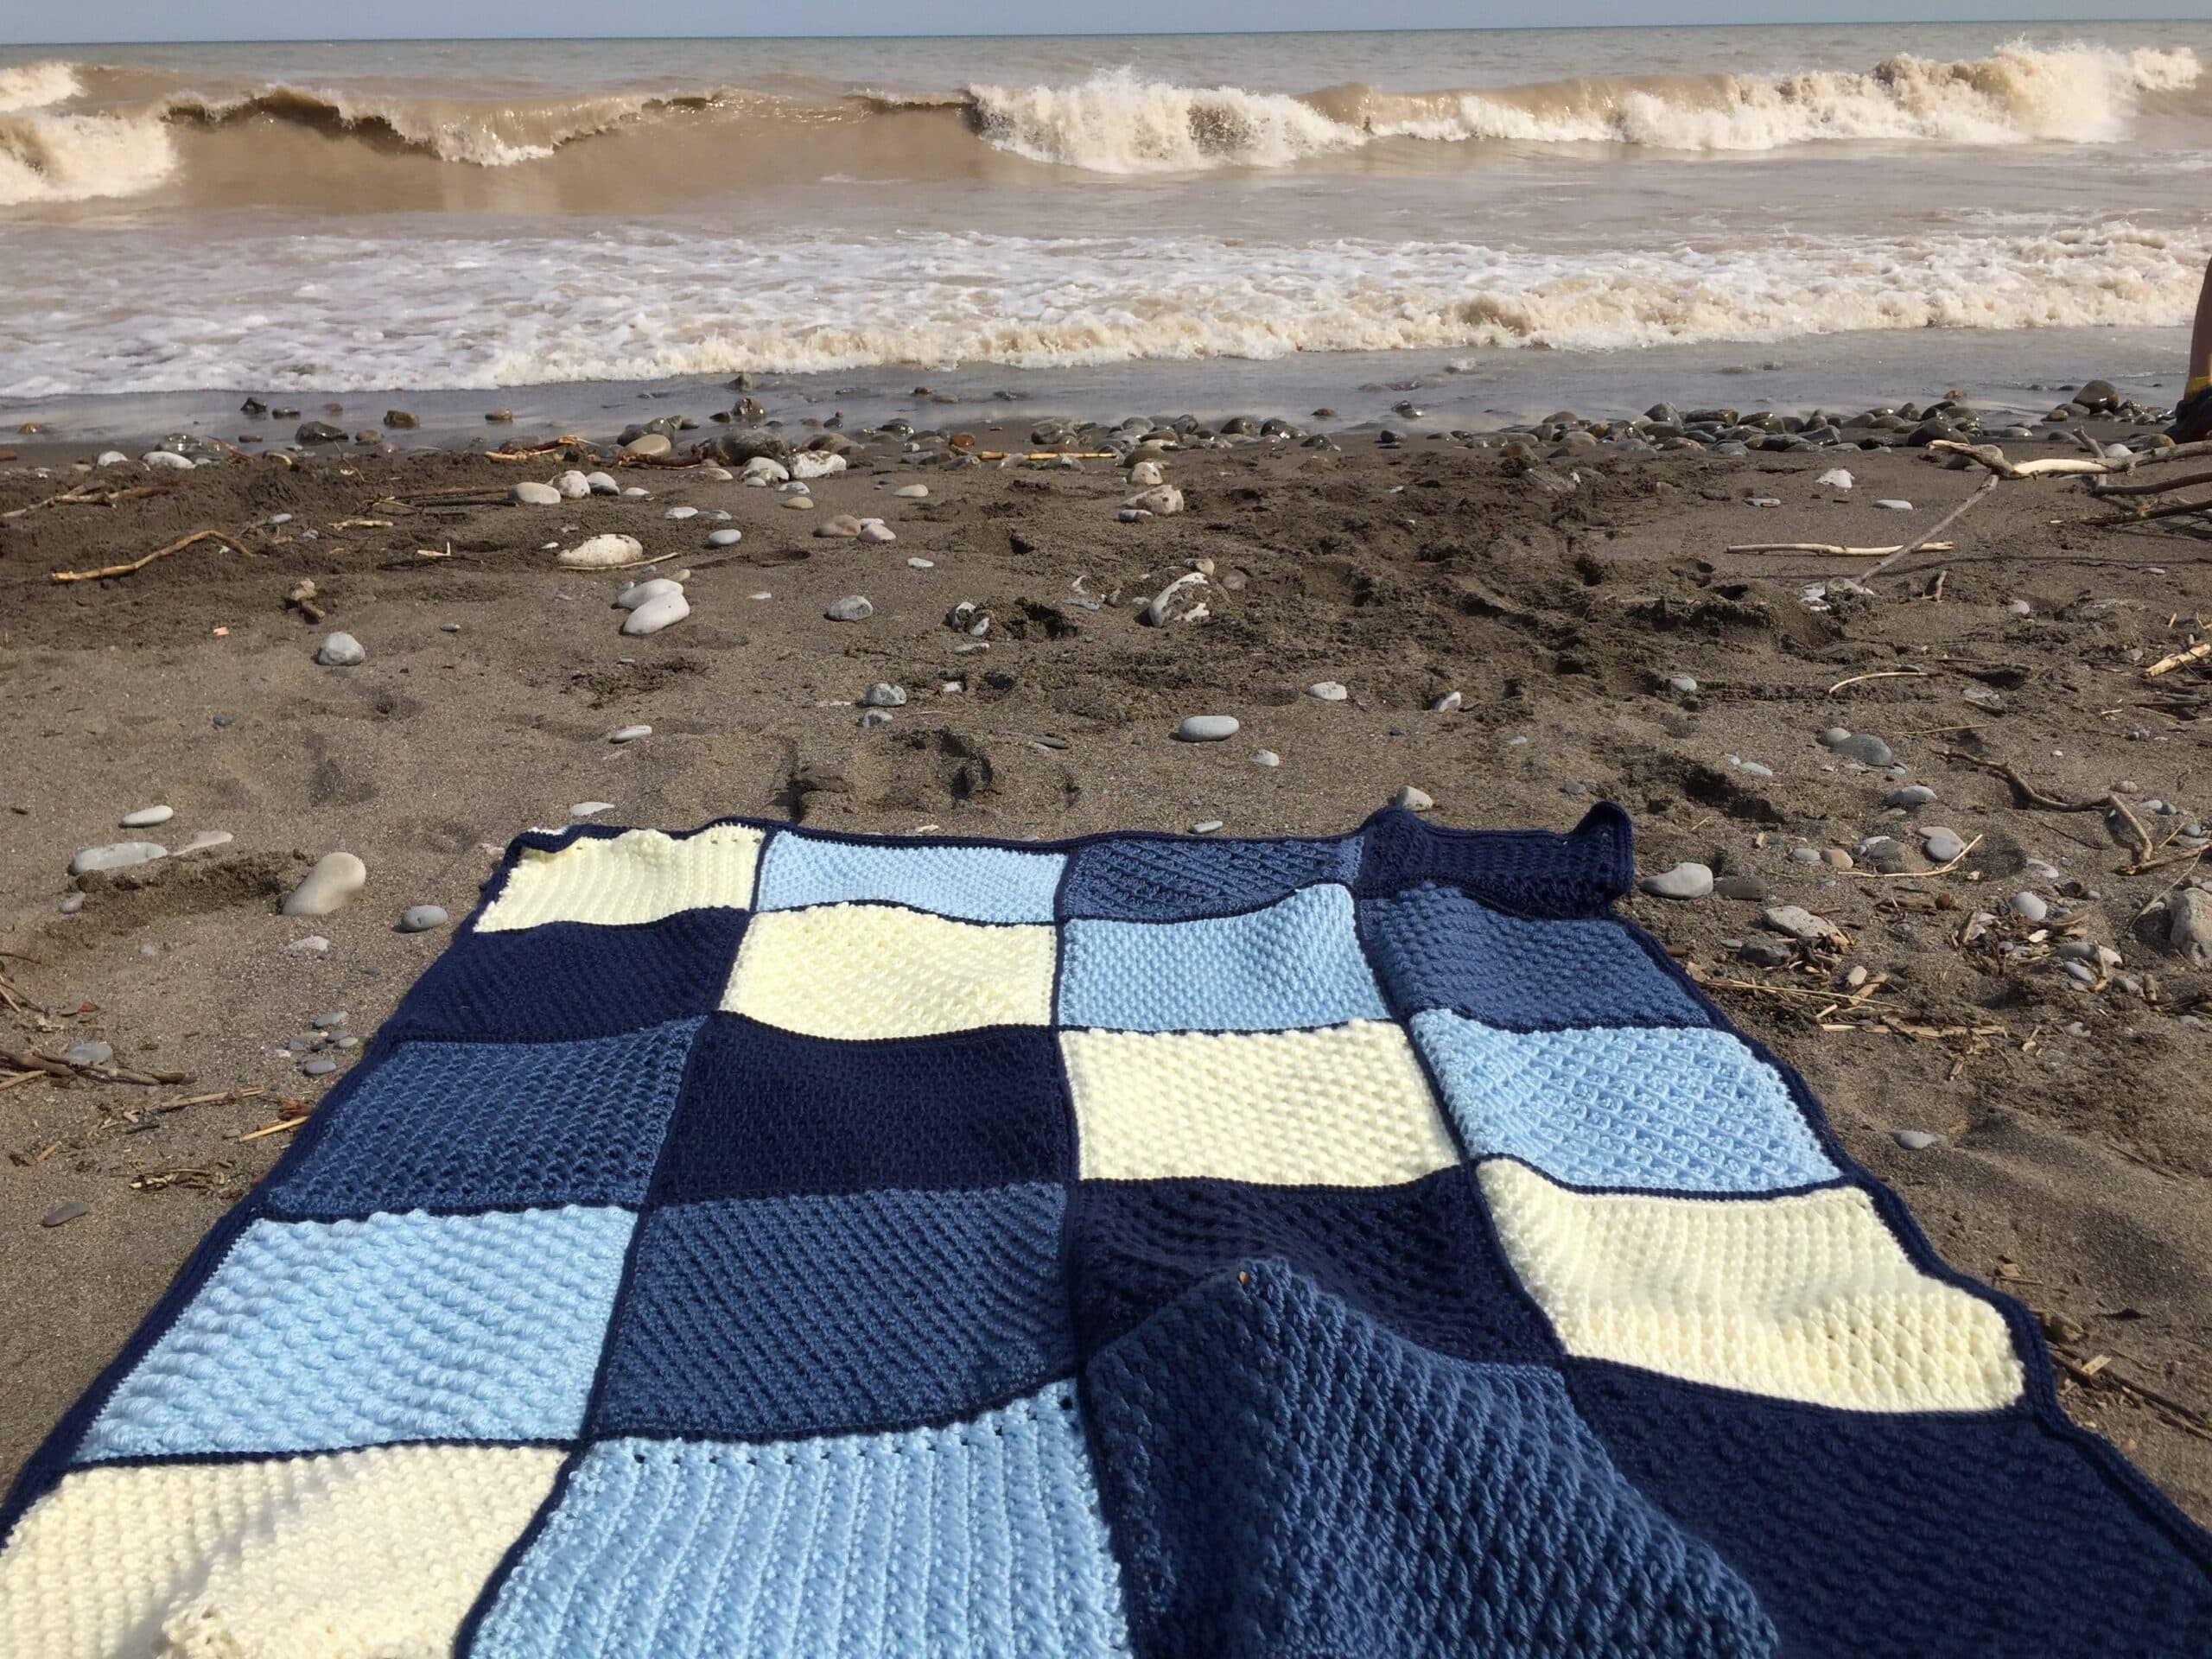
Hi and welcome to week one of the Erie Waters Crochet Along with Rich Textures Crochet! I am so excited to be starting this crochet journey with you!Thank you so much for crocheting along with me! I (as my name might suggest 😉 ) am in love with texture when it comes to crochet. I also love to crochet blankets. Blankets, throws and crochet afghans love to show off their texture. So for this crochet along I have selected five great textures to bring this blanket together.
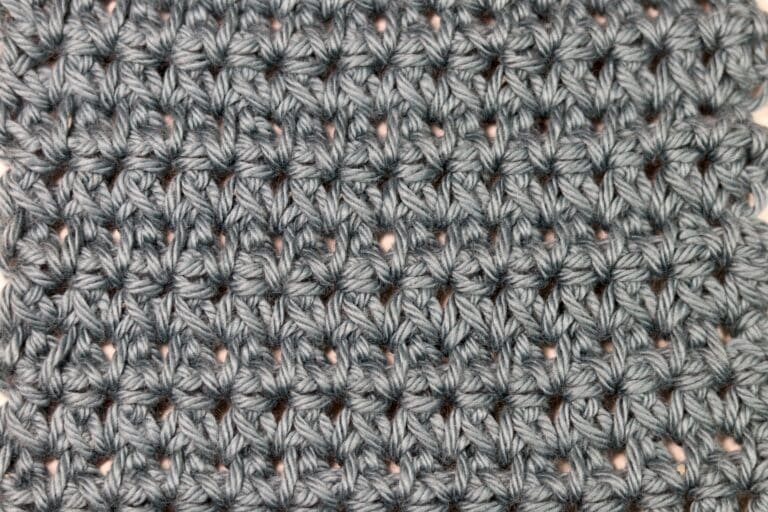
As I mentioned in the introduction to this crochet along, the waters of Lake Erie are constantly changing. They can vary greatly from one day to the next – sometimes being quite rough, and at other times, gentle ripples on the surface.

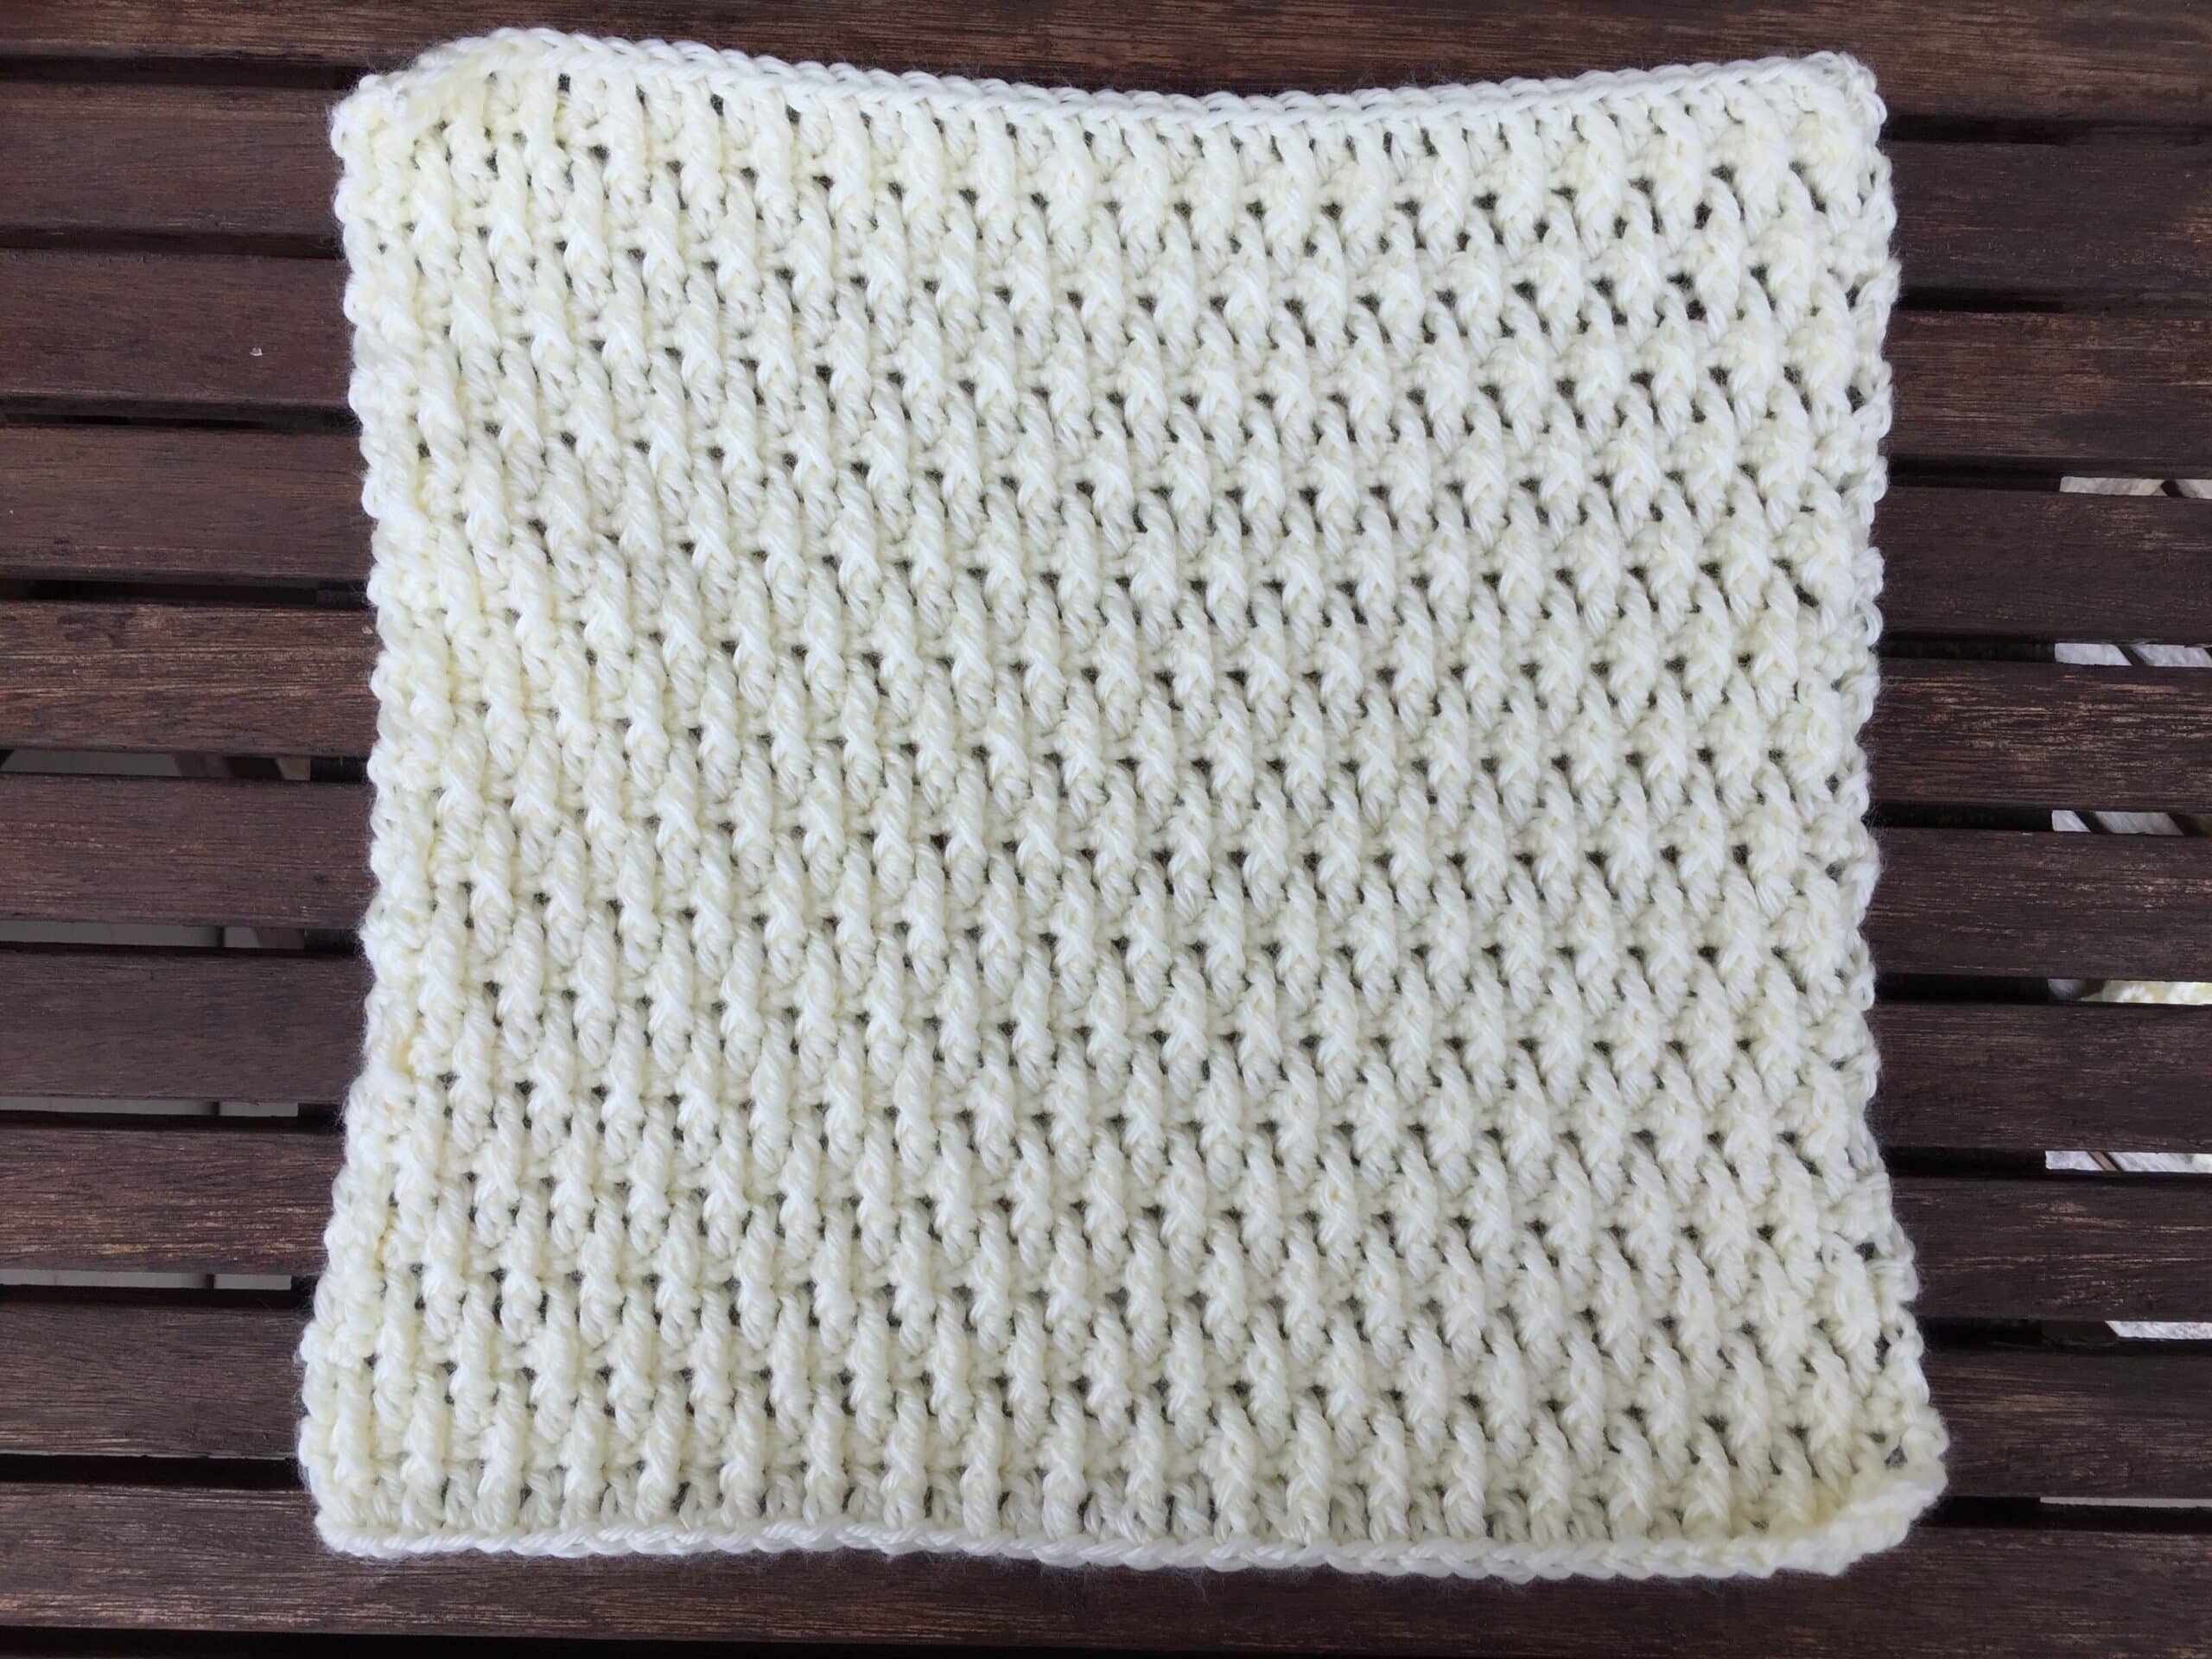
This weeks square, with it’s gentle and rolling texture, reflects these more gentler times.
The raised ripple stitch is a fun stitch. It features lots of great texture. It’s predominate use of the double and triple crochet stitches also means that it works up quite quickly.
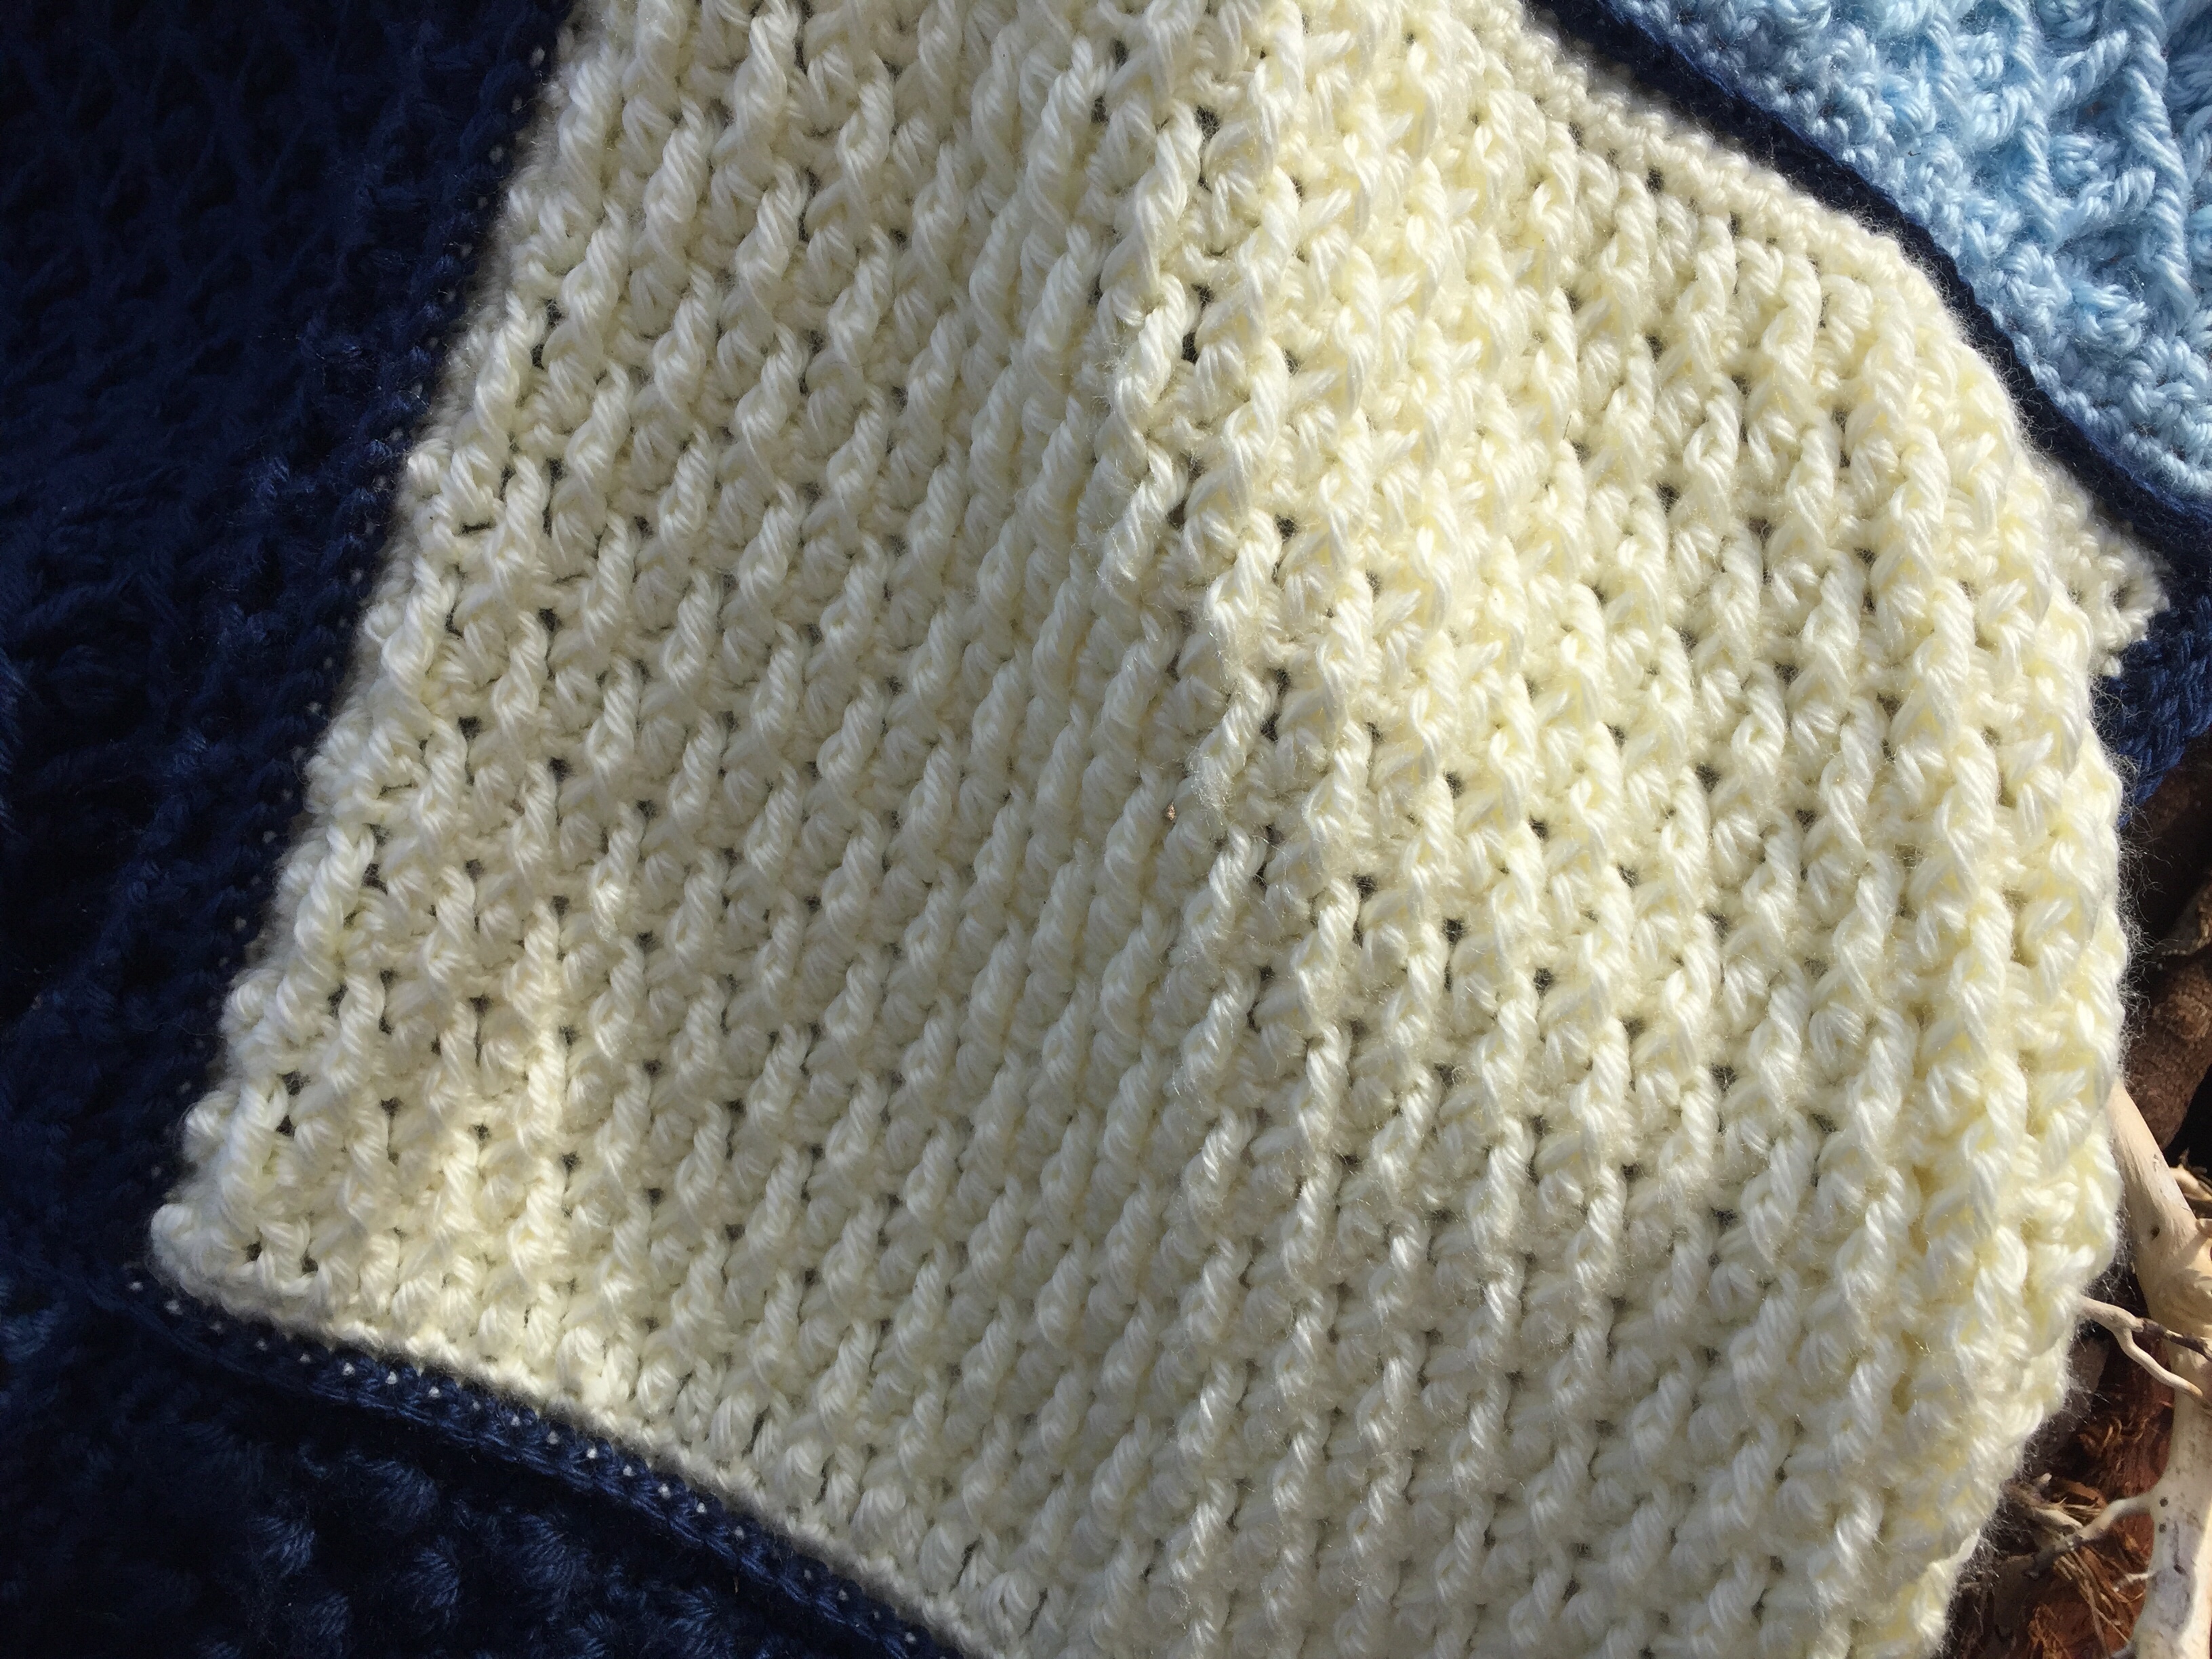
For this square you will need to be familiar with the single crochet, double crochet and triple crochet stitches. The texture in the stitch is created by working the triple crochet stitches around the post of the stitch a couple of rows below.
Below you will find the instructions, both written and video, for this first square in the Erie Waters Throw. I will continue releasing a portion of the pattern once a week for the next five weeks. Following the crochet along I will have a PDF version available in my Etsy and Ravelry shops.
Did you miss the post about the introduction and materials for the project? You may jump over to it here: Erie Waters Throw CAL – Introduction and Materials.
This pattern is now also available as a single PDF which can be purchased (and added to your library!) for $2.50 CAD from my Ravelry and Etsy Shops:
Rich Textures Crochet on Ravelry
To complete the blanket to the size shown, you will need to make four of this square. If you have chosen four different colours/shades as I have, you will make one of these squares in each colour.
Stitches and Abbreviations:
Ch – Chain
Dc – Double Crochet
FpTr – Front post Triple Crochet (a triple crochet worked around the post of the double
crochet two rows below)
Lp – Loop
Lps – Loops
Rpt – Repeat
Sc – Single Crochet
Sk – Skip
Sl st – Slip stitch
Yo – Yarn over
Pattern Notes:
– Pattern is written in American English
– Ch 3 at the beginning of row counts as dc
– Weave in ends as needed.
– To work around the post of the double crochet, with your hook in from of your work, yarn over twice, insert your hook from right to left behind the post of the double crochet stitch indicated two rows below. Complete the stitch as you would for a triple crochet worked in the top of the stitch. (For additional help, please see the video tutorial below)
Square Measurements: 11 inches x 9.5 inches
Pattern:
Ch 43.
Row 1: Dc in the 4th chain from hook and each each ch st to the end. Turn. (41 sts)
Row 2: Ch 1, Sc in the first st and in each across. Turn. (41 sts)
Row 3: Ch 3 (counts as dc), sk first Sc, * sk next Sc, but working around the post of the
dc below fptr, dc in next sc; Rpt from * to end of row, dc in the final st. Turn. (41 sts)
Row 4: Ch 1, Sc in the first st and in each across. Turn. (41 sts)
Row 5: Ch 3, sk first sc, dc in next sc, * sk next Sc, but working around the post of the
dc below fptr, dc in next sc; Rpt from * to end of row, dc in the final st. Turn. (41 sts) (note: at the end of this row you will have 1 dc in each of the last two sts just as you had dc in the first two)
Rows 6-27: Rpt rows 2-5 until work from the beginning measures approximately 9.5 inches.
Fasten off and weave in ends.
Edging (Worked in rnds):
With the right side facing, join yarn with a sl st in the top right corner.
Rnd 1: Sc in the same st as joining and in each st across the next 39 sts, work 3 sts in the corner st. Working along the side of the square, evenly work 35 sc across, work 3 sc in the corner st, sc 39 across, 3 sc in the corner st, work 35 sc evenly across, work 2 sc in final corner. Join with a sl st in first sc.
Fasten off, weave in ends.
Repeat the above steps three more times so that you have a total of four squares.
Congratulations! You have now completed the first square for the Erie Waters Throw! Stay tuned for the next piece to be revealed 🙂
Be sure to join the event on Facebook at http://www.facebook.com/richtextures/. There you will be able to share updates and post photos. Sharing on social media? Be sure to tag #eriewaterscal
Happy Crocheting!
Sarah


I am just so grateful to be able to make this blanket and appreciate it being given as a free pattern. Much blessings.
I am so glad! Enjoy!
The pattern is absolutely beautiful. However, I have a question on this first square…
Your pattern notes are for a Front Post Double Crochet but you are using a Front Post Triple Crochet in your pattern. Am I confused or am I just reading something wrong here?
Pattern Notes:
– Pattern is written in American English
– Ch 3 at the beginning of row counts as dc
– Weave in ends as needed.
– To work around the post of the double crochet, with your hook in from of your work, yarn over, insert your hook from right to left behind the post of the double crochet stitch indicated two rows below. Complete the stitch as you would for a double crochet worked in the top of the stitch. (For additional help, please see the video tutorial below)
Thanks!
You are absolutely correct!! Thanks for pointing it out and I have adjusted the notes 🙂
Happy to help! Looking forward to getting to work on it!!
Thanks for creating and sharing this beautiful and fun pattern! I have a question regarding gauge. After finishing my first square, it measures 10,5’ X 8’ for 43 ch and 27 rows. What is more important: the achieved size in inches or the number of rows? Thanks for letting me know,
It is up to you – what will be important is that you ensure all of your blocks are roughly the same size (when you do you sc edging, make sure all the blocks have the same number of stitches). If all your block remain the size of the one you mentioned your finished blanket will be slightly smaller. If you would like you can try going up a hook size to make them larger or add stitches to your starting chain and rows to the pattern. Or you can keep them as is 🙂
Will these patterns be available for awhile? I have another blanket to finish first. But I started something very similar to your lovely Erie Waters, picking textured patterns I liked from various sources and in these same colors. I’d love to finish it and your patterns are inspiring me.
Yes they will be! After the “event” I will also release a single PDF in my Etsy and Ravelry shops – but they will always be free here 🙂
Sorry I missed this! CAL are hard for me. Not good with the FB