This post contains affiliate links. This means that when you purchase through one of these links we will receive a small commission at no additional cost to you. Thank you for supporting Rich Texture Crochet!
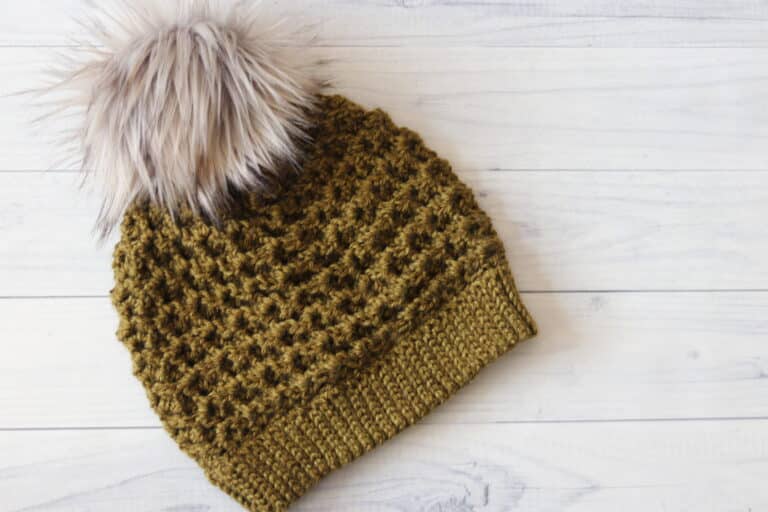
The Golden Valley Hat crochet pattern is a beautiful, light weight crochet beanie that features one of those favourite classic stitch patterns.
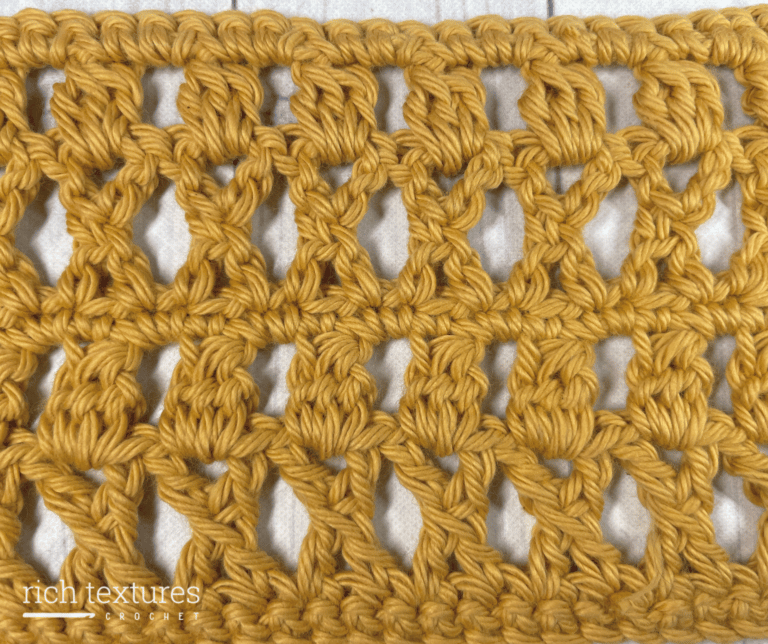
If you ask a crocheter to name their favourite crochet stitch, often the Alpine Stitch is near the top of their list. It is certainly one of my favourites. It is easy to see why. The alpine stitch is worked using two different basic stitches and the fabric the pattern creates has an absolutely wonderful texture.
The texture sits all to the front of the fabric and is created by working rows of single crochet stitches followed by rows of front post double crochet and double crochet stitches. It has an easy rhythm to it.

What yarn and hook should I use for my crochet hat?
To work the Golden Valley Hat crochet pattern I selected the Valley Tweed Yarn by Rowan. It is a beautiful 100% wool fingering weight yarn that comes in a variety of beautiful earth and jewel tones. It makes for a gorgeous light weight crochet hat!
I have paired the yarn with an E/4 (3.5 mm) crochet hook. In the video tutorial below you will see me using a Birchwood Crochet Hook also by Rowan. If you are looking for a hybrid hook, this is one of my favourites!

How to make a crochet hat:
The Golden Valley Hat crochet pattern is worked from the brim up. It features a ribbed brim that is worked in rows. I usually prefer to work the brims of my hats in slip stitches. Although they can be more challenging to work, they really hold their shape well, fit snug and feature that classic knit look.
The body of the hat is worked in rounds and the texture continues up through to the crown of the hat. For this reason, I have classified the hat as an intermediate pattern as to get the texture to carry through you will need to work some irregular stitches which I explain below. As always you will find the free video tutorial on my YouTube channel.

PDF Copies of this crochet pattern:
The crochet pattern for the Golden Valley Hat will be written out in full below. However if you would like to add this pattern to your library or purchase an ad-free PDF, you can do so from my Etsy and Ravelry shops linked below:
CLICK HERE FOR THE GOLDEN VALLEY HAT CROCHET PATTERN ON ETSY
CLICK HERE FOR THE GOLDEN VALLEY HAT CROCHET PATTERN ON RAVELRY
Thank you so much for stopping by! While here you may want to also check out the Cabin Beanie – A Free Crochet Pattern. Don’t forget to sign up for my email newsletter below so that you never miss a new free crochet pattern.
Happy Crocheting!
Sarah

Golden Valley Hat Crochet Pattern:
Skill Level: Intermediate
Gauge: 21 sts x 10 rows of pattern = 4 inches
Finished Size: Approximately 9.5 x 8.5 inches laid flat, excluding pompom, 20-23 inch circumference.
Yarn: Valley Tweed by Rowan® (100% Wool; 1.75 oz, 50 g; 226 yds, 207 m). Fingering Weight (1). You will need 1.5 – 2 skeins.
Hook: Size E/4 (3.5 mm) hook.
Notions: Yarn Needle
Stitches and Abbreviations:
Ch – Chain
Fpdc – Front Post Double Crochet Stitch
Fpdc2tog – Front Post Double Crochet Two Stitches Together
Fpdc/dc2tog – A Front Post Double Crochet and Double Crochet Two Stitches Together (Yarn over, bring your hook in front of your work and insert your hook from front to back around the post of the next st, yarn over and draw up a loop, yarn over and draw through two loops. Yarn over and insert your hook into the top of the next st, yarn over and draw up a loop, yarn over and draw through two loops. Yarn over and draw through all the loops on your hook.
Lp – loop
Rpt – Repeat
Sc – Single Crochet Stitch
Sc2tog – Single Crochet Two Stitches Together
Sk – Skip
Sl st – Slip stitch
Sp – space
Yo – Yarn over
Pattern Notes:
- Pattern is written in American English terms.
- Brim of the hat is worked in rows, body of the hat is worked in rounds.
- Ch 1 at beginning of round does not count as a st.
- Only turn as instructed.
- Weave in ends as needed.
- Hat may be worn with a pompom or without.
- To change the size of your hat, work the brim to the desired size and then work a multiple of 2 stitches for the first round of the hat body. Work pattern adjusting the stitch count as necessary.
Free Crochet Pattern:
Brim (Worked in rows):
Ch 14.
Row 1: Sl st in the 2nd ch from hook and in each ch across. Ch 1, turn. (13 sl sts)
Row 2: Working in the blo, sl st in each st across. Ch 1, turn. (13 sl sts)
Continue to repeat row 2 until work from the beginning measures approximately 16-17 inches.
Do not fasten off, but fold brim of hat so that two shorter ends meet. Now working through both thicknesses, sl st across working through the blo on each side. Do not fasten off, turn work right side out (so that the right side is facing you).
Now working around the edge of the brim, continue working in rounds as follows:
Hat Body (Worked in rounds):
Rnd 1: Ch 3 (counts as a dc), evenly work 99 dc all the way around. Join with a sl st in the first st, do not turn. (100 sts)
Rnd 2: Ch 1, Sc in the 1st st and in each st around. Join with a sl st in the 1st st.
Rnd 3: Ch 1, *fpdc around the post of the 1st dc (which is your starting ch-3) 2 rows below, dc in the next st of the previous row (skipping the sc in behind the fpdc just worked), fpdc around the post of the next dc 2 rows below; Rpt from * around to the final st, dc in the final st. Join with a sl st in the 1st st.
Rnd 4: Ch 1, sc in the 1st st and in each st around. Join with a sl st in the 1st st.
Rnd 5: Ch 1, dc in the top of the 1st st, *fpdc around the post of the next st 2 rows below, dc in the top of the next st; Rpt from * around ending with a fpdc around the post of the final st 2 rows below. Join with a sl st in the 1st st.
Rnd 6: Ch 1, sc in the 1st st and in each st around. Join with a sl st in the 1st st.
Rnds 7-22: Repeat Rnds 3 – 6 four times more more.
Rnd 23: Ch 1, *[fpdc around the post of the next dc 2 rows below, dc in the next st of the previous row] 4 times, fpdc 2 rows below/dc2tog over the next 2 sts; Rpt from * around, join with a sl st in the top of the 1st st. (90 sts)
Rnd 24: Ch 1, Sc in the 1st st and in each st around. Join with a sl st in the 1st st. (90 sts)
Rnd 25: Ch 1, *[dc in the top of the next st, fpdc around the post of the next dc 2 rows below] 3 times, dc in the top of the next st, fpdc2tog over the next 2 sts 2 rows below; Rpt from * around, join with a sl st in the top of the 1st st. (80 sts)
Rnd 26: Ch 1, Sc in the 1st st and in each st around. Join with a sl st in the 1st st. (80 sts)
Rnd 27: Ch 1, *[fpdc around the post of the next dc 2 rows below, dc in the next st of the previous row] 3 times, fpdc 2 rows below/dc2tog over the next 2 sts; Rpt from * around, join with a sl st in the top of the 1st st. (70 sts)
Rnd 28: Ch 1, Sc in the 1st st and in each st around. Join with a sl st in the 1st st. (70 sts)
Rnd 29: Ch 1, *[dc in the top of the next st, fpdc around the post of the next dc 2 rows below] 2 times, dc in the top of the next st, fpdc2tog over the next 2 sts 2 rows below; Rpt from * around, join with a sl st in the top of the 1st st. (60 sts)
Rnd 30: Ch 1, Sc in the 1st st and in each st around. Join with a sl st in the 1st st. (60 sts)
Rnd 31: Ch 1, *[fpdc around the post of the next dc 2 rows below, dc in the next st of the previous row] 2 times, fpdc 2 rows below/dc2tog over the next 2 sts; Rpt from * around, join with a sl st in the top of the 1st st. (50 sts)
Rnd 32: Ch 1, Sc in the 1st st and in each st around. Join with a sl st in the 1st st. (50 sts)
Rnd 33: Ch 1, *[dc in the top of the next st, fpdc around the post of the next dc 2 rows below] once, dc in the top of the next st, fpdc2tog over the next 2 sts 2 rows below; Rpt from * around, join with a sl st in the top of the 1st st. (40 sts)
Rnd 34: Ch 1, Sc in the 1st st and in each st around. Join with a sl st in the 1st st. (40 sts)
Rnd 35: Ch 1, *[fpdc around the post of the next dc 2 rows below, dc in the next st of the previous row] once, fpdc 2 rows below/dc2tog over the next 2 sts; Rpt from * around, join with a sl st in the top of the 1st st. (30 sts)
Rnd 36: Ch 1, Sc in the 1st st and in each st around. Join with a sl st in the 1st st. (30 sts)
Rnd 37: Ch 1, *fpdc around the post of the next dc 2 rows below, fpdc2tog over the next 2 sts 2 rows below; Rpt from * around, join with a sl st in the top of the 1st st. (20 sts)
Rnd 38: Ch 1, fpdc2tog all the way around. Join with a sl st in the top of the 1st st. (10 sts)
Fasten off leaving a long tail. Using the long tail, sew the top of the hat closed. Fasten off and weave in your ends. Attach Pompom to the top if desired.
Video Tutorial:
CLICK HERE TO WATCH THE GOLDEN VALLEY HAT VIDEO TUTORIAL ON YOUTUBE