
This post contains affiliate links. This means that when you purchase through one of these links we will receive a small commission at no additional cost to you. Thank you for supporting Rich Texture Crochet!
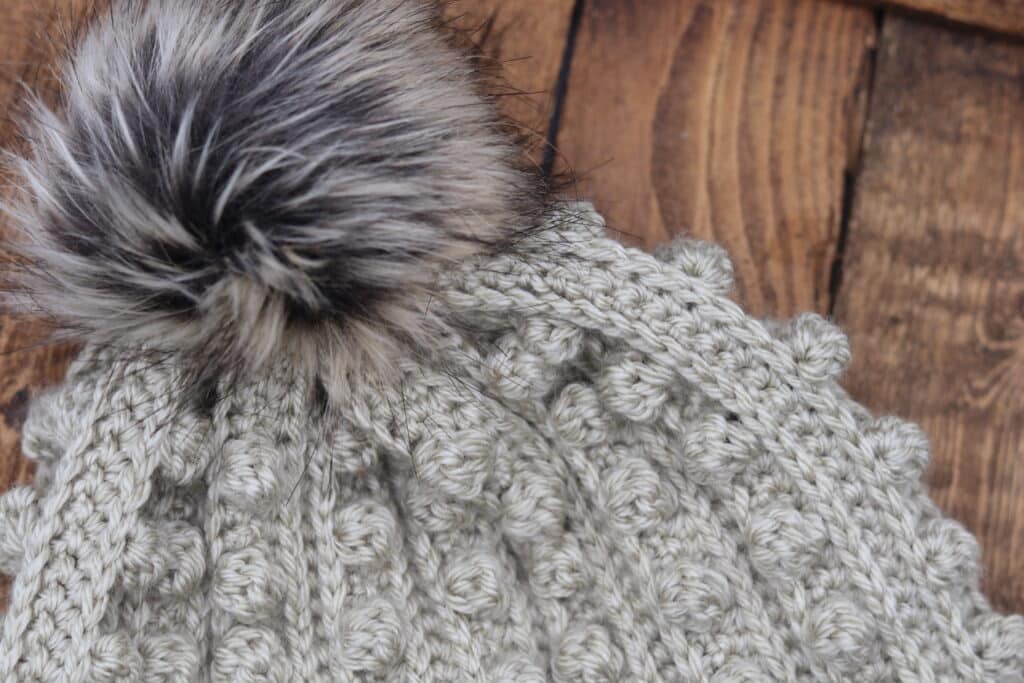
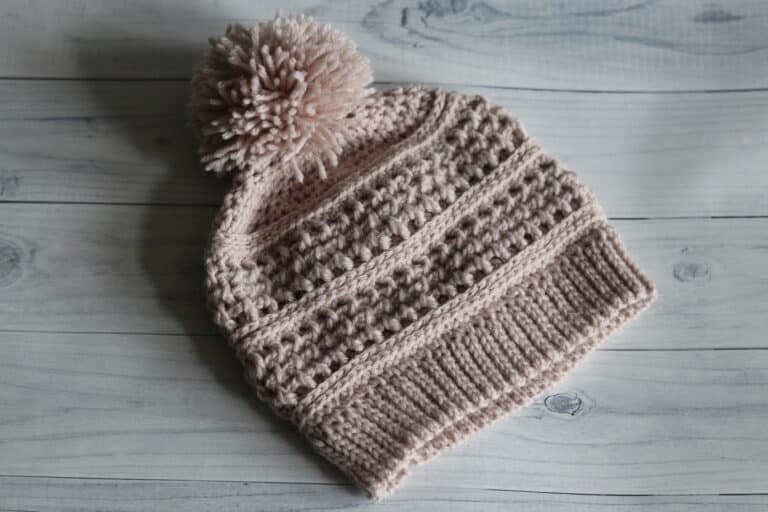
The Rocky Beanie is a beautiful textured crochet beanie worked in a unique way! You will love how easy it is!
The Rocky Beanie is worked is a way that is similar to my Easy Winter Beanie Crochet Pattern. Instead of being worked from the bottom up or top down, it is worked lengthwise in rows. A magic ring or a chain ring are used at one end of the rows to help cinch the top of the hat closed at the end.
I love using this method for making hats! It is so easy to customize!
This post contains affiliate links. This means that when you make a purchase through one of these links, Rich Textures Crochet will earn a small commission at no additional cost to yourself. Thank you for supporting Rich Textures Crochet!

To adjust the size of the hat, simply work your foundation chain to the desired length and then work the repeat in the pattern until it reaches the desired head circumference. It’s that easy! I invite you to check out the video tutorial below where I will explain this, and how to make the crochet beanie in full.
The Materials:
For this crochet beanie today I will be using about 250 yards of a worsted weight acrylic yarn called Heartland by Lion Brand Yarn. You see it here in the colour Dry Tortugas. I will also be using a 5mm crochet hook. In the video below I will be using a 5mm Clover Armour Crochet hook.
PDF Copies of the Pattern:
PDF Copies of the pattern are also available in my Etsy and Ravelry Shops which are linked below:
Click Here for the Rocky Beanie on Etsy
Click Here for the Rocky Beanie on Ravelry
Thank you so much for stopping by! I invite you to sign up for my email newsletter at the bottom of this page or in the right hand side bar. That way you will never miss a new free pattern!
Happy Crocheting!
Sarah

The Rocky Beanie Crochet Pattern:
Skill Level: Easy
Gauge: 20 sts x 12 rows of pattern = 4 inches.
Finished Size: Approximately 8 x 10 inches laid flat, 20-21 inch circumference at hat opening to fit adult head.
Yarn: Heartland by Lion Brand Yarn (100% extra acrylic; 5 oz/142g; 251 yds/230 m); 1 Skein Dry Tortugas
Hook: Size H/8 (5.0 mm). Adjust hook size if necessary to obtain correct gauge.
Notions: Yarn Needle
Stitches and Abbreviations:
3rd Loop – The loop under the top loop of the half double crochet stitch.
Blo – Back Loop Only
Bobble – Bobble Stitch ([yarn over, insert your hook in the stitch indicated, yarn over and draw up a loop, yarn over and draw through two loops] five times, yarn over and draw through all loops on your hook)
Ch – Chain
Hdc – Half Double Crochet
Rpt – Repeat
Sk – Skip
Sl St – Slip Stitch
Yo – Yarn Over
Pattern Notes:
- Pattern is written in American English terms.
- Pattern is worked in rows lengthwise.
- The sl st into the ring and ch 1 at beginning of row does not count as stitch.
- Each time you return to your starting loop after working the row, sl st into the centre of the loop before turning.
- Weave in ends as needed.
- OPTIONAL – Add pompom to the top.
- Note: you can change the length of your beanie as desired, simply make your starting chain the desired length, then add one additional chain. To make the circumference larger or smaller simply work the pattern to the width desired before working the seam.
Free Crochet Pattern:
Start by making a magic circle, then working out from that circle, ch 46. (Alternatively you may ch 10 and join with a sl st in the first st to make a ring.)
Row 1: Sc in the 2nd ch from hook and in each of the next 9 sts, hdc in each of the next 35 sts, sl st into ring, ch 1, turn. (45 sts)
Row 2: Working in the 3rd loop, sc in each of the next 5 sts, *bobble in the next st, sc in each of the next 3 sts; rpt from * across to the final 10 sts, working in the blo, sc in each of the next 10 sts. Ch 1, turn.
Row 3: In the blo, sc in each of the 1st 10 sts, now working under both loops, hdc in each of the next 35 sts, sl st into ring, ch 1, turn. (45 sts)
Row 4: Working in the 3rd loop, sc in each st across to the last 10 sts, in the blo, sc in each of the next 10 sts. Ch 1, turn.
Row 5: In the blo, sc in each of the 1st 10 sts, now working under both loops, hdc in each of the next 35 sts, sl st into ring, ch 1, turn. (45 sts)
Rows 6-60: Repeat rows 2-5 fourteen times, ending on a row 4.
Turn hat inside out so that wrong side is facing. Working through both thickness and the blo of both sides, sl st in each st across crocheting the two ends together. Fasten off.
Pull the magic ring at the top of the hat gently closed and sew if needed. Fasten off and weave in your ends. Make optional pompom and affix to the top.
Video Tutorial:
The photographs and pattern contained in this document are the property of Rich Textures Crochet.
This pattern is for personal use only.
No unauthorized reproduction, in whole or in part, or distribution of this pattern or content is permitted. ALL FINISHED PRODUCTS from this pattern can be used for local sales and sold online.
Thank you so much for supporting Rich Textures Crochet! To stay in touch or see more great products, be sure to visit me on Facebook and Instagram (Rich Textures Crochet). Thanks again! Happy Crocheting!


Hello Sarah, what a coincidence I just pick up last weekend the yarn I need for the next hat and it’s the same yarn and color as yours. I really love all your pattern I wish found your website long time ago but thank you for posting your patterns.
You’re welcome! And what a happy coincidence!
I just found your website today. I’m totally enjoying going through all the patterns and articles. One question. On this hat, is there more information on the fur-ish pom pom you used? Thank you!! Oh and btw… I never heard of a yarn it either! Until now.
I purchased my pompoms from Wool Interrupted however I’m not sure that they are selling them anymore 🙂
Loved having the video to guide me with this pattern. Viewed it, backed it up, viewed again, and yet again. Otherwise I’d have just given up. Love your hard working hands, and I too do not get gel nails. Yeah for plain! Thanks again. Not done yet but having fun!
Sarah, Thanks for putting this on youtube! I am a beginner and trying to get gauged. When I crochet the gauge swatch, do I need to use the same stitch as the pattern or can I just make a single crochet swatch? Also, if my measurement is larger, I need to use a smaller needle right? When I measured my chain for 46 chains, it was about 12 inches long. I believe 46 stiches based on your gauge should be about 9 1/2 inches right?
Thanks.
Haley
Hi, I’m enjoying your beautiful design but have run into a bit of a mystery. I’m finding in my count after the row of bobbles I turn my work and do the next row, at the end of it I’m always coming up short by one stitch and have to add another one on the next row. I’m totally stuck as to why. Am I missing something? Thanks
I just counted per the written instructions for row 2 (bobble row) & no matter how I count it comes out to only 44 sts. Is the slip-stitch at the end supposed to count as 1? I count 5sc (top of hat) 1 bbl, 3 sc, 1 bbl, 3sc, 1bbl, 3sc, 1bbl, 3sc, 1bbl, 3sc, 1bbl, 3sc, 1bbl, 3sc, 1bbl, 10sc (rim) = 44sts. Maybe I’m still missing something? Any advice would be greatly appreciated, I’m trying to finish the hat as a gift for someone. Thank you!
I have the same exact question. I would love to see a response.
I had the same issue. I graphed it out and discovered that if I do 6 sc in the third loop, then bobble and then do continuing pattern of 3 sc in third loop to the last 10 sc it counts out correctly as a total of 45 stitches