
This post contains affiliate links. This means that when you purchase through one of these links we will receive a small commission at no additional cost to you. Thank you for supporting Rich Texture Crochet!
The Prairie Beanie is another great easy crochet beanie! You’ll love the gentle rhythm of the stitch pattern.
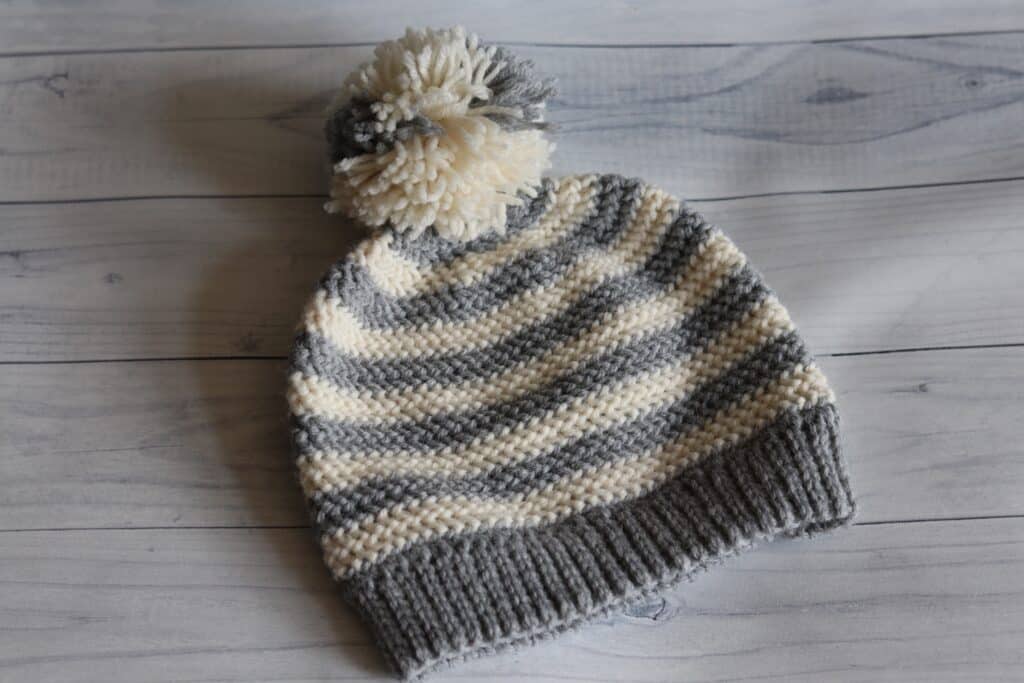
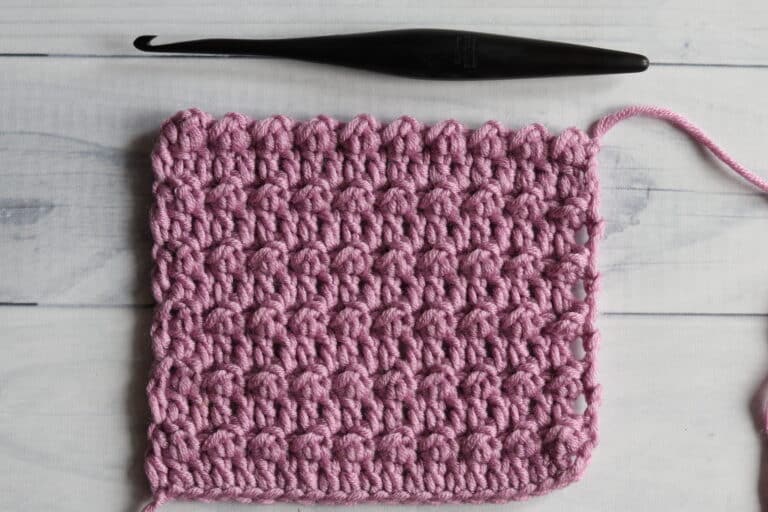
This crochet beanie is made with another one of my favourite stitches – the herringbone stitch. To add a little variation in the beanie I have worked round of alternating colour giving it some fun stripes!
The Prairie Beanie is the second crochet hat being featured in the Wonderful Hats Crochet Along! If this is your first time hearing about the crochet along, you will definitely want to check it out (Wonderful Hats Crochet Along). During the event I am releasing four new crochet beanie patterns and their matching scarves! Last week I released The Winterberry Beanie and The Winterberry Scarf.
This post contains affiliate links. This means that when you make a purchase through one of these links, Rich Textures Crochet will earn a small commission at no additional cost to yourself.
The Construction:
As are the other beanies in this crochet along, this hat is worked from the brim up. You will start by working a slip stitch brim in rows (the slip stitches can be substituted for single crochet or half double crochet). And then you will work the body of the hat. You may add a pompom to the top of your hat, or leave it without – both options look great!
The Materials:
For my hat today I have used the Wool Ease yarn by Lion Brand Yarn. It is a wool blended yarn that is medium/worsted weight. You are welcome to switch the yarn for another worsted weight, just be sure to check your gauge as it will affect the outcome of the size of your hat.
Along with the yarn, I will be using a 5 mm crochet hook. You will see me working with a Wooden Streamline hook in Ebony by Furls Crochet in the video tutorial below.
PDF Copies are also available:
The pattern will be written out in full below, but if you would like to add this pattern to your library or purchase an ad free PDF, you may do so from either my Etsy or Ravelry Shop:
Click Here for the Prairie Beanie on Etsy
Click Here for the Prairie Beanie on Ravelry
Thank you so much for stopping by and I do hope to see you on Friday for the matching scarf pattern! Until then, happy stitching!
Sarah

The Prairie Beanie:
Skill Level: Easy
Gauge: 16 sts x 14 rows of herringbone Stitch = 4 inches
Finished Size: 8 x 9 inches laid flat
Yarn: Wool-Ease® by Lion Brand® Yarn (80% acrylic; 20% wool; 197 yds/180 m; 3oz/85 g; (4) Medium/worsted weight): Colour A: 1/2 ball of Grey Heather; Colour B: 1/2 ball of Fisherman.
Hook: Size H/8 (5 mm) Hook. Adjust hook size if necessary to obtain correct gauge
OPTIONAL: Pompom to attach to the top
Stitches and Abbreviations:
Ch – Chain
Dc – Double Crochet
Hhdc – Herringbone Half Double Crochet (insert your hook into the stitch indicated, yarn over and draw up a loop also pulling it through the first loop on your hook, yarn over and draw through the two loops on your hook)
Hhdc2tog – Herringbone Half Double Crochet two stitches together
Rpt – Repeat
Sc – Single Crochet
Sk – Skip
Sl St – Slip Stitch
Yo – Yarn Over
Pattern Notes:
- Pattern is written in American English terms.
- Brim of hat is worked in rows, body of hat is worked in rounds.
- Ch 1 at beginning of round does not count as stitch.
- Do not turn at the end of each round, unless stated otherwise.
- Weave in ends as needed.
- OPTIONAL: Brim of hat may be worked using either single crochet stitches or half double crochet stitches instead of the slip stitches.
- To change the size of your beanie, work the first single crochet round of the hat body in any multiple.
Free Crochet Pattern:
Brim (Worked in rows):
WITH COLOUR A
Ch 10.
Row 1: Sl st in the 2nd ch from hook and in each ch across. Ch 1, turn. (9 sl sts)
Row 2: Working in the blo, sl st in each st across. Ch 1, turn. (9 sl sts)
Continue to repeat row 2 until work from the beginning measures approximately 16-17 inches.
Do not fasten off, but fold brim of hat so that two shorter ends meet. Now working through both thicknesses, sl st across working through the blo on each side. Do not fasten off, turn work right side out (so that the right side is facing you).
Now working around the edge of the brim, continue working in rounds as follows:
Hat Body (Worked in rounds):
Rnd 1: Ch 1, evenly work 72 sc all the way around, switching to colour B in the final st. Join with a sl st in the first st, do not turn. (72 sts)
Rnd 2: With colour B, Ch 1, hhdc in each st all the way around; join with a sl st in the first st.
Rnd 3: Ch 1, hhdc in each st all the way around switching to colour A in the final st; join with a sl st in the first st.
Rnds 4-5: With Colour A, hhdc in each st all the way around switching to colour B in the final st of rnd 5; join with a sl st in the first st.
Rnds 6-7: With Colour B, hhdc in each st all the way around switching to colour A in the final st of rnd 5; join with a sl st in the first st.
Rnds 8-9: With Colour A, hhdc in each st all the way around switching to colour B in the final st of rnd 5; join with a sl st in the first st.
Rnds 10-11: With Colour B, hhdc in each st all the way around switching to colour A in the final st of rnd 5; join with a sl st in the first st.
Rnds 12-13: With Colour A, hhdc in each st all the way around switching to colour B in the final st of rnd 5; join with a sl st in the first st.
Rnds 14-15: With Colour B, hhdc in each st all the way around switching to colour A in the final st of rnd 5; join with a sl st in the first st.
Rnd 16: With colour A, ch 1, * hhdc in each of the next 6 sts, hhdc2tog; rpt from * around. Join with a sl st in the first st.
Rnd 17: Ch 1, * hhdc in each of the next 5 sts, hhdc2tog; rpt from * around switching to colour B in the final st. Join with a sl st in the first st.
Rnd 18: With colour B, ch 1, * hhdc in each of the next 4 sts, hhdc2tog; rpt from * around. Join with a sl st in the first st.
Rnd 19: Ch 1, * hhdc in each of the next 3 sts, hhdc2tog; rpt from * around, switching to colour A in the final st. Join with a sl st in the first st.
Rnd 20: With colour A ch 1, * hhdc in each of the next 2 sts, hhdc2tog; rpt from * around. Join with a sl st in the first st.
Rnd 21: Ch 1, * hhdc in each of the next st, hhdc2tog; rpt from * around, switching to colour B in the final st. Join with a sl st in the first st.
Rnd 22: With colour B, ch 1, hhdc2tog in each st around. Join with a sl st in the first st.
Fasten off leaving a long tail. Using the long tail, sew the top of the hat closed. Fasten off and weave in your ends. Attach Pompom to the top if desired.
Video Tutorial:
The photographs and pattern contained in this document are the property of Rich Textures Crochet.
This pattern is for personal use only.
No unauthorized reproduction, in whole or in part, or distribution of this pattern or content is permitted. ALL FINISHED PRODUCTS from this pattern can be used for local sales and sold online.
Thank you so much for supporting Rich Textures Crochet! To stay in touch or see more great products, be sure to visit me on Facebook and Instagram (Rich Textures Crochet). Thanks again! Happy Crocheting!


Can’t wait to get started on this one! Just a quick question though – I’m wondering why there is no stitch count provided for each row? I’m a newbie and rely heavily on stitch counts to ensure I’m doing each round correctly. Thanks again for another fantastic pattern!
Hi 🙂
I made this style hat and it turned out nicely, but it’s so big! I used the same weight yarn(4), 5mm hook, same amount of rows for the band along with the rest. I would say my tension is in the middle, not too tight but not too loose. I am somewhat a beginner, but I’ve never had a hat come out so big in size. Do I need to tighten up my tension? Please help!
Cheers
Hello Tricia – unfortunately not all yarns, even if they are the same weight will work up always with the same gauge. Some, even if a number 4 will work up more larger depending on a number of factors including brand and fibre. But no need to worry! If you would like, you can work with a smaller crochet hook to make the stitches tighter (such as a 4.5 mm). Or for this particular hat you can adjust the number of stitches you work in the first round of the body. Simply work as many stitches as you feel comfortable for the size you would like and then continue to follow the pattern with your new stitch count. I hope that helps!
I would like to see measurements for men’s hat. First time doing slip stitch brim and not sure what measurement should be
How would I adjust this for a child?
Hi! I didn’t understood how you work in multiples to change the size of the beanie. I’m new to this! Love your patterns!??
Hey, just wanted to say I’ve made this hat a few times. Me and my partner have bigger heads and this pattern is perfect for our head sizes. Here’s hoping he likes his xmas hat!
Can you please add a stitch count to the end of each decrease row? It would greatly help me.
Thank you!