
This post contains affiliate links. This means that when you purchase through one of these links we will receive a small commission at no additional cost to you. Thank you for supporting Rich Texture Crochet!
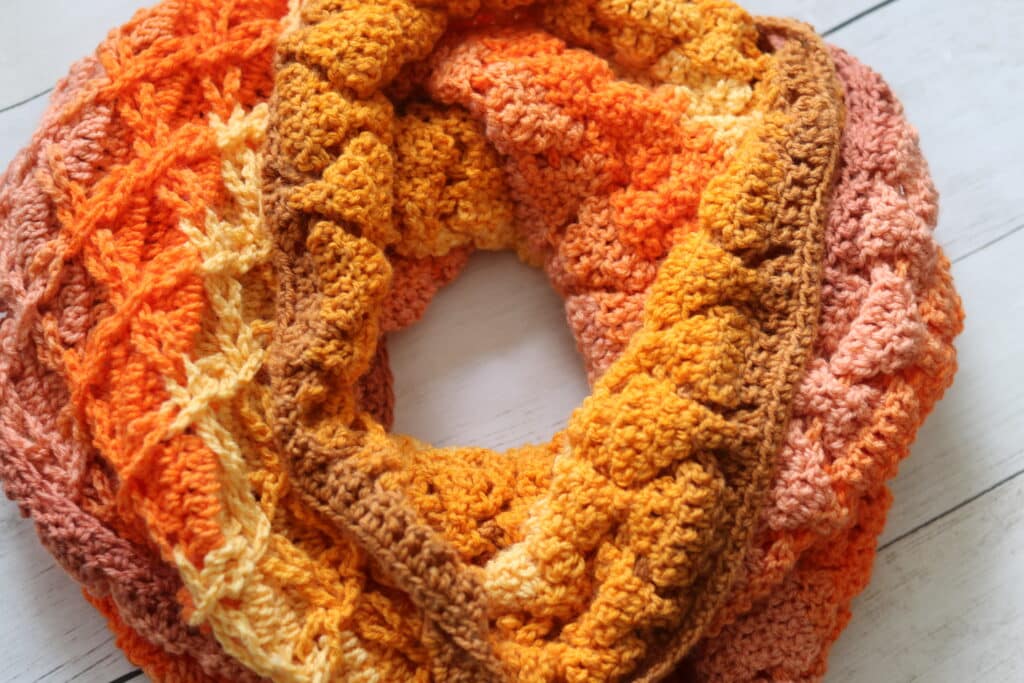
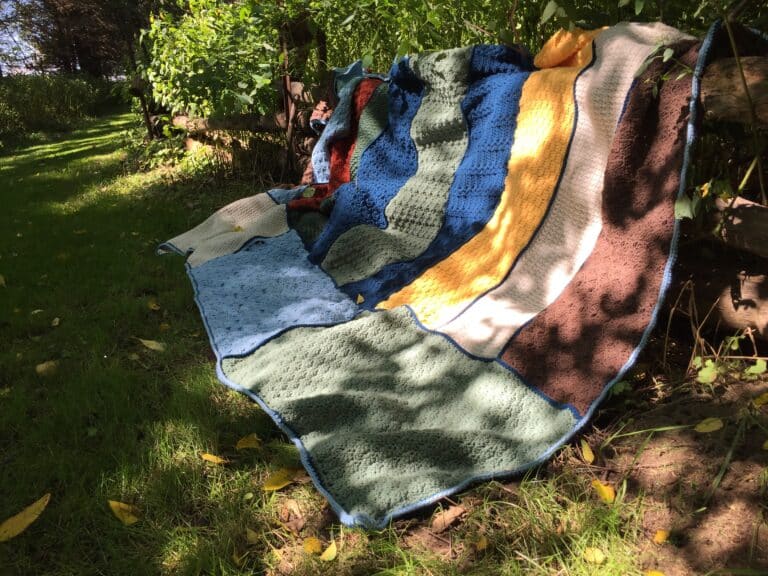
The vibrant colours combined with this easy textured crochet stitch in this Solar Flare Infinity Scarf remind me of sunshine!
I have been thinking about the sun a lot lately! And I know that many others have been also, especially those who may find themselves like me in the position this April to be in the direct path of the 2024 total solar eclipse. There is a lot of hype surrounding the event this year, especially in my own local community. I’ve even purchased some of the solar eclipse glasses so that I can view it with my children. We are all pretty excited!
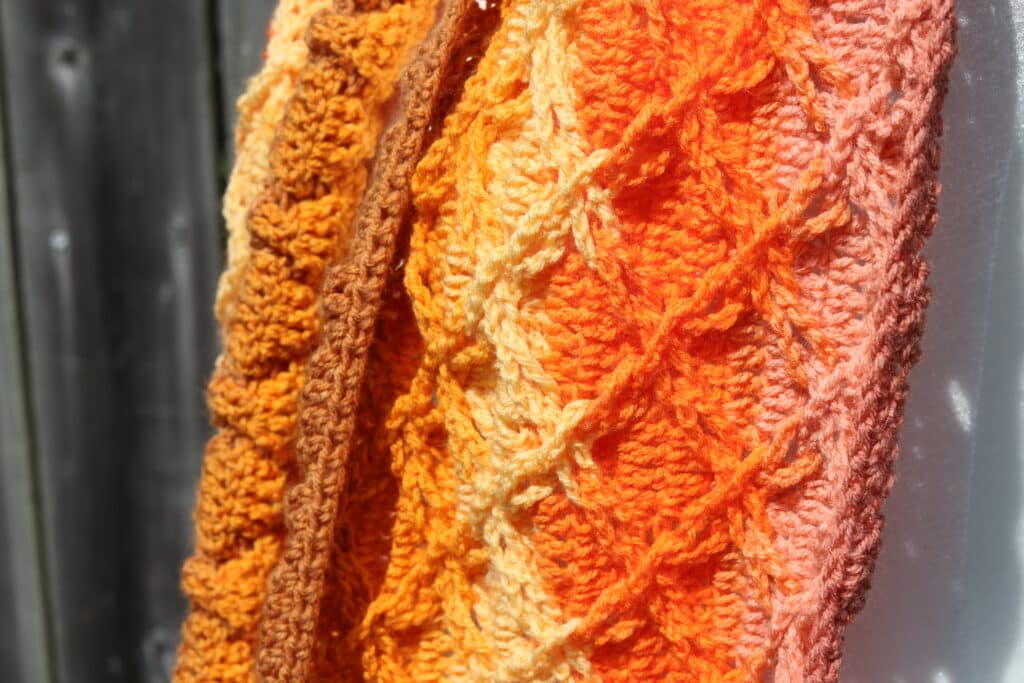
So with all of this on my mind, when I picked up this Mandala Yarn cake called Elektro by Lion Brand Yarn and began to work with it, I was unable to avoid the fact that its vibrant colour reminded me of the sun. This crochet infinity scarf features a stitch pattern called the “Polish Star Stitch” that reminds me of a star burst. I felt it was very fitting for the colour of yarn I was using.
I love this Polish Star Stitch. It is relatively easy to work and very attractive. I previously used this stitch in my Lattice Beanie and loved the results. This time, while working it in the Solar Flare Infinity Scarf Crochet Pattern, I simplified it even more buh working it with the single cake and allowing the self stripping yarn to work its magic. I love how it turned out.
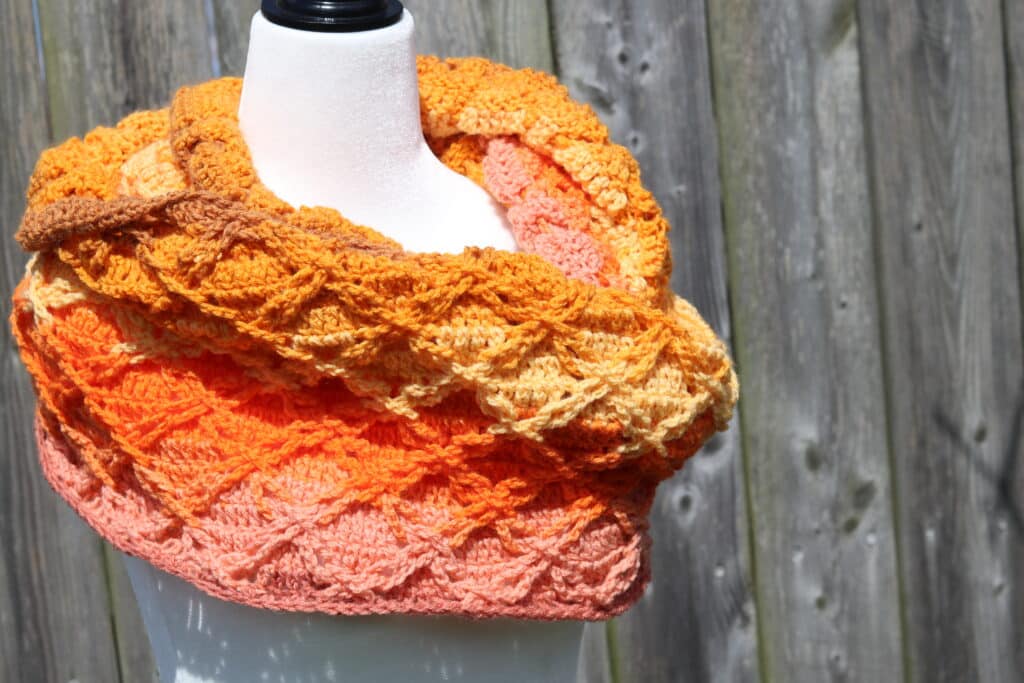
The Solar Flare Infinity Scarf crochet pattern is worked in a round and it is extra long (about 80 inches) so that you can twist it and vary the style a little bit. The scarf is very squishy and cozy, a wonderful addition to your wardrobe!
The Materials:
For this crochet infinity scarf I used almost an entire ball of the Mandala Bonus Bundle Cake by Lion Brand yarn. It is a light weight yarn with about 1100 yards per cake. I also used a 5mm crochet hook. If you are looking for other projects worked in this yarn, you may wish to check out the Happy Trails scarf, the Acorn Scarf or Goldenrod Scarf. If you are looking for one with a lot of texture, the Bethany Scarf is the way to go!
PDF Copies also available:
The Solar Flare Infinity Scarf crochet pattern will be written out in full below followed by a video tutorial and it is free to follow here on Rich Textures Crochet. If you would like to add this pattern to your library and purchase an ad free PDF you may do so from my Etsy and Ravelry Shops linked below:
CLICK HERE FOR THE SOLAR FLARE INFINITY SCARF ON ETSY
CLICK HERE FOR THE SOLAR FLARE INFINITY SCARF ON RAVELRY
Thank you so much for stopping by! Please don’t forget to sign up for my email newsletter so that you never miss a new free crochet pattern:
Happy Crocheting!
Sarah
Solar Flare Infinity Scarf Crochet Pattern:
Skill Level: Intermediate
Gauge: 16sts x 6 rows of exdc = 4 inches
Finished Size: 80 x 11 inches
Yarn: Mandala Bonus Bundle by Lion Brand ® (100% acrylic; 1181 yds/1080 m; 10.5oz/300 g; (3) Light/DK weight): 1 ball per scarf. Colour: Elektro
Hook: Size H/8 (5 mm) Hook. Adjust hook size if necessary to obtain correct gauge, yarn needle. Optional: Several Stitch Markers: I find using these when braiding the loops at the end really help to hold the loops and keep them from pulling back through.
Stitches and Abbreviations:
Blo – Back Loop Only
Ch – Chain
Exdc – Extended Double Crochet Stitch (yo, insert your hook into the indicated stitch, yo and draw up a loop. Yo and draw through the first loop on your hook, [yo and draw through 2 loops on your hook] twice. Extended Double Crochet Stitch made.)
Hdc – Half Double Crochet
Rpt – Repeat
Sc – Single Crochet
Sk – Skip
Sl St – Slip Stitch
Yo – Yarn Over
Pattern Notes:
- Pattern is written in American English terms.
- Pattern is worked in rounds.
- Ch 1 at beginning of row does not count as stitch.
- Ch 4 at the beginning of the round counts as an exdc.
- Do not turn unless stated otherwise.
- Weave in ends as needed.
- To change the length of your scarf you will need a multiple of 8 stitches for your foundation chain.
Free Crochet Pattern:
Ch 224, without twisting, join with a sl st in the 1st st.
Rnd 1: Ch 1, hdc in each st around, join with a sl st in the first st, Do not turn. (224 sts)
Rnd 2: Ch 4 (counts as a st), exdc in the next st, *ch 10, exdc in each of the next 4 chs; Rpt from * around until 2 sts remain, ch 10, exdc in each of the final 2 sts. Join with a sl st in the 1st st. Do not turn.
Rnd 3: Ch 4, work 2 exdc in the next st, *ch 10, sk the next ch-10 and exdc, exdc in each of the next 2 sts, ch 10, sk the next exdc and ch-10, 2 exdc in next st, exdc in each of the next 2 sts, 2 exdc in next st; Rpt from * around until 2 sts remain, ch 10, sk the next ch-10, 2 exdc in the next st, exdc in the final st. Join with a sl st in the 1st st. Ch 4, do not turn.
Rnd 4: Exdc in next st, *Ch 10, sk the next exdc, sk the next ch-10 sp, 2 exdc in each of the next 2 sts, ch 10, sk the next ch-10 sp, sk the next exdc, exdc in each of the next 4 sts; Rpt from * around until 3 sts remain, ch 10, sk the next ch-10 sp, sk the next st, exdc in each of the final 2 sts. Join with a sl st in the 1st st. Do not turn.
Rnd 5: Ch 4, sk the next exdc, * ch 10, sk the next ch-10 sp, 2 exdc in the next st, exdc in each of the next 2 sts, 2 exdc in the next st, ch 10, sk the next ch-10 sp, sk the next exdc, exdc in each of the next 2 sts, sk the next st; Rpt from * around ending with a ch 10, exdc in the final st. Join with a sl st in the 4th ch of the starting ch-14. Ch 4, Do not turn.
Rnd 6: Exdc in the first st, *ch 10, sk the next ch-10 sp, sk the next exdc, exdc in each of the next 4 sts, sk the next exdc, ch 10, sk the next ch-10 sp, 2 exdc in each of the next 2 sts; Rpt from * around, ending with ch 10, 2 exdc in the final st. Join with a sl st in the 1st st. Do not turn.
Rnds 7-18: Repeat rnds 3-6 three more times.
Rnd 19: Ch 4, exdc in the next st, sk the ch-10, *exdc in each of the next 4 sts, sk the next ch-10; Rpt from * arounds until 2 sts remain, exdc in each of the final 2 sts. Join with a sl st in the 1st st.
Braid your loops:
Now make sure the right side of your work is facing you and all of the ch-10 loops are pulled through to the front of the fabric.
Step 1:
Starting with the first two chain loops created in rnd 2, cross them over inserting the left loop through the right loop.
Next with the right loop, pull the loop directly above it in rnd 3 through the rnd 2 loop and repeat the same for rnd 4 pulling the rnd 3 loop through rnd 4. Repeat this with the loop on the left side.
Repeat the above Step 1 all the way around rnd 2.
Step 2:
Starting with the first loop in rnd 4, pull the loop from rnd 5 directly above it through and repeat pulling the rnd 6 loop above it through the rnd 5 loop.
Next moving to the next set of 2 loops in rnd 4, repeat the step one process with rnds 5 and 6.
Move across rnd 4 repeating the above steps until you come to the final loop. With your final loop on the side pull the loop from rnd 5 directly above it through and repeat pulling the rnd 6 loop above it through the rnd 5 loop.
Continuing at rnd 6, repeat steps 1 and 2 until you have braided all of your loops. It should form a lattice/diamond pattern and you will finish off by crossing all of the loops in the final rnd.
Rnd 20: With the right side of your work facing, ch 1, hdc in the 1st st, hdc in the next st, *hdc in the next st also inserting your hook through the final crossed loose loop directly below, hdc in each of the next 2 sts, hdc in the next st also inserting your hook through the final crossed loose loop directly below, hdc in each of the next 4 sts; Rpt from * around until 2 sts remain, hdc in each of the final 2 sts, join with a sl st in the 1st st.
Fasten off, weave in your ends.
Free Video Tutorial:


I’m confused by the chain 224 then hdc only 72 in rnd 1 written above. The video says to hdc in every stitch which would mean 224 hdc. If I do 72 stitches evenly around as rnd 1 states, that doesn’t divide up equally. Can you please clarify?
Thank you for pointing it out! It was an error that’s now been fixed.