This post contains affiliate links. This means that when you purchase through one of these links we will receive a small commission at no additional cost to you. Thank you for supporting Rich Texture Crochet!
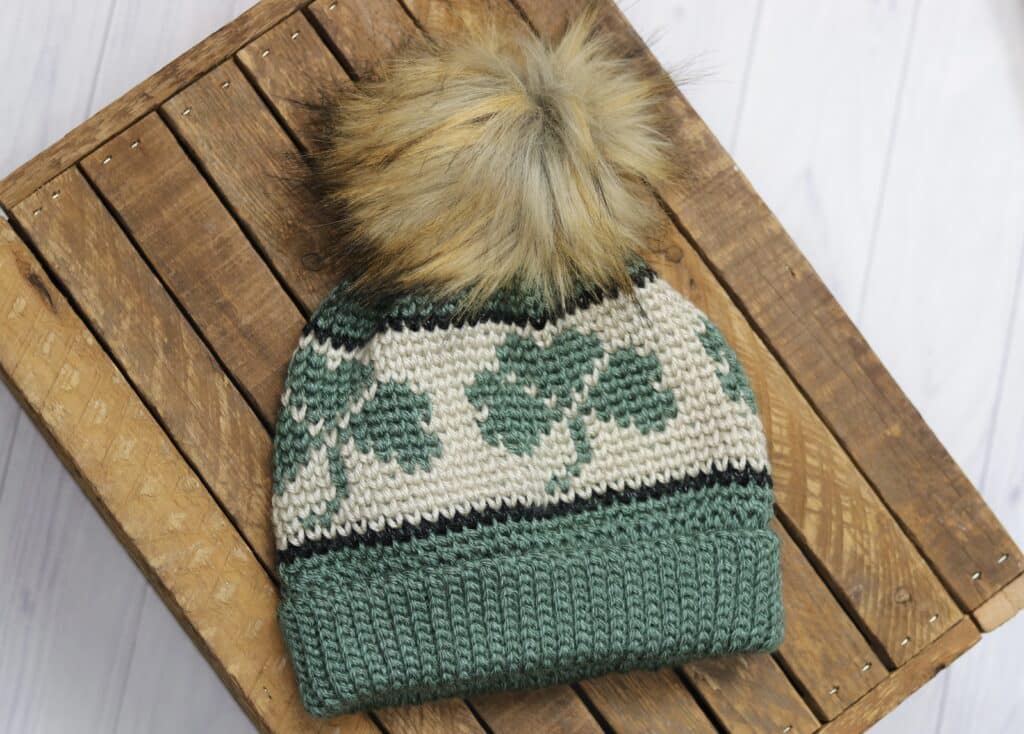
The Shamrock Beanie is a fun crochet beanie featuring colour worked shamrocks around the body of the hat!
This crochet pattern is actually an update to a pattern for a Shamrock Toque that I wrote a few years ago. In the original pattern I used the knit stitch throughout the beanie, including in the brim. This update includes a different brim along with updated colours, yarn and stitch counts.
This Shamrock Beanie would make a great accessory to wear while celebrating St. Patrick’s Day which was what I had in mind when I designed it, but it would also make a great accessory all year!
This post contains affiliate links. This means that when you make a purchase through one of these links, Rich Textures Crochet will earn a small commission at no additional cost to yourself. Thank you for supporting Rich Textures Crochet!
The Design:
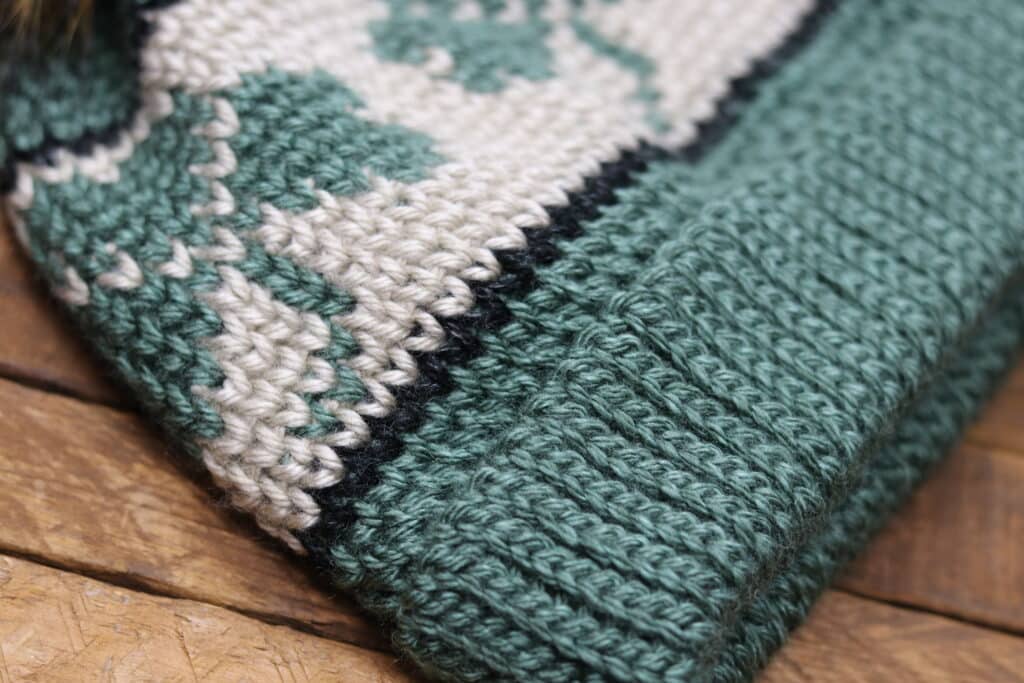
This crochet beanie is worked from the bottom up. It features a double thick brim that is worked in a slip stitch ribbing. You are welcome to change the thickness of the brim (make it single instead) and if you are not a fan of slip stitches, you may substitute them for single or half double crochet stitches.
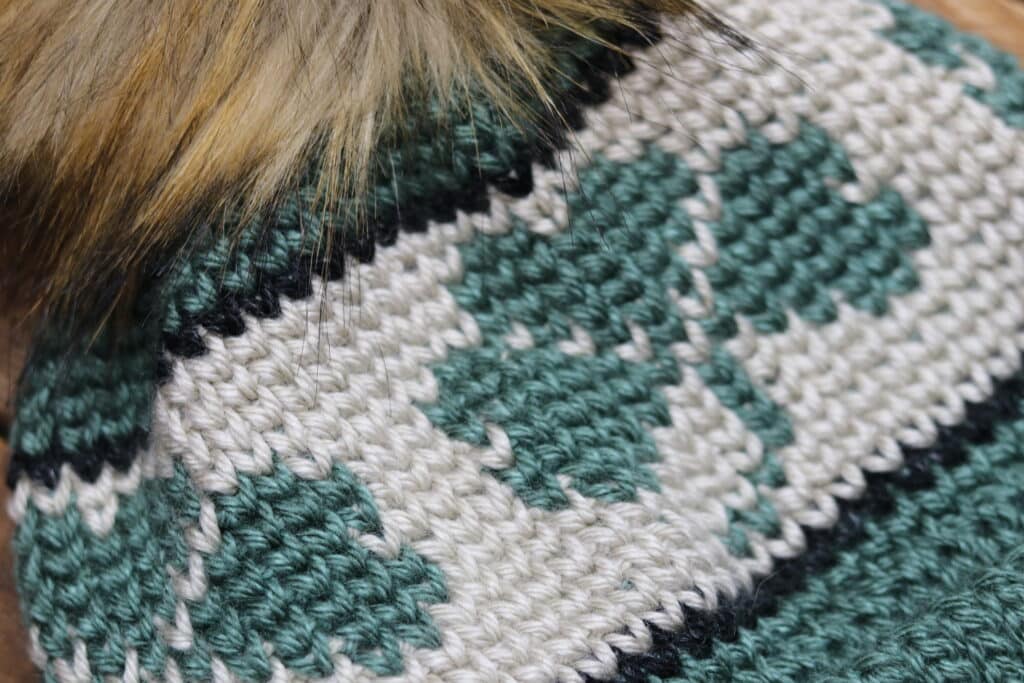
The body of the hat is worked in the knit stitch. This stitch is also sometimes called the waistcoat stitch. To create the knit look, the single crochet stitches are worked into the post of stitch down below instead of being worked into the top loops. The trick with this stitch is to make sure that you keep a very loose tension. This allows you to insert your hook more easily.
Colour Charts:
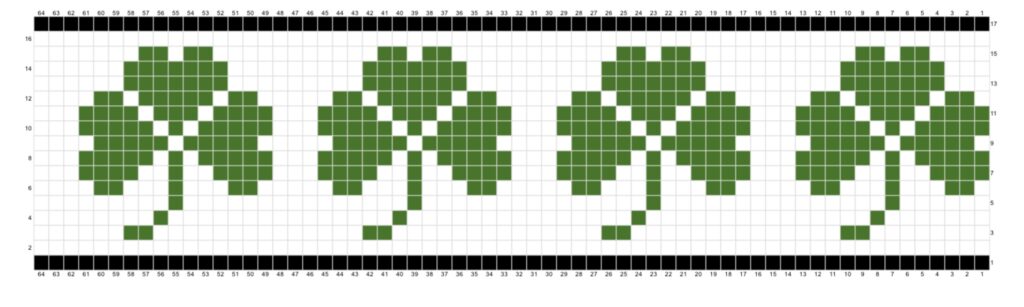
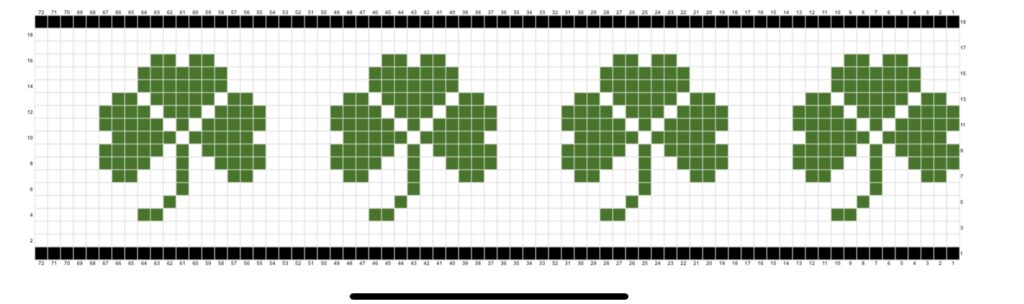
You will see below in the written pattern, that when it comes to working the shamrock design in the body of the hat, I have included two colour charts: one for a small size, and one for a large. If you are changing the size of your beanie further, I recommend changing your bringing round of single crochet stitches in multiples eight. This will ensure that your decrease rounds for the top of the hat remain even.
To read the chart, you will always read it from the same direction. So if you are working right to left as I do in the video below, you will always read the chart right to left. So at the end of each round, you will come back to the right side of the chart to begin reading the next round. Each block equals one single crochet stitch.
The Materials:
For this crochet beanie today I will be using three colours of a worsted weight acrylic yarn called Heartland by Lion Brand Yarn. You see it here in the colour Grand Canyon (100-120 yards), Black Canyon (20-30 yards) and Petrified Forest (1 Ball). I will also be using a 5mm crochet hook. In the video below I will be using a 5mm Clover Armour Crochet hook.
PDF Copies of the Pattern:
PDF Copies of the pattern are also available in my Etsy and Ravelry Shops which are linked below:
Click Here for the Shamrock Beanie on Etsy
Click Here for the Shamrock Beanie on Ravelry
Thank you so much for stopping by! I invite you to sign up for my email newsletter at the bottom of this page or in the right hand side bar. That way you will never miss a new free pattern! If you enjoyed this pattern you may also wish to check out the Rocky Beanie Crochet Pattern.
Happy Crocheting!
Sarah
The Shamrock Crochet Beanie:
Skill Level: Easy
Gauge: 14 sts x 18 rows of pattern = 4 inches.
Finished Size: Size Small: Approximately 8.5 x 8 inches laid flat, excluding pompom, with brim folded. 20 inch circumference. Size Large: Approximately 9.5 x 9 inches laid flat, excluding pompom, with brim folded. 22 inches circumference
Hook: Size H/8 (5.0 mm). Adjust hook size if necessary to obtain correct gauge.
Notions: Yarn Needle
Stitches and Abbreviations:
Blo – Back Loop Only
Ch – Chain
Ks – Knit Stitch (Also called the Waistcoat Stitch)
Ks2tog – knit stitch two together
Lp – loop
Lps – loops
Rpt – Repeat
Sc – Single Crochet
Sk – Skip
Sl st – Slip stitch
Yo – Yarn over
Pattern Notes:
- Pattern is written in American English terms.
- Pattern is worked in rounds.
- Join at the end of a round unless otherwise stated.
- Weave in ends as needed.
- All rounds are worked with the right side facing.
- Brim of the hat is worked in rows.
- While working the graph, you may crochet over the non-working yarn, or carry it behind your work.
- The knit stitch does not have a lot of stretch. Two sizes are included below and written as S/L
Free Crochet Pattern:
Brim (worked in rows):
With colour A, ch 23/25.
Row 1: Sl st in the 2nd ch from hook and in each st across. Ch 1, turn. (NOTE: you m ay substitute the slip stitches in the brim for single or half double crochet stitches).
Row 2: Working in the blo, sl st in the 1st st and in each st across. Ch 1, turn.
Continue to repeat row 2 until your work from the beginning measures approximately 17/18 inches.
Do not fasten off, but fold brim of hat so that two shorter ends meet. Now working through both thicknesses, sl st across working through the blo on each side. Do not fasten off, turn work right side out (so that the right side is facing you).
Now working around the edge of the brim, continue working in rounds as follows:
Hat Body (worked in rounds):
Rnd 1: Ch 1, evenly work 64/72 sc around, join with a sl st in the 1st st. Do not turn.
Rnd 2: Ch 1, ks in each st around, switch to colour C in the final stitch, join with a sl st in the first st. Do not turn.
Rnd 3 (first round of chart): With colour C, ks in each st around, switch to colour B in the final st, join with a sl st in the first st. Do not turn.
Rnds 4-19/21: Continue working the graph below. You will start on row 2 on the bottom right hand side corner. Work the horizontal rows (working right to left), each colour block representing one knit stitch in the colour shown. When you reach the end of the row on the graph, simply begin again on the right side of the graph. Carry your non working colour behind your work and crochet over top of the non working yarn in order to hide it. Join your colour A in the final st of chart.
SIZE SMALL:
SIZE LARGE:
Once you have finished working the chart, you will proceed as follows:
Next 2 Rnds: With colour A, ks in each st around, join with a sl st in the 1st st. Do not turn.
Decrease rounds (to for the top of the hat)
Rnd 1: Ch 1, * Ks in the next 6 sts, ks2tog. Rpt from * around join with a sl st in the first st. Do not turn. (56/64 sts)
Rnd 2: Ch 1, * Ks in the next 5 sts, ks2tog. Rpt from * around join with a sl st in the first st. Do not turn. (48/56 sts)
Rnd 3: Ch 1, * Ks in the next 4 sts, ks2tog. Rpt from * around join with a sl st in the first st. Do not turn. (40/48 sts)
Rnd 4: Ch 1, * Ks in the next 3 sts, ks2tog. Rpt from * around join with a sl st in the first st. Do not turn. (32/40 sts)
Rnd 5: Ch 1, * Ks in the next 2 sts, ks2tog. Rpt from * around join with a sl st in the first st. Do not turn. (24/32 sts)
Rnd 6: Ch 1, * Ks in the next st, ks2tog. Rpt from * around, join with a sl st in the first st. Do not turn. (16/24 sts)
Rnd 7: Ch 1, ks2tog in each st around, join with a sl st in the first st. (8/16 sts)
Large Size only: Ch 1, ks in each st around, join with a sl st in the first st. (16 sts)
Fasten off leaving a long tail. Use this tail to sew the top of the hat closed. Optional: Attach pompom to the top.
Video Tutorial:
The photographs and pattern contained in this document are the property of Rich Textures Crochet.
This pattern is for personal use only.
No unauthorized reproduction, in whole or in part, or distribution of this pattern or content is permitted. ALL FINISHED PRODUCTS from this pattern can be used for local sales and sold online.
Thank you so much for supporting Rich Textures Crochet! To stay in touch or see more great products, be sure to visit me on Facebook and Instagram (Rich Textures Crochet). Thanks again! Happy Crocheting!