This post contains affiliate links. This means that when you purchase through one of these links we will receive a small commission at no additional cost to you. Thank you for supporting Rich Texture Crochet!
Welcome to the final week of the Make it Your Way Crochet Along where we will finally join all of our squares together and work the Royal Ridges Edging around our blanket!
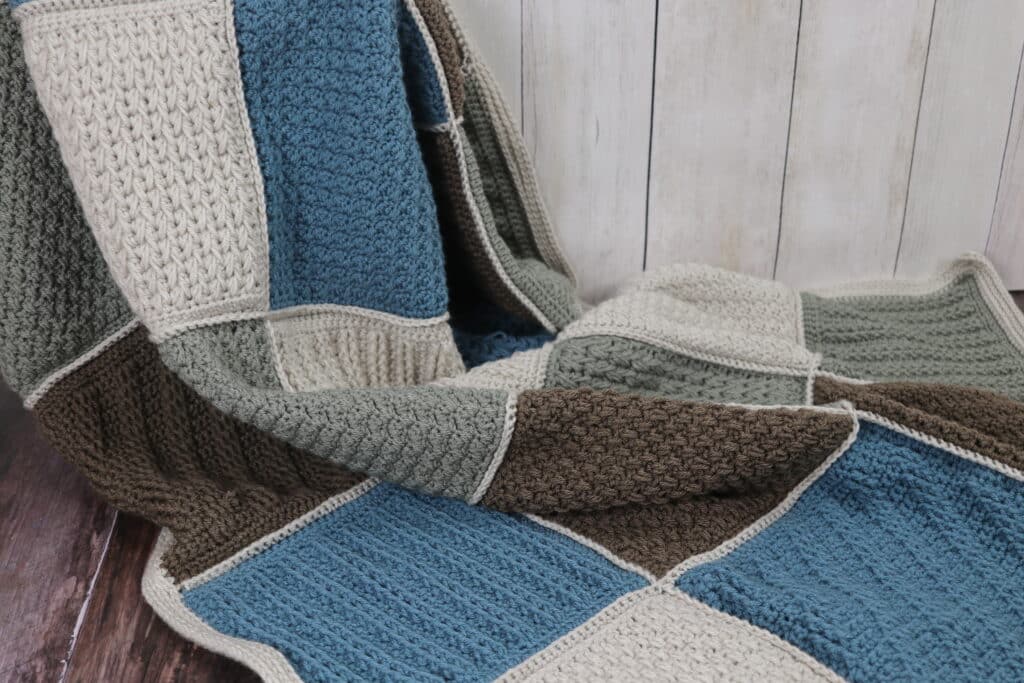
You made it! I feel like these past several weeks have just flown by and I am excited to be finally finishing this blanket with you! Today we will join our squares together using a single crochet join and then worked a beautiful Royal Ridges edging around our blanket.
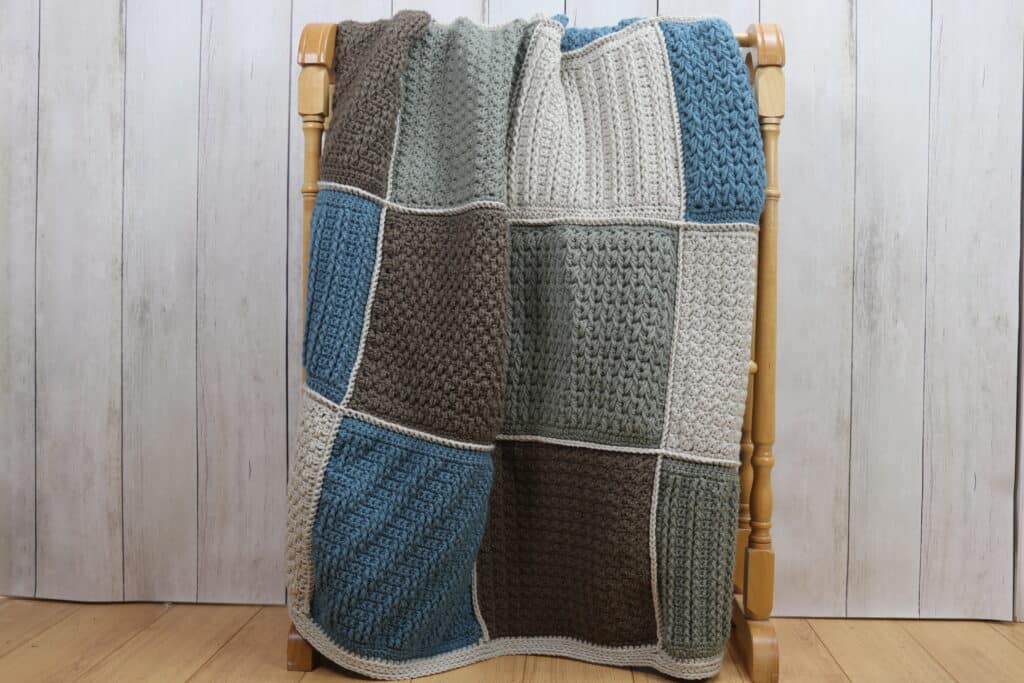
I have called my final blanket the Blue Spruce Blanket which includes all of the option one squares from the Make it Your Way Crochet Along.
This post contains affiliate links. This means that when you make a purchase through one of these links, Rich Textures Crochet will earn a small commission at no additional cost to yourself. Thank you for supporting Rich Textures Crochet!
Joining your Squares Together:
Now that you have worked 20 crochet afghan squares, you are ready to join them together! To begin you will lay them out in a 4 x 5 grid. You may place them however you wish – you may sort them by colour or by pattern. I chose to sort mine by colour!
Once you have laid them flat with the right sides facing, you will proceed as follows:
Starting at one end of a blanket row:
Working in the front loops only, and through both thicknesses, insert your hook into the corner stitches on both squares, and work a single crochet stitch. Continue working in the front loops only working single crochet stitches all the way across. When you come to the end of your square, line up the next two squares along side the ones you are working on, and your next single crochet will be worked into their corner stitches. Continue working your single crochet stitches across.
When you reach the end of your row, fasten off and weave in your ends. Then repeat until all the rows have been crocheted together.
You are now all set to work the blanket edging!
Blanket Edging:
For this blanket I have chosen a textured edging called a Royal Ridges Edging. It is worked entirely in half double crochet stitches. The texture is created by working the half double crochet stitches in the third loop only. If you’re not sure where the “3rd loop” can be found, be sure to check out the video tutorial below.
For the blanket edging, join your yarn with a slip stitch in any corner and proceed as follows:
Ch 1
Rnd 1: Hdc in the 1st st and in each st around working 3 hdc in each corner st. Join with a sl st in the 1st st. Ch 1, do not turn.
Rnds 2-3: Working in the 3rd lp all the way around, hdc in the first st and in each st around working 3 hdc in each corner st. Join with a sl st in the 1st st. Ch 1.
Fasten off, weave in ends.

A couple of notes:
As your are working the blanket edging, when you come to a seam, I work one stitch into the seam to help pull the squares together more. This will help to ensure that there are no gaps in your edging.
Secondly, I have only worked two rounds of half double crochet stitches in the 3rd loop, but you can work as many rounds in the 3rd loop as you would like! More rounds will mean a thicker edging.
I am so excited to see all of your finished blankets!
PDF Copies:
The Blue Spruce Blanket afghan squares will remain free to follow on my website, even well after this crochet along is finished. However, if you would like a printable copy, you may purchase one from my Etsy and Ravelry Shops linked below:
Click Here for the Blue Spruce Blanket on Ravelry
Click Here for the Blue Spruce Blanket on Etsy
Enjoy and Happy Crocheting!
Sarah
The photographs and pattern contained in this document are the property of Rich Textures Crochet.
This pattern is for personal use only.
No unauthorized reproduction, in whole or in part, or distribution of this pattern or content is permitted. ALL FINISHED PRODUCTS from this pattern can be used for local sales and sold online.
Thank you so much for supporting Rich Textures Crochet! To stay in touch or see more great products, be sure to visit me on Facebook and Instagram (Rich Textures Crochet). Thanks again! Happy Crocheting!