
This post contains affiliate links. This means that when you purchase through one of these links we will receive a small commission at no additional cost to you. Thank you for supporting Rich Texture Crochet!
March is National Crochet Month and this year I look forward to sharing with you this wonderful Crossbody Messenger Bag Crochet Pattern!
National Crochet Month is a month dedicated to the celebration of one thing we all love: crochet! There are so many things to love about crochet! One of the things I love about crochet is the endless opportunity to create and experiment with texture!
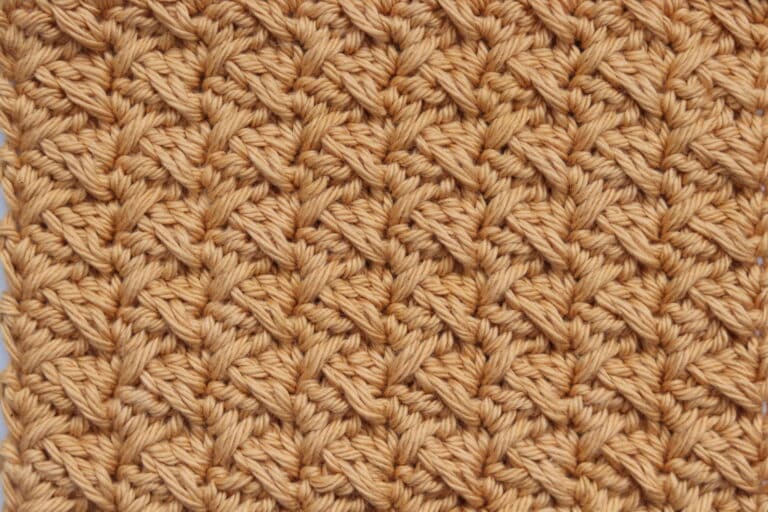
Our crochet Crossbody Messenger Bag crochet pattern today does texture very well! The design is worked in a wonderful textured star stitch often referred to as the trinity stitch. The stitch pattern is fun to work and wonderful to look at with its beautiful design.
When I crochet I often find myself gravitating to thicker yarns including super bulky weight yarns such as the Wool Ease Thick and Quick by Lion Brand. Super Bulky weight yarns are easy to work with and make projects work up very quickly. I’ve worked several crochet patterns in this yarn including my popular Fireside Slippers and the fan favourite Midwinter Blanket. It’s this yarn that I will use in the crochet pattern today.
You are going to love the Crossbody Messenger Bag crochet pattern. As it is worked in the super bulky weight yarn, this bag is going to work up in a few hours despite its large size. I designed this bag to fit my 16 inch laptop, so it is going to hold a lot! I have add a single pocket to the front of the bag and two smaller pockets and a water bottle sleeve to the inside.

To accent the bag I have added some hardware including a couple of buckles to the front of the bag and to assist with attaching the bag strap to the sides. I love how they give the bag a finished, boutique worthy finish! The buckles you see in the photos and video tutorial were purchased from Hobbii Yarn. I look forward to seeing your own personal touches!
For this pattern you will also need an 8mm (L/11) crochet hook. In the video tutorial below you will see me using a Birchwood Crochet Hook by Rowan Yarn.

National Crochet Month:
Enjoy! And happy National Crochet Month! There are so many things about crochet that you can celebrate this month (and all year!). Be sure to check out the National Crochet Month Blog Hop being hosted by the Underground Crafter. There are so many wonderful free crochet patterns being featured this month.

PDF Copies are also available:
The crochet pattern for the Crossbody Messenger Bag will be written out in full below and is free to follow here on my website. The free pattern will be followed by a free video tutorial. However should you wish to add this pattern to your library and purchase an ad free PDF you may do so from my Etsy and Ravelry shops linked below:
CLICK HERE FOR THE CROSSBODY MESSENGER BAG ON ETSY
CLICK HERE FOR THE CROSSBODY MESSENGER BAG ON RAVELRY
Thank you so much for stopping by! If you enjoyed this pattern be sure to check out the BULKY CLASSIC BEANIE if you enjoy working quick projects in superbly weight yarn. Happy Crocheting!

Crossbody Messenger Bag Crochet Pattern:
Skill Level: Intermediate
Gauge: 5 sts x 8 row of Trinity Stitch = 4 inches
Finished Size: 12 x 16 x 4 inches
Hook: Size L/11 (8 mm) Hook. Adjust hook size if necessary to obtain correct gauge.
Notions: Yarn Needle, 2 metal locks, 2 Metal Buckles S/2.
Stitches and Abbreviations:
Blo – Back Loop Only
Ch – Chain
Flo – Front Loop Only
Rpt – Repeat
Rsc – Reverse Single Crochet (Instead of working the single crochet stitch in your default direction, you will work the stitch in the reverse. For example, if you typically work from right to left, you will work the stitch from left to right.
Sc – Single Crochet
Sk – Skip
Sl St – Slip Stitch
Trinity St – Trinity Stitch (Single Crochet Three Stitches together beginning in the same stitch as the previous stitch just worked: Yo, insert your hook in the same st as the previous st, yo and draw up a loop, yo and insert your hook into the next st, yo and draw up a loop, yo and insert your hook into the next st, yo and draw up a loop, yo and draw through all the loops on your hook, chain 1. Trinity Stitch Made)
Yo – Yarn Over
Pattern Notes:
- Pattern is written in American English terms.
- Pattern is worked in rows.
- Pattern is worked in several pieces that are then crocheted together.
- Turn your work as instructed.
- Ch 1 at the beginning of the row does not count as a stitch.
- Weave in ends as needed.
- To change the size of your bag, when working the front, back and flap you will need an even number of chains for your foundation chain.
- You may adjust the length of the bag strap by working more or less stitches. No particular stitch multiple is required. Strap as written measures approximately 2×40 inches.

Free Crochet Pattern:
Bag Front:
Ch 36
Row 1: Sc in the 2nd ch from your hook, work the trinity st (See “Stitches and Abbreviations”) all the way across. For your final trinity st, do not ch 1 but sc in the final st. Ch 1, turn. (35 sts)
Rows 2-20: Sc in the 1st st, work the trinity st all the way across working in the top of each st and in each ch-1 st. For your final trinity st, do not ch 1 but sc in the final st. Ch 1, turn.
Fasten off, weave in your ends. Set aside.
Bag Back and Flap:
Ch 36
Row 1: Sc in the 2nd ch from your hook, work the trinity st (See “Stitches and Abbreviations”) all the way across. For your final trinity st, do not ch 1 but sc in the final st. Ch 1, turn. (35 sts including sc, trinity sts and ch sts)
Rows 2-40: Sc in the 1st st, work the trinity st all the way across working in the top of each st and in each ch-1 st. For your final trinity st, do not ch 1 but sc in the final st. Ch 1, turn.
Fasten off, weave in your ends. Set aside.
Bag Bottom and Sides:
Ch 9.
Row 1: Hdc in the 2nd ch from your hook and in each ch across. Ch 1, turn. (8 sts)
Rows 2-62: Ch 1, hdc in the 1st st and in each st across. Ch1, turn.
Fasten off, weave in your ends. Set aside.
NOTE: You will want the bag bottom and sides to be the same length as the sides and bottom of the bag front. This may mean, that due to your own tension and gauge, you may need to work more or less rows of hdc.
Bag Strap:
Ch 100.
Row 1: Sc in the 2nd ch from your hook and in each of the next 9 sts, hdc in each st across until 10 sts remain, sc in the remaining 10 sts. Ch 1, turn. (99 sts)
Rows 2-3: Sc in the 1st st, hdc in each of the next 79 sts, sc in the final 10 sts. Ch 1, turn.
Fasten off, weave in your ends. Set aside.
Front Pocket:
Ch 18
Row 1: Sc in the 2nd ch from your hook, work the trinity st (See “Stitches and Abbreviations”) all the way across. For your final trinity st, do not ch 1 but sc in the final st. Ch 1, turn. (17 sts including sc, trinity sts and ch sts)
Rows 2-9: Sc in the 1st st, work the trinity st all the way across working in the top of each st and in each ch-1 st. For your final trinity st, do not ch 1 but sc in the final st. Ch 1, turn.
At the end of row 9 do not turn.
Row 10: Rsc in each st across.
Fasten off, weave in your ends. Set aside.
Bottle Sleeve (Inside):
Ch 13.
Row 1: Hdc in the 2nd ch from your hook and in each ch across. Ch 1, turn. (12 sts)
Rows 2-12: Ch 1, hdc in the 1st st and in each st across. Ch1, turn.
Fasten off, weave in your ends. Set aside.
Inside Pockets (make 2):
Ch 10.
Row 1: Hdc in the 2nd ch from your hook and in each ch across. Ch 1, turn. (9 sts)
Rows 2-8: Ch 1, hdc in the 1st st and in each st across. Ch1, turn.
Fasten off, weave in your ends. Set aside.
Joining:
Begin by joining the Front pocket to the Bag Front. Place pocket in the centre of the bag approximately 2 rows from the top. Pin in place if desired. Use a bit of yarn and a yarn needle whip stitch the pocket in place.
(Optional) Below the pocket place and secure two metal locks (or buttons, velcro, etc.
Join two Inside pockets to the inside of the Bag Back. Position pockets so that the tops are lined with row 15 of the Bag Back and Flap. Whip Stitch into place.
Join the Bottle Holder to the inside of the Bag Side. Place bottle holder approximately 5 rows down from the side edge. Line up the bottle holder edges with the side edges and pin if desired. Whip stitch along the sides of the bottle holder in place.
Join Bag Sides to the Front and Back of the Bag. Line bag side up with the top of the bag front and at row 20 of the back back. Working through both thicknesses, join yarn through the front and side of bag. Reverse sc working through both thickness along each side and bottom of the bag. The continue to reverse sc along the top front of the bag. Join with a sl st in the first st. Fasten off, weave in your ends.
Repeat the above process around the back and sides of the bag and continue to reverse sc around the front flap of the bag.
To join the Bag Strap: One each of the back sides, join metal buckle using a whip stitch about 2 rows from the top of the bag side. Thread the narrower end of the bag handle through the buckle and sew into place. Repeat for the second side. Fix Bag Buckles to the bag sides in the desired place – I placed mine about 2 inches in from the top of the bag sides.
Add additional hardware and buckles to your bag according to their instructions.
Fasten off, weave in any remaining ends and enjoy!


Thank you! I love this design and its color!