This post contains affiliate links. This means that when you purchase through one of these links we will receive a small commission at no additional cost to you. Thank you for supporting Rich Texture Crochet!
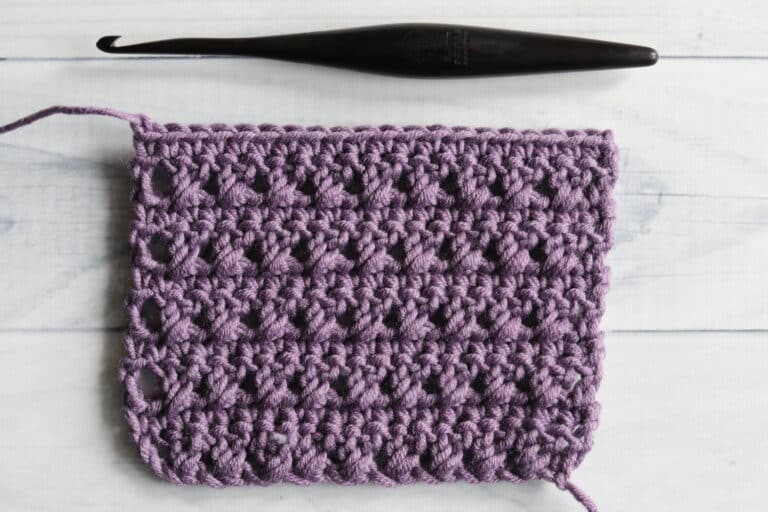
The Puff Chevron Stitch crochet pattern is a beautiful, lush and surprisingly easy crochet stitch pattern!
To start off, I will answer everyone’s initial question: Is it a yarn eater? Yes. Yes, this crochet stitch is very thick and worked entirely out of puff stitches so it will use up more yarn than your typical stitch pattern.
But the end result is very worth it! The resulting fabric is puffy and quite dense, but with beautiful drape. The pattern can be worked in a solid colour or in multiple as I will do here. I look forward to seeing what you make with this crochet stitch!
Materials for this Tutorial:
For this tutorial today I will be using a small amount of cotton yarn in two different colours: Colour A and Colour B. This yarn is a worsted weight yarn called Pima Cotton by Lion Brand Yarn. I will also be using a 5 mm crochet hook. The hook you will see me using in the video tutorial below is a Etimo Tulip crochet hook. Another favourite is a Birchwood Crochet Hook by Rowan Yarn..
Thank you so much for stopping by! If you enjoy learning new crochet stitches, you will find many more in the “Crochet Stitches” category here on Rich Textures Crochet, or you may wish to check out the Polish Star Stitch. I update this website with a new crochet stitch every week!
Puff Chevron Stitch Crochet Pattern:
Stitches and Abbreviations:
3 Puff CL – Three Puff Stitch Cluster ([yo, insert your hook into the space indicated, yo and draw up a loop] twice, [yo, insert your hook into the next space indicated, yo and draw up a loop] twice, [yo, insert your hook into the space indicated, yo and draw up a loop] twice, yo and draw through all of the loops on your hook. 3 Puff Stitch Cluster Made.
7 Puff CL – Seven Puff Stitch Cluster (([yo, insert your hook into the next space indicated, yo and draw up a loop] twice) three times, [yo, insert your hook into the next sc, yo and draw up a loop] twice, ([yo, insert your hook into the next space indicated, yo and draw up a loop] twice) three times, yo and draw through all of the loops on your hook. 7 Puff Stitch Cluster Made.
Ch – Chain Stitch
Puff St – Puff Stitch ([yo, insert your hook into the space indicated, yo and draw up a loop]twice, yo and draw through all the loops on your hook. Puff Stitch made.)
Rpt – Repeat
Sc – Single Crochet Stitch
Sl St – Slip Stitch
Yo – Yarn Over
Notes:
This stitch is worked in rows in this tutorial and it may be worked in one colour or many. I will be working this pattern in two colours: Colour A and Colour B.
To begin make a slip knot and make a foundation chain. For this stitch you will need a multiple of eight chains, plus four (8+4) for your foundation chain.
To begin, you will work your foundation chain in a fairly unique way.
With colour A, ch 4, dc in the 3rd ch from your hook, *ch 8, dc in the 3rd ch from your hook; Rpt from * across for as long as you would like. Ch 1, turn. Proceed as follows:
Row One:
Sc around the post of the next dc, ch 1, *(puff, ch 1] 7 times) around the post of the next dc, sk the next 2 chs, sc in the next st, ch 1; Rpt from * across, sc in the final ch-st switching to colour B. Ch 1, turn.
Row Two:
With colour B, 3 Puff CL over each of the next 3 ch-sps (between the puff sts), *ch 3, sc into the same sp as the last leg of the previous puff CL, ch 3, sc into the next ch-sp, ch 1, 7 Puff CL beginning in the same sp as the sc and over the next [2 ch-1 sps, sc, 3 ch-1 sps]; Rpt from * across to the final 3 sps, ch 3, sc into the same sp as the last leg of the previous puff CL, ch 3, sc into the next ch-sp, ch 1, 3 Puff CL beginning in the same sp as the sc and over the next 2 ch-1 sps. Ch 1, turn.
Row Three:
Sc into the centre of the 1st puff CL, ch 1, sk the next sc, *[puff, ch 1] 7 times) in the next ch-3 sp, sc in the centre of the next CL st, ch 1; Rpt from * across, sc in the final ch-st switching to colour A. Ch 1, turn.
And that’s it!
For the rest of the pattern simply repeat rows 2 and 3 alternating between colours A and B every two rows. Fasten off, weave in your ends.