This post contains affiliate links. This means that when you purchase through one of these links we will receive a small commission at no additional cost to you. Thank you for supporting Rich Texture Crochet!
These little Ribbon Tree Christmas Ornaments are a lot of fun to make! They are easy and quick which makes them great for last minute projects, gifts and craft fair items!
Ribbon trees have been around for a while! I remember making them when I was younger, except then we used craft ribbon, beads and a hot glue gun! This time making them, we will begin by crocheting our own ribbon.
This post contain affiliate links. This means that when you make a purchase through one of these links, Rich Textures Crochet will earn a small commission at no additional cost to yourself. Thank you for supporting Rich Textures Crochet!

I have seen a few other crochet ribbon trees around. The main difference with this one is that I have added a few different crochet stitches to give the ornament a little bit more texture. In this pattern you will find single, half double, double and triple crochet stitches. The pattern consists of one row before the ribbon is folded into its tree shape. Vary the beads in order to give your tree a different look.
The Materials:
For this pattern I have used a 100% cotton yarn called Dishie by WeCrochet. You will need a small amount of yarn, about 10-20 yards total.
You will also need a 3.5 mm crochet hook.
PDF Copies:
The pattern will be written out in full below and always remain free on my website, however if your would like to purchase an ad free PDF or add this pattern to your library, you may do so from my Etsy or Ravelry Shops Below:
Click here for the Ribbon Tree Ornament on Etsy
Click Here for the Ribbon Tree Ornament on Ravelry
Thank you for stopping by! Don’t forget to sign up for my e-newsletter so you’ll be notified of all my new free crochet patterns! Also, if you enjoy this design you may also wish to check out the Mini Christmas Stocking Crochet Pattern or the Cinnamon Tree Christmas Ornament Crochet Pattern.
Happy Crocheting!
Sarah
Crochet Ribbon Tree Ornament:
Skill Level: Easy
Gauge: 20 sc x 16 rows = 4 inches
Finished Size: Approximately 4 x 3.5 inches (Height and width may vary depending on the beads used)
Yarn: Dishie by KnitPicks/WeCrochet® (190 yds; 100g; 100% cotton; (4) worsted weight). You will need about 30 yards per ornament: Colour shown: Swan.
Hook: Size E/4 (3.5 mm) hook.
Notions: Yarn Needle, several beads, thread, needle.
Stitches and Abbreviations:
Ch – Chain
Dc – Double Crochet
Hdc – Half Double Crochet
Rpt – Repeat
Sc – Single Crochet
Sk – Skip
Sl st – Slip stitch
Tr – Triple Stitch
Yo – Yarn over
Pattern Notes:
- Pattern is written in American English terms.
- Pattern is worked in rows.
- Ch 1 at beginning of round does not count as stitch.
- Weave in ends as needed.
- To change the length of your ribbon you will need a multiple of 6 + 2 stitches
Free Crochet Pattern:
Ch 122
Row 1: Sc in the 2nd ch from your hook, *hdc in the next st, dc in the next st, tr in the next st, dc in the next st, hdc in the next st, sc in the next st; Rpt from * across. (121 sts)
Fasten off, weave in your ends.
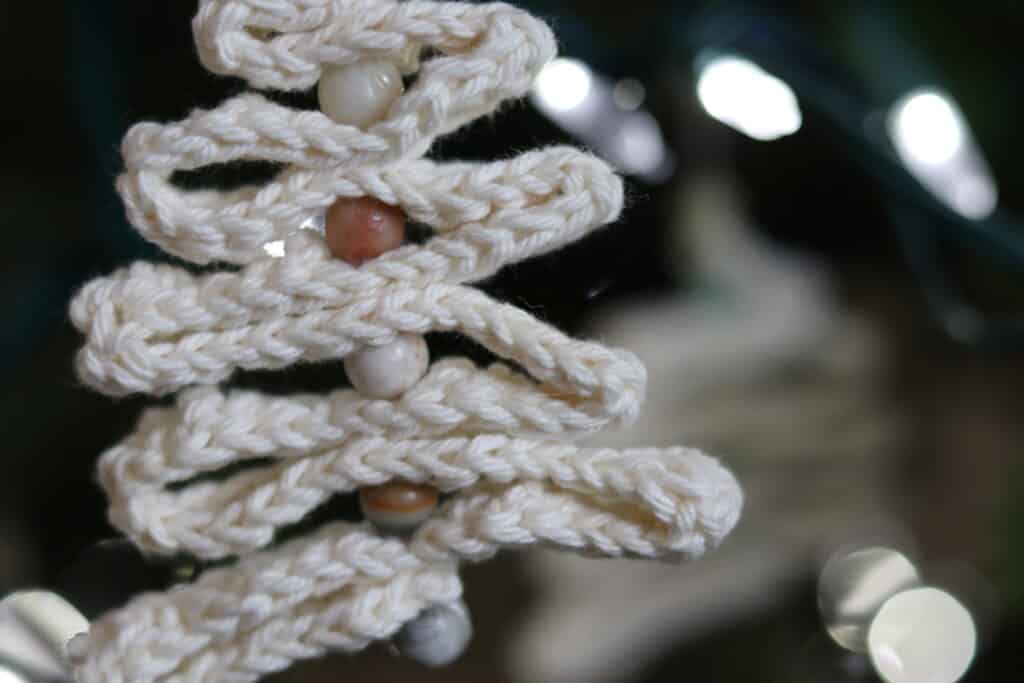
To fold the tree, begin at one end and fold over at about two inches (The end of your ribbon should extend about 1/2 way across the bottom of your tree). For the next level, measure about four inches and fold ribbon over in the opposite direction. Continue folding the ribbon back and forth decreasing the length of the folds until you come to a point at the top. My tree had about 5 folds on each side.
Using your needle and thread, begin with a bead at the bottom centre of your tree and thread the thread up through the centre of your tree adding another bead every two layers of “ribbon.” When you come to the top, add on more bead. Remove the thread from your needle.
Return to the bottom of your tree and once again thread the bottom end of the thread onto your needle. As you did before thread the second end up through the centre of your tree being sure to work once again through all the beads. At the top, secure the final bead and tie the thread to make a hanger.
Video Tutorial:
The photographs and pattern contained in this document are the property of Rich Textures Crochet.
This pattern is for personal use only.
No unauthorized reproduction, in whole or in part, or distribution of this pattern or content is permitted. ALL FINISHED PRODUCTS from this pattern can be used for local sales and sold online.
Thank you so much for supporting Rich Textures Crochet! To stay in touch or see more great products, be sure to visit me on Facebook and Instagram (Rich Textures Crochet). Thanks again! Happy Crocheting!