This post contains affiliate links. This means that when you purchase through one of these links we will receive a small commission at no additional cost to you. Thank you for supporting Rich Texture Crochet!
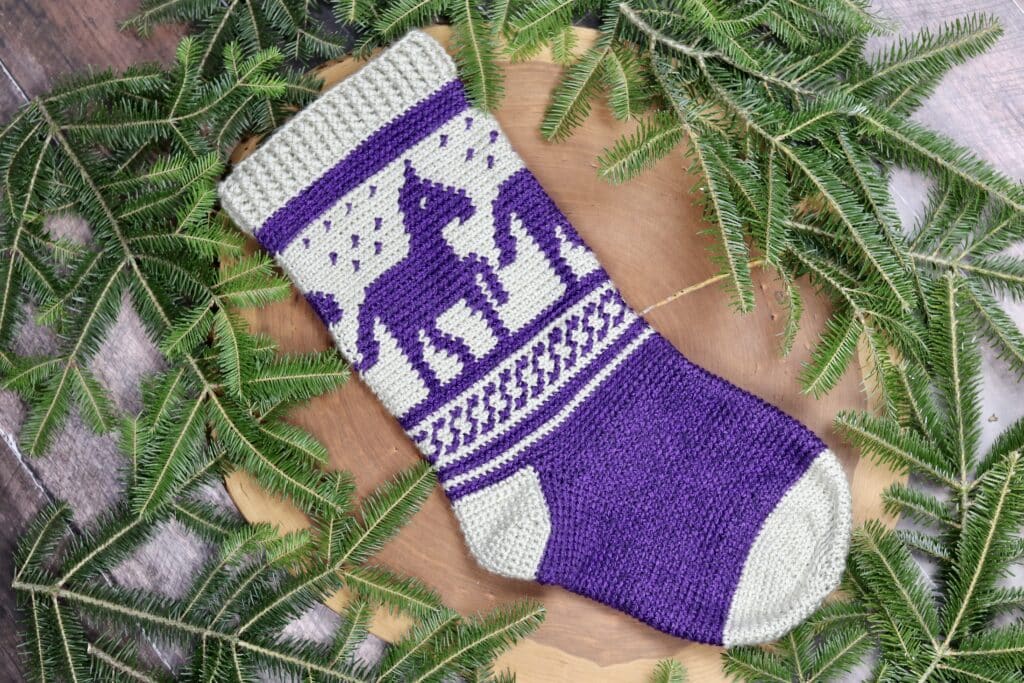
Each year I like to publish a crochet Christmas stocking and this year I am happy to bring you the Pony Christmas Stocking crochet pattern.
Although, I will confess, my daughter is telling me they look more like unicorns. Either way, she is happy.
When it comes to crochet Christmas stockings, I love a festive mosaic design. In years past I have published the Wintertime Christmas Stocking and the Comfort and Joy Christmas Stockings.
Each of these designs uses crochet colour work to create an image that wraps around the leg of the stocking. The most challenging part is the colour change itself, but once you get a good rhythm going, you’ll find the single crochet stitches easy!
How to crochet a Christmas Stocking:
The Pony Christmas Stocking is worked primarily in single crochet stitches and it is worked from the top down to the toe.
The cuff is worked using front and back post double crochet stitches which gives it a great texture. The leg of the sock is then worked in single crochet stitches that are worked in the back loop only.
As you work this part of the sock, you will use a colour chart that is easily direct you in your colour changes.

How to change colours in crochet:
In this crochet pattern, the easiest way to change colour is by drawing up a loop through the last two loops on your hook in the previous crochet stitch before the new colour. I will demonstrate this process in the free video tutorial below.
To change colour in your crochet pattern, with your colour A, insert your hook into the next stitch (back loop only in this stocking), yarn over and draw up a loop. You will then drop your colour A, pick up the colour B, place it on your hook and draw through the two loops on your hook. You are then all set to continue with the colour B.
When the colour is not in use, I like to carry it along in behind , and work the new stitch over top of the yarn being carried. This will hide it quite nicely.

Barn Quilt Blankets is a collection of five blanket crochet patterns that feature a beautiful geometric designs. The book is now available in both paperback and ebook formats on Amazon! You can read about it here: BARN QUILT BLANKETS
PDF Copies of the pattern:
The Pony Christmas Stocking crochet pattern will be written out in full below and it is free to follow here on Rich Textures Crochet. However, if you would like to add this pattern to your library or purchase an ad free PDF, you can do so from my Etsy and Ravelry shops linked below:
CLICK HERE TO PURCHASE THE PDF FOR THE PONY CHRISTMAS STOCKING CROCHET PATTERN ON ETSY
CLICK HERE TO PURCHASE THE PDF FOR THE PONY CHRISTMAS STOCKING CROCHET PATTERN ON RAVELRY
Thank you so much for stopping by! Don’t forget to sign up for my email newsletter below so that you never miss a new free crochet pattern. Are you looking for some more festive crochet patterns? Check out my Christmas crochet patterns here: CROCHET CHRISTMAS ORNAMENTS AND STOCKINGS.
Happy Crocheting!
Sarah

Intermediate Crochet Stitchesincludes 102 crochet stitches focused on texture and colour! If you love learning new crochet stitches, this book is for you! It is available on Amazon in ebook, paperback and hardcover formats. Learn more about it here: Intermediate Crochet Stitches
Pony Christmas Stocking Crochet Pattern:
Skill Level: Intermediate
Gauge: 18 sts x 16 rows of sc in blo = 4 inches
Finished Size: 7.5 x 23 inches laid flat
Yarn: Heartland® by Lion Brand® (100% Acrylic; 5 oz, 142 g; Approx. 251 yds, 230 m). Worsted/medium Weight (4). Colour A: Grand Canyon; Colour B: Cuyahoga Valley – 1 Ball of each colour
Hook: Size H/8 (5.0 mm) Hook. Adjust hook size if necessary to obtain correct gauge.
Notions: Yarn Needle, stitch marker
Stitches and Abbreviations:
Blo – Back Loop Only
Bpdc – Back Post Double Crochet
Ch – Chain
Fpdc – Front Post Double Crochet
Rpt – Repeat
Sc – Single Crochet
Sc2tog – Single Crochet Two Stitches Together
Sc3tog – Single Crochet Three Stitches Together
Sk – Skip
Sl St – Slip Stitch
Yo – Yarn Over
Pattern Notes:
- Pattern is written in American English terms.
- Pattern is worked in rounds.
- Heel is worked in rows.
- Ch 1 at beginning of round does not count as stitch.
- Ch 3 at beginning counts as a stitch.
- Weave in ends as needed.
- Do not turn at the end of each round.
- When colour is not in use, carry it behind the working yarn.
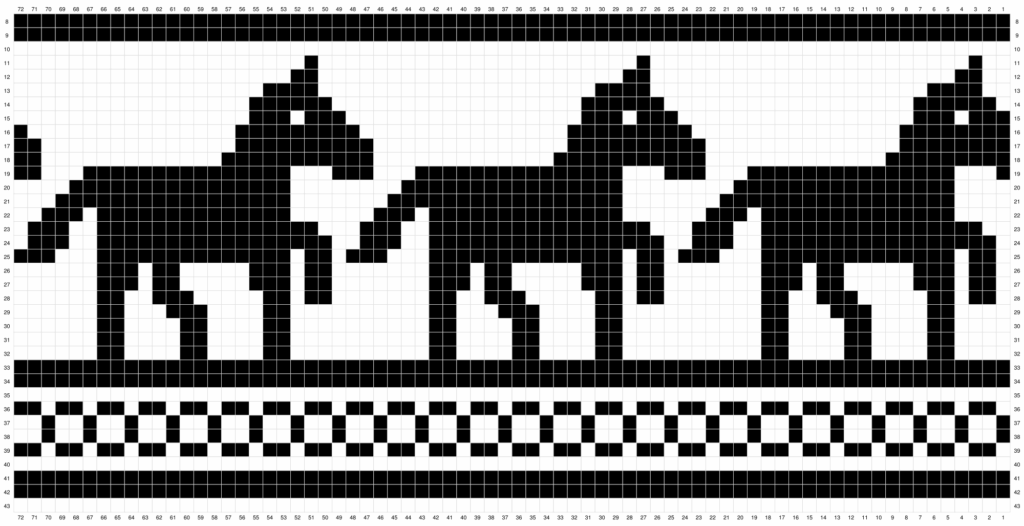
- When reading the chart you will always read the chart in one direction (ie always from right to left or always from left to right).
- In the chart below, each box is equivalent to one single crochet stitch worked in the back loop only of the stitch below.
- You will start reading the chart from the top (the chart is worked upside down as the stocking is worked from the top down.
- In the chart below, white boxes are worked in your colour A, black boxes are worked in your colour B.

Free Crochet Pattern:
Cuff:
With Colour A, ch 72, without twisting chain, sl st in the first st to make a ring.
Rnd 1: Ch 3 (Counts as dc), dc in the next st and in each st around; join with a sl st in the top of ch-3. Do not turn. (72 sts)
Rnd 2: Ch 1, fpdc around the 1st st, bpdc around the next st, *fpdc around the next st, bpdc around the next st; rpt from * around, join with a sl st in the top of the ch-3. (72 Sts)
Rnds 3-5: Repeat rnd 2. Switch to colour B.
Continue with colour B:
Rnds 6-7: Working in the blo, ch 1, * sc in each st all the way around; Join with a sl st in the first st. Switch to colour B at the end of round 5. (72 sts)
On the following page I have included a colour chart below that will be followed for the graphic design.
Rnds 8 – 43: Beginning with colour B, continue working inthe blo, sc in each st around, working the graph below beginning at row 8 (at the top of the chart – you will be working the chart upside down).
Each square on the graph is equivalent to one sc, change the yarn colour as the need arises by completing the stitch prior with the new colour yarn (i.e. In the stitch prior to the stitch worked in the new colour, with colour A insert your hook in the next st and draw up a loop. Drop colour A, pick up colour B and draw through the two loops on your hook completing the stitch, work the next st in the new colour).
Carry the non working yarn in behind the working yarn (I prefer to work over top of the strand that you are carrying behind as demonstrated in my video tutorial).
Join with a sl st in the first st at the end of each round.
NOTE: When working this chart you will always work in the same direction as you are working in rounds. Ie, Always read and work the chart from right to left OR left to right.
**Work the chart from top to bottom**
At the end of rnd 43, fasten off colour A.
(A larger copy of this chart for printing separately is available at the end of the crochet pattern instructions.)
Rnds 44-45: With colour B and working in the blo, ch 1, sc in each st all the way around; join with a sl st in the first st. (72 Sts). Fasten off colour B.
Heel Flap (Worked in rows):
Find the centre stitch at the back of the stocking (This will be the stitch where you joined at the end of each round). From that stitch count 10 sts to the right and join colour A with a sl st.
Row 1: With colour A and working through both loops, sc in the same st as joining and in each of the next 20 sts; Turn leaving remaining sts unworked. (21 sts)
Rows 2-8: Ch 1, sc in each across; Turn. (21 sts)
Heel Shaping:
Row 9: Ch 1, sc in each of the first 16 sts; turn leaving remaining sts unworked. (16 sts)
Row 10: Sc in each of the first 11 sts; turn leaving the remaining sts unworked. Ch 1, turn. (11 sts)
Row 11: Sc in each of the first 11 sts, sc in the next st 3 rows below (row 8), sl st in the next st. Ch 1, turn. (12 sc)
Row 12: Sk the first sl st, sc in each of the next 12 sts, sc in the next st 3 rows below (row 9), sl st in the next st. Ch 1, turn. (13 sc)
Row 13: Sk the first sl st, sc in each of the next 13 sts, sc in the next st 2 rows below, sl st in the next st. Ch 1, turn. (14 sc)
Row 14: Sk the first sl st, sc in each of the next 14 sts, sc in the next st 2 rows below, sl st in the next st. Ch 1, turn. (15 sts)
Row 15: Sk the first sl st, sc in each of the next 15 sts, sc in the next st 2 rows below. Ch 1, turn. (16 sc)
Row 16: Sc in each of the next 16 sts, sc in the next st 2 rows below; continue working along the side of the heel working 8 sts across, sl st in the next st of sock body (Rnd 45). Ch 1, turn leaving remaining sts unworked. (25 sts)
Row 17: Sk the first sl st, sc in each of the next 25 sts, working alongside of the heel, work 8 sc, sl st into next st on sock body (Rnd 45). Fasten off colour A. (33 sts)
Foot (Worked in Rounds):
With the right side of your sock facing you, find the center back of heel and join colour B with a sl st.
Rnd 1: With colour B, ch 1, in the blo sc in each of the first 16 sts, sc3tog over next sc, sl st, next sc, sc in each of the next 47 sts, sc3tog in the next sc, sl st, sc, sc in the final 15 sts. Join with a sl st. (80 sts)
Rnd 2: Ch 1, working in the blo sc in each of the first 15 sts, sc3tog, sc in each of the next 45 sc, sc3tog, sc in each of the final 14 sts, join with a sl st. (76 sts)
Rnd 3: Ch 1, working in the blo sc in each of the first 14 sts, sc3tog, sc in each of the next 43 sts, sc3tog, sc in each of the next 13 sts; do not join, but mark the first st with a stitch marker. (72 sts)
Rnds 4-29: Ch 1, working in the blo sc in each st all the way around without joining in the first st. Instead, mark the first st and move the stitch marker as your work progresses.
Change to colour A in the last st of rnd 29; join with a sl st in the first st. (72 sc)
Toe (Worked in rounds):
Rnds 30-33: With colour A, ch 1, working in the blo sc in each st all the way around; at the end of rnd 33, join with a sl st in the first st. (72 sc)
Rnd 34: With colour A, ch 1,working in the blo * sc in each of the next 7 sts, sc2tog; rpt from * all the way around, join in the first st with a sl st. (64 sts)
Rnd 35: Ch 1, working in the blo* sc in each of the next 6 sts, sc2tog; rpt from * all the way around, join in the first st with a sl st. (56 sts)
Rnd 36: Ch 1, working in the blo * sc in each of the next 5 sts, sc2tog; rpt from * all the way around, join in the first st with a sl st. (48 sts)
Rnd 37: Ch 1, working in the blo * sc in each of the next 4 sts, sc2tog; rpt from * all the way around, join in the first st with a sl st. (40 sts)
Rnd 38: Ch 1, working in the blo * sc in each of the next 3 sts, sc2tog; rpt from * all the way around, join in the first st with a sl st. (32 sts)
Rnd 39: Ch 1, working in the blo * sc in each of the next 2 sts, sc2tog; rpt from * all the way around, join in the first st with a sl st. (24 sts)
Rnd 40: Ch 1, working in the blo * sc in the next st, sc2tog; rpt from * all the way around, join in the first st with a sl st. (16 sts)
Rnd 41: Ch 1, working in the blo *sc2tog; rpt from * all the way around, join in the first st with a sl st. (8 sts)
Rnd 42: Ch 1, sc in each st around; join with a sl st. (8 sts)
Fasten off leaving a long tail. Using the tail sew the toe of the sock closed. Fasten off and weave in ends.
Hanger:
Find centre back of stocking and with colour B join yarn with a sl st on the inside of the cuff (Make sure it is secure!). Ch 15, join once again on the inside of the cuff. Turn, ch 1, sl st in each st all the way across and join once again on the inside of the cuff. Fasten off and weave in ends.
Video Tutorial:
The photographs and pattern contained in this document are the property of Rich Textures Crochet.
This pattern is for personal use only.
No unauthorized reproduction, in whole or in part, or distribution of this pattern or content is permitted. ALL FINISHED PRODUCTS from this pattern can be used for local sales and sold online.
Thank you so much for supporting Rich Textures Crochet! To stay in touch or see more great products, be sure to visit me on Facebook and Instagram (Rich Textures Crochet). Thanks again! Happy Crocheting!