This post contains affiliate links. This means that when you purchase through one of these links we will receive a small commission at no additional cost to you. Thank you for supporting Rich Texture Crochet!
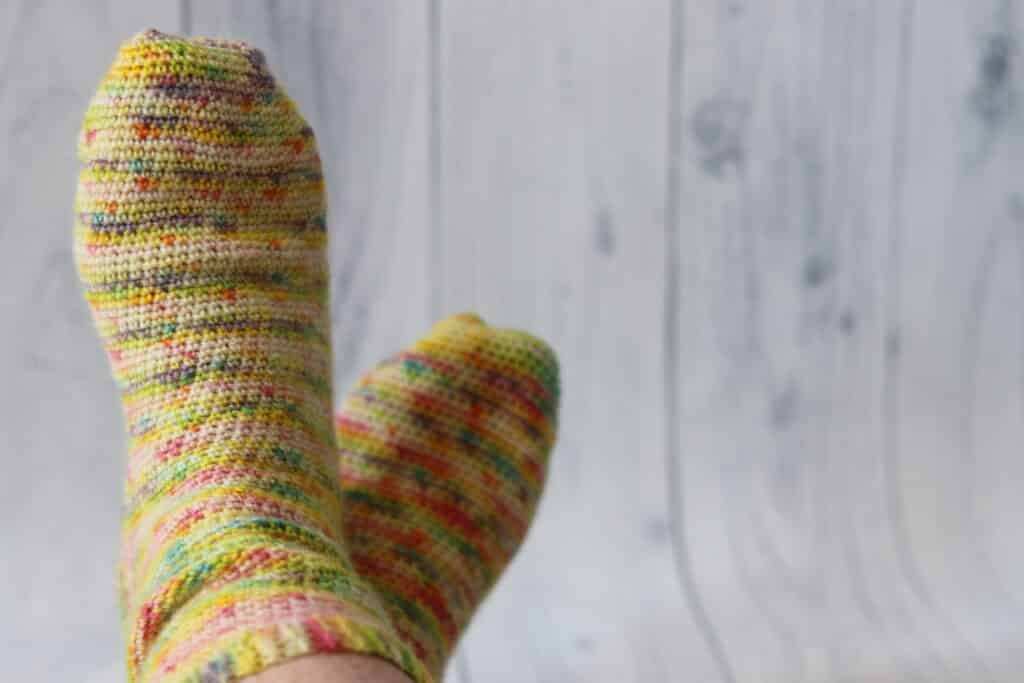
When I look at this Happy Socks crochet pattern I cannot help but smile! And, when worked in your favourite colour in these easy stitches, I am sure you will smile too!
As far as crochet socks go, these ones are pretty easy! I have designed them almost entirely in single crochet stitches, they are worked all as one piece from the cuff down to the toe. There is no need to cut your yarn!
This post contains affiliate links. This means that when you make a purchase through one of these links, Rich Textures Crochet will earn a small commission at no additional cost to yourself. Thank you for supporting Rich Textures Crochet!
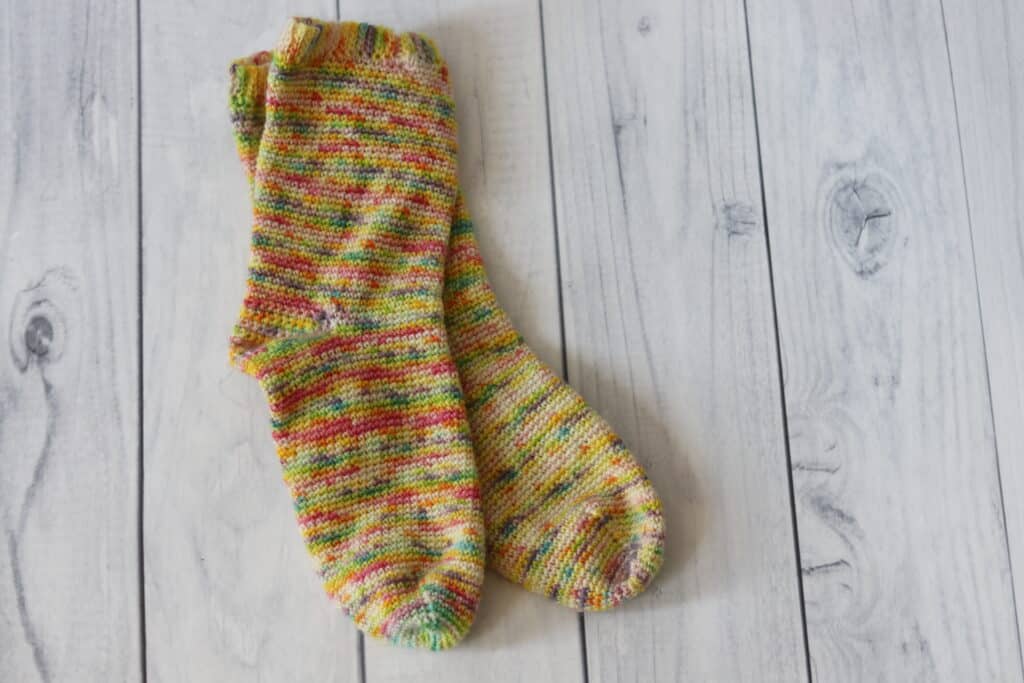
These crochet socks are worked from the cuff down to the toe. The cuff has a bit of ribbing up at the top which I have worked in slip stitches. The rest of the cuff (and later the foot of the sock) is worked in continuous rounds. This means that you will want to have a couple of stitch markers handy so that you can mark your first stitch.
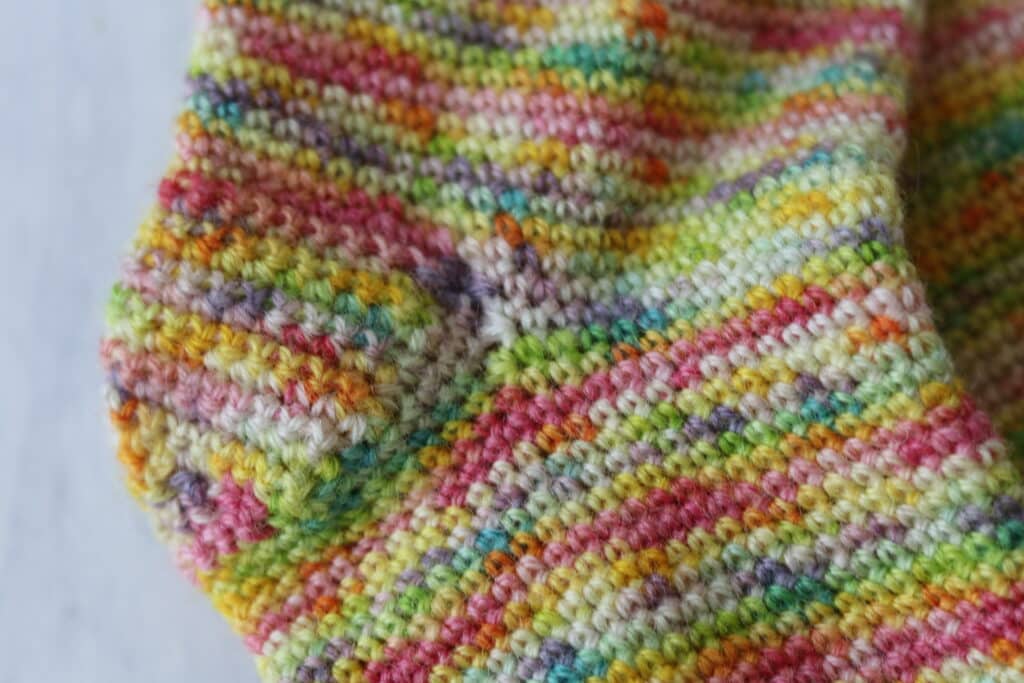
The heel of the sock is worked using the heel flap method, it’s one of my favourite ways to work a heel. If you are new to the technique, don’t worry, there is a full video tutorial after the written pattern below!
The Materials:
These socks are worked in a sock weight yarn and are shown here in the Point Prim Sock Yarn by Fleece and Harmony. I absolutely love their yarn. It is locally sourced, minimally processed, untreated and organic! The colours are vibrant and beautiful! You can check out the full range of their Point Prim Sock yarn, and many other yarns, here (not an affiliate link): https://fleeceandharmony.com/collections/point-prim-sock.
Along with the sock yarn I am also using a 3.75 mm crochet hook. In the video tutorial below you will see me using a wooden streamline hook in Ebony by Furls Crochet.
PDF Copies also available:
The Happy Socks crochet pattern will be written out in full below however, if you would like to add this pattern to your library or purchase an ad free PDF, you may do so from my Etsy and Ravelry Shops linked below:
Click Here for the Happy Socks on Etsy
Click Here for the Happy Socks on Ravelry
Thank you so much for stopping by! I can’t wait to see your own happy socks, be sure to tag me on social media! Also, I invite you to sign up for my email newsletter at the bottom of this page, or at the right hand side so that you never miss a free pattern!
Happy Crocheting!
Sarah
Happy Socks Crochet Pattern:
Skill Level: Easy
Gauge: 23 stitches x 28 rows of sc = 4 inches
Finished Sizes: Women’s 5/6: 7 in. foot, 6 in. tall
Women’s 7/8: 8 in. foot, 8 in. tall
Women’s 9/10: 9 in. foot, 10 in. tall
Yarn: Point Prim Sock Yarn by Fleece & Harmony® (400 yds; 104g; 80% wool, 20% Canadian Mohair). You will need 1 skein for size small, 1.25 skeins for size medium, 2 skeinsfor size large; Colour shown is Ferris Wheel.
Hook: Size F (3.75 mm) hook.
Notions: Yarn Needle, 2-3 stitch markers.
Crochet Stitches and Abbreviations:
Blo – Back Loop Only
Ch – Chain
Rpt – Repeat
Sc – Single Crochet
Sc2tog – Single Crochet two Stitches Together
Sk – Skip
Sl st – Slip stitch
Yo – Yarn over
Pattern Notes:
- Pattern is written in American English terms.
- Pattern is worked in rounds.
- Do not turn unless stated otherwise.
- Ch 1 at beginning of row does not count as stitch.
- Weave in ends as needed.
- Pattern contains 3 sizes indicated as Women’s 5/6, (Women’s 7/8, Women’s 9/10)
Free Crochet Pattern:
Cuff Ribbing (worked in rows)
Ch 6, (6, 6).
Row 1: Working in the back bumps of your foundation chain, Sl st in the 2nd ch from hook and in each ch across. ((5, (5, 5) sts)
Row 2: Ch 1, working in the blo, sl st in each st across. ((5, (5, 5) sts)
Repeat row two until your work from the beginning measures approximately 6, (7, 8) inches. Fold cuff over so that the two shorter ends meet. Ch 1, and working through the blo of both thickness, sl st in each st across. Do not fasten off, turn cuff so that it is right side out and proceed as follows in rounds:
Cuff Continued (worked in rounds):
Rnd 1: Ch 1, evenly work 45, (51, 57) sc around the cuff ribbing. Do not join, do not turn. ((45, (51, 57))
Rnds 2 – 36, (40, 44): Ch 1, sc in each st around, do not join but place a stitch marker in the first stitch and move as work progresses. Do not turn.
Heel Flap (worked in rows):
Row 1: Sc in each of the next 20, (22, 24) sts and ch-1 sps. Ch 1, turn leaving the remaining sts unworked. (20, (22, 24) sts )
Rows 2 – 10 (12, 14): Sc in each st across. Ch 1, turn.
Heel Shaping (Worked in Rows):
Row 1: Sc in each of the next 12, (14, 16) sts. Ch 1, turn.
Row 2: Sc in each of the next 4, (6, 8) sts. Ch 1, turn.
Row 3: Sc in each of the next 4, (6, 8) sts, sc in the next st two rows below on your heel flap which is the same st as the joining two rows below, sl st into the next st. Turn.
Row 4: Sk the sl st, sc in each of the next 5, (7, 9) sts, sc in the next st on your heel flap which is the same st as the joining two rows below, sl st into the next st. Turn.
Row 5: Sk the sl st, sc in each of the next 6, (8, 10) sts, sc in the next st on your heel flap which is the same st as the joining two rows below, sl st into the next st. Turn.
Row 6: Sk the sl st, sc in each of the next 7, (9, 11) sts, sc in the next st on your heel flap which is the same st as the joining two rows below, sl st into the next st. Turn.
Row 7: Sk the sl st, sc in each of the next 8, (10, 12) sts, sc in the next st on your heel flap which is the same st as the joining two rows below, sl st into the next st. Turn.
Row 8: Sk the sl st, sc in each of the next 9, (11, 13) sts, sc in the next st on your heel flap which is the same st as the joining two rows below, sl st into the next st. Turn.
Row 9: Sk the sl st, sc in each of the next 10, (12, 14) sts, sc in the next st on your heel flap which is the same st as the joining two rows below, sl st into the next st. Turn.
Row 10: Sk the sl st, sc in each of the next 11, (13, 15) sts, sc in the next st on your heel flap which is the same st as the joining two rows below, sl st into the next st. Turn.
Row 11: Sk the sl st, sc in each of the next 12, (14, 16) sts, sc in the next st on your heel flap which is the same st as the joining two rows below, sl st into the next st. Turn.
Row 12: Sk the sl st, sc in each of the next 13, (15, 17) sts, sc in the next st on your heel flap which is the same st as the joining two rows below, sl st into the next st. Turn.
Row 13: Sk the sl st, sc in each of the next 14, (16, 18) sts, sc in the next st on your heel flap which is the same st as the joining two rows below, sl st into the next st. Turn.
Row 14: Sk the sl st, sc in each of the next 15, (17, 19) sts, sc in the next st on your heel flap which is the same st as the joining two rows below, sl st into the next st. Turn.
Row 15: Sk the sl st, sc in each of the next 16, (18, 20) sts, sc in the next st on your heel flap which is the same st as the joining two rows below, sl st into the next st. Turn.
Row 16: Sk the sl st, sc in each of the next 17, (19, 21) sts, sc in the next st on your heel flap which is the same st as the joining two rows below, sl st into the next st. Turn.
Row 17: Sk the sl st, sc in each of the next 18, (20, 22) sts, sc in the next st on your heel flap which is the same st as the joining two rows below, sl st into the next st. Turn.
Row 18: Sk the sl st, sc in each of the next 19, (21, 23) sts, sc in the next st on your heel flap which is the same st as the joining two rows below, sl st into the next st. Turn.
Foot (Worked in Rounds):
Rnd 1: Sk the first sl st, sc in each of the next 20, (22, 24) sts, evenly work 8, (10, 12) sc down the side of the heel, sc3tog working in the remaining sp on the heel flap, the joining sp of the heel and the next st on the cuff, sc in each of the next 23, (27, 31) sts, sc3tog over the next st, the same st as joining the heel flap, and the next sp on the heel flap, evenly work 8, (10, 12) sc up the side of the heel flap. Do not join, do not turn. (61, (71, 81) sts)
Rnd 2: Sc in each of the next 27, (31, 35) sts, sc3tog over the next 3 sts, sc in each of the next 21, (25, 29) sts, sc3tog over the next 3 sts, sc in each of the next 7, (9, 11) sc up the side of the heel flap. Do not join, do not turn. (57, (67, 77) sts)
Rnd 3: Sc in each of the next 26, (30, 34) sts, sc3tog over the next 3 sts, sc in each of the next 19, (23, 27) sts, sc3tog over the next 3 sts, sc in each of the next 6, (8, 10) sc up the side of the heel flap. Do not join, do not turn. (53, (63, 73) sts)
Rnd 4: Sc in each of the next 25, (29, 33) sts, sc3tog over the next 3 sts, sc in each of the next 17, (21, 25) sts, sc3tog over the next 3 sts, sc in each of the next 5, (7, 9) sc up the side of the heel flap. Do not join, do not turn. (49, (59, 69) sts)
Rnd 5: Sc in each of the next 24, (28, 32) sts, sc3tog over the next 3 sts, sc in each of the next 15, (19, 23) sts, sc3tog over the next 3 sts, sc in each of the next 4, (6, 8) sc up the side of the heel flap. Do not join, do not turn. (45, (55, 65) sts)
Medium/Large Sizes Only:
Rnd 6: Sc in each of the next (27, 31) sts, sc3tog over the next 3 sts, sc in each of the next (17, 21) sts, sc3tog over the next 3 sts, sc in each of the next (5, 7) sc up the side of the heel flap. Do not join, do not turn. ((51, 61) sts)
Large Size Only:
Rnd 7: Sc in each of the next 30 sts, sc3tog over the next 3 sts, sc in each of the next 19 sts, sc3tog over the next 3 sts, sc in each of the next 6 sc up the side of the heel flap. Do not join, do not turn. (57 sts)
Next 34, (38, 42) rounds: Sc in each st all the way around. Do not join, but move stitch marker up as work progresses. (45, (51, 57) sts)
Toe Shaping:
Place the sock on a flat surface, placing it so that the sole of the foot is down. Flatten and with your stitch markers, mark the two sides of the foot. These markers will indicate where you will work your decreases.
Working continuous rounds, sc in each stitch until you reach your first stitch marker, sc2tog in the marked st and the next st (replace your st maker now in this sc2tog), sc in each st to the next stitch marker and sc2tog.
Continue to repeat the above until you have 29, (33, 37) sts remaining and join with a sl st in the first st.
Fasten off, leaving a long tail.
Turn the sock inside out and using the long tail, sew the tip of the toe closed. Fasten off and weave in your ends.
Video Tutorial:
The photographs and pattern contained in this document are the property of Rich Textures Crochet.
This pattern is for personal use only.
No unauthorized reproduction, in whole or in part, or distribution of this pattern or content is permitted. ALL FINISHED PRODUCTS from this pattern can be used for local sales and sold online.
Thank you so much for supporting Rich Textures Crochet! To stay in touch or see more great products, be sure to visit me on Facebook and Instagram (Rich Textures Crochet). Thanks again! Happy Crocheting!