This post contains affiliate links. This means that when you purchase through one of these links we will receive a small commission at no additional cost to you. Thank you for supporting Rich Texture Crochet!
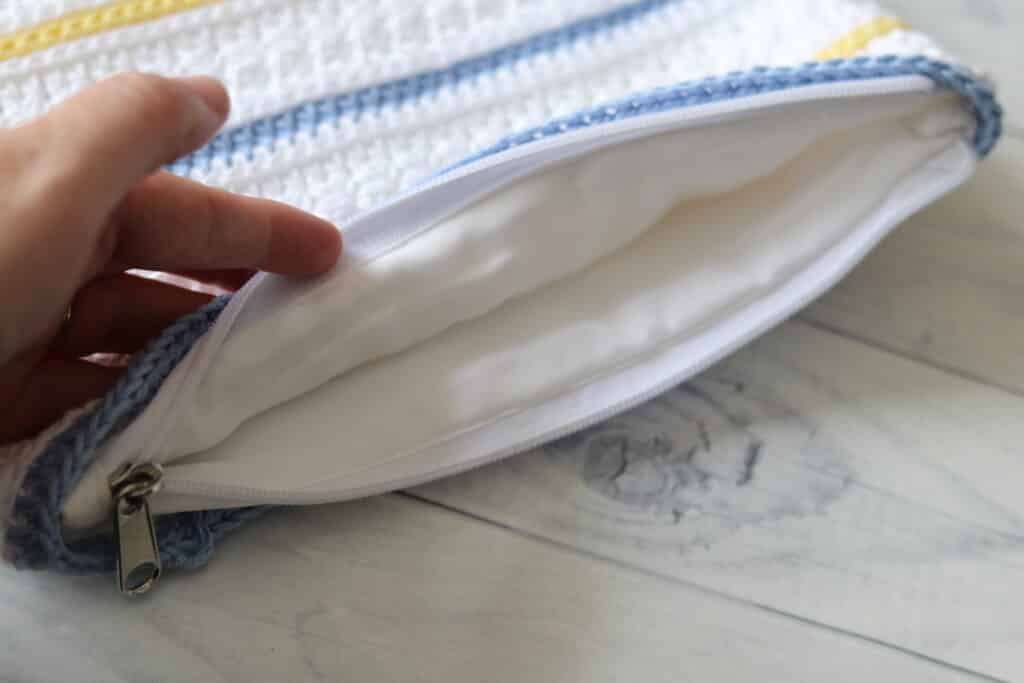
This Daisy Accessory Pouch crochet pattern teaches you how to crochet an easy and convenient zippered bag!
During the month of May each year I like to host a market bag crochet along where we make five new crochet market bag patterns together. It’s always a lot of fun! This year as I was making the bags I thought about how wonderful it would be to have a little matching accessory pouch to go along with the bags. It’s taken me a few months, but I am happy to be now publishing those patterns! I really do love how they turned out. And it makes adding a zipper and liner to a bag so, so easy!

For these little crochet accessory pouches you will need a small zippered canvas bag. I picked up several blank ones from my local craft store. Mine measure approximately 7.5 inches by 10 inches. They are a plain white with a zipper at the top. These little canvas pouches are what create the liner and zipper for your crochet bag. Simply crochet the bag, slip it on over top of the canvas pouch and sew or glue around the top to hold it in place. It’s so easy and you end up with a product that you could have easily bought at a boutique.
This little Daisy Accessory Pouch crochet pattern is the first of five! It was designed to go along with the Daisy Market bag so you will see a lot of the same stitches. Be sure to follow along and sign up for my email newsletter so that you don’t miss the next four pouches!

PDF Copies:
The full crochet pattern for the Daisy Accessory Pouch will be written out in full below followed by a free video tutorial. The pattern is free to follow on my website and always will be! If you would like to add this pattern to your library and purchase an ad free PDF you can do so through my Etsy and Ravelry shops linked below:
CLICK HERE FOR THE DAISY ACCESSORY POUCH ON ETSY
CLICK HERE FOR THE DAISY ACCESSORY POUCH ON RAVELRY
Thank you so much for stopping by! Happy Crocheting!
Sarah
Daisy Accessory Pouch Crochet Pattern:
Skill Level: Intermediate
Gauge: 18 x 20 rows of sc = 4 inches
Finished Size: Approximately 7.5 x 10 inches
Yarn: 24/7 Cotton by Lion Brand® (186 yds/170 m; 100g/3.5 oz; 100% cotton; (4) worsted weight). You will need 1/2 ball Sky (Colour A), 1/2 ball white (Colour B), about 10 yards Lemon (Colour C)
Hook: Size G/6 (4 mm) hook.
Notions: Yarn Needle, 7.5 x 10 in. Canvas pouch with zipper, sewing needle or fabric glue.
Stitches and Abbreviations:
3rd lp – Third Loop (At the back of the hdc st, the loop that runs below the top back loop).
Beg Daisy St – Beginning Daisy Stitch (insert your hook in the 2nd ch from your hook, yarn over and draw up a loop. Insert your hook into the stitch at the base of the chain, yarn over and draw up a loop. Skip the next stitch. Insert your hook in the next stitch, yarn over and draw up a loop. Yarn over and draw through 4 loops on your hook. Ch 1. Beginning Daisy Stitch Made).
Ch – Chain
Daisy St – Daisy Stitch (Insert your hook in the chain stitch, yarn over and draw up a loop. Insert your hook into the stitch at the base of the previous daisy stitch, yarn over and draw up a loop. Skip the next stitch. Insert your hook in the next stitch, yarn over and draw up a loop. Yarn over and draw through 4 loops on your hook. Ch 1. Daisy Stitch Made).
Dc – Double Crochet
Hdc – Half Double Crochet
Rpt – Repeat
Sc – Single Crochet
Sk – Skip
Sl st – Slip stitch
Yo – Yarn over
Pattern Notes:
- Pattern is written in American English terms.
- Pattern is worked in rounds, as one piece, from the bottom up to the handles.
- Ch 1 at beginning of round does not count as stitch.
- Weave in ends as needed.
- To change the size of your pouch, you will need to start with an odd number of stitches for your foundation chain.
- Do not turn unless stated otherwise.
Free Crochet Pattern:
With colour A, ch 47.
Rnd 1: With colour A, hdc in the 2nd ch from your hook and in each st across to the final st, 3 hdc in the final st. Now working along the opposite side of your foundation ch, hdc in each st across to the final ch, 2 hdc in the final ch, join with a sl st in the 1st st. (94 sts) Do not turn.
Rnds 2-3: Ch 1, hdc in the same st as joining and in each st around, join with a sl st in the 1st st. Switch to colour B in the final st of rnd 3. (94 sts) Do not turn.
NOTE: Before going further you may wish to double check the size to ensure that your pouch will fit over the canvas one.
Rnd 4: With colour B, ch 1, hdc in the 1st st and in each st around, join with a sl st in the 1st st. Do not turn.
Rnd 5: Ch 1, working in the 3rd lp all the way around, hdc in the 1st st and each st around. Join with a sl st in the 1st st. Do not turn.
Rnd 6: Ch 3, beg daisy st (See “Stitches and Abbreviations”, daisy st (See “Stitches and Abbreviations) in each st all the way around, working your final daisy st into the same st as joining, do not work the final ch-st. Join with a sl st in the 1st st. Ch 3, TURN.
Rnd 7: Ch 3, beg daisy st (working into the 2nd ch, the ch-st that is the centre of the same daisy and the centre of the next daisy), daisy st in each st all the way around, working your final daisy st into the same st as joining, do not work the final ch-st. Join with a sl st in the 1st st. Ch 1, TURN.
Rnd 8: Hdc in each st all the way around. Join with a sl st in the 1st st. Ch 1, do not turn. Switch to colour C.
Rnd 9: With colour C, working in the 3rd lp all the way around, hdc in the 1st st and each st around. Join with a sl st in the 1st st. Switch to colour B. Ch 1.
Rnd 10: With colour B, working in the 3rd lp all the way around, hdc in the 1st st and each st around. Join with a sl st in the 1st st. Ch 1.
Rnd 11: Working in the 3rd lp all the way around, hdc in the 1st st and each st around. Join with a sl st in the 1st st.
Rnd 12 Ch 3, beg daisy st, daisy st in each st all the way around. Join with a sl st in the 1st st. Ch 3, TURN.
Rnd 13: Ch 3, beg daisy st (See “Stitches and Abbreviations”, daisy st (See “Stitches and Abbreviations) in each st all the way around. Join with a sl st in the 1st st. Ch 1, TURN.
Rnd 14: Hdc in each st all the way around. Join with a sl st in the 1st st. Ch 1, do Not Turn. Switch to colour A.
Rnd 15: With colour A, working in the 3rd lp all the way around, hdc in the 1st st and each st around. Switch to your colour B. Join with a sl st in the 1st st. Ch 1.
Rnds 16-28: Repeat rnds 4-15 once more. Fasten off, weave in your ends.
Slip the Daisy pouch over top of your canvas pouch with the zipper at the top. Using a small amount of thread (alternatively you may use some fabric glue), sew/secure the daisy pouch to the canvas pouch through the final round of stitches.