
This post contains affiliate links. This means that when you purchase through one of these links we will receive a small commission at no additional cost to you. Thank you for supporting Rich Texture Crochet!
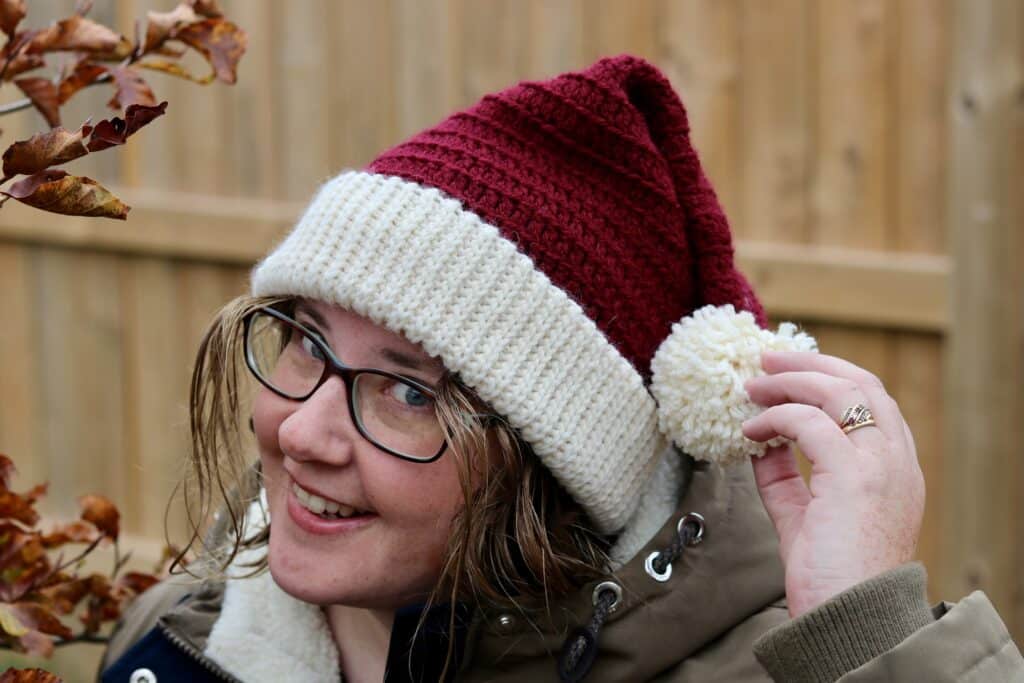
The Classic Santa hat crochet pattern emits an old Christmas feel with it’s easy and relaxed stitches and classic knit looking brim!
I have been wanting to make a crochet Santa hat pattern for a while now! It’s one item that gets requested year after year. It’s also an item that I find myself scrambling to look for as the children approach holiday hat day at school! This year I was determined to make a few (and an Elf hat too! Stay tuned!).

My Classic Santa Hat one that features my favourite brim up technique and slip stitch crochet brim. I have also worked the brim so that it can be folded up to give a more cozy look. It is a wonderful hat to wear. I have sized it for an adult head (gender neutral!) but as it has quite a bit of stretch in the brim, my children are enjoying wearing it as well!
The Classic Santa Hat features some basic crochet stitches, mainly double crochet! Mine ended up being about 13 inches long when laid flat excluding the pompom. It results in a nice slouch that is not too overwhelming. You certainly can make it longer by adding rounds of double crochet stitches after round six of the hat body or in between the decrease round in the top.
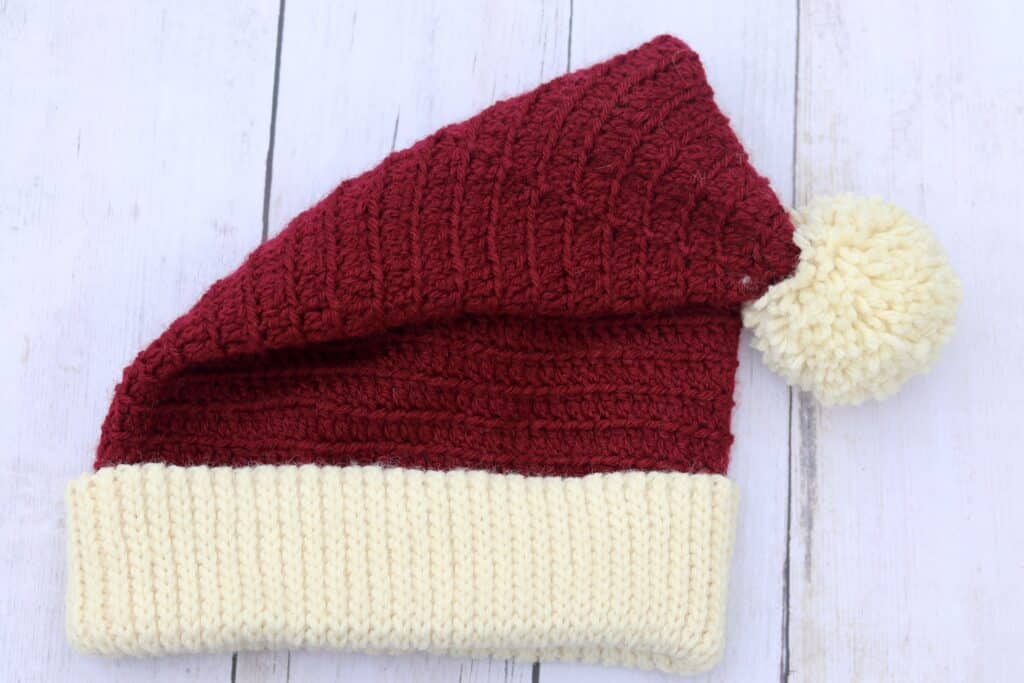
The other part of the hat that you may wish to customize is in the brim. As mentioned, I worked the brim extra wide so that I could fold it up and make it more cozy and warm. However, you can work less stitches in the foundation chain and make it more narrow.
I also love a slip stitch brim. The slip stitches stretch very nicely when worked in the back loop only and they retain their shape. If you are not a fan of slip stitches though, you may try single crochet or half double crochet stitches for your brim. I will also explain this in the free video tutorial below.

Materials:
For the Classic Santa hat crochet pattern I used a worsted/medium weight wool blended yarn called Wool Ease by Lion Brand Yarn. I loved the shades of the off white (Fisherman) and deep red (Tawny Port) as I felt they really emphasized the classic Christmas feel. You will need less than a ball in each colour for the hat. You will also need a 5mm (H/8) crochet hook.
PDF Copies are Also Available:
The Classic Santa hat crochet pattern will be written out in full below followed by a free video tutorial. They are free to follow here on Rich Textures Crochet and on my YouTube channel. However, if you would like to add this pattern to your library and purchase an ad free PDF you may do so from my Etsy and Ravelry shops linked below:
CLICK HERE FOR THE CLASSIC SANTA HAT ON ETSY
CLICK HERE FOR THE CLASSIC SANTA HAT ON RAVELRY
Thank you so much for stopping by! Don’t forget to sign up for my email newsletter. And, are you in the mood for more holiday patterns? You may wish to check out my Wintertime Christmas Stocking Pattern or the Cozy Christmas Tree Skirt.
Classic Santa Hat Crochet Pattern:
Skill Level: Intermediate
Gauge: 16 sts x 8 rows of dc in blo = 4 inches
Finished Size: 9 x 13 inches laid flat, excluding pompom
Hook: Size H/8 (5 mm) Hook. Adjust hook size if necessary to obtain correct gauge
OPTIONAL: Pompom to attach to the top
Stitches and Abbreviations:
Blo – Back Loop Only
Ch – Chain
Dc – Double Crochet
Dc2tog – Double Crochet Two Stitches Together
Rpt – Repeat
Sc – Single Crochet
Sk – Skip
Sl St – Slip Stitch
Yo – Yarn Over
Pattern Notes:
- Pattern is written in American English terms.
- Brim of hat is worked in rows, body of hat is worked in rounds.
- Ch 1 at beginning of round does not count as stitch.
- Ch 3 at beginning of round counts as a double crochet.
- Do not turn at the end of each round, unless stated otherwise.
- Weave in ends as needed.
- OPTIONAL: Brim of hat may be worked using either single crochet stitches or half double crochet stitches instead of the slip stitches.
- Brim of the hat may be worked as a fold up which is shown in the photos or you may choose to work a shorter brim and simply start with less chains for the foundation chain.
- To change the size of your hat, you can use any multiple of stitches making note that when it comes to the decrease rounds for the hat top, you may have an uneven stitch count.
Free Crochet Pattern:
Brim (Worked in rows):
With colour A, ch 25.
Row 1: Sl st in the 2nd ch from hook and in each ch across. Ch 1, turn. (24 sl sts)
Row 2: Working in the blo, sl st in each st across. Ch 1, turn. (24 sl sts)
Continue to repeat row 2 until work from the beginning measures approximately 16-17 inches.
Do not fasten off, but fold brim of hat so that two shorter ends meet. Now working through both thicknesses, sl st across working through the blo on each side. Do not fasten off, continue working with the wrong side facing you.
Join colour B
Now working around the edge of the brim, continue working in rounds as follows:
Hat Body (Worked in rounds):
Rnd 1: With colour B, ch 1, evenly work 80 sc all the way around. Join with a sl st in the first st, do not turn. (80 sts)
Rnds 2-7: Ch 3, working in the blo of each st, dc in the next st and in each st all the way around; join with a sl st in the top of the starting ch-3. (NOTE: For a longer Santa hat, simply work additional rounds)
Rnd 8: Ch 3, working in the blo, dc in each of the next 5 sts, dc2tog, *dc in each of the next 6 sts, dc2tog; Rpt from * around. Join with a sl st in the top of the 1st st. (70 sts)
Rnd 9: Ch 3, dc in the next st and in each st around. Join with a sl st in the first st.
Rnd 10: Ch 3, working in the blo, dc in each of the next 4 sts, dc2tog, *dc in each of the next 5 sts, dc2tog; Rpt from * around. Join with a sl st in the top of the 1st st. (60 sts)
Rnd 11: Ch 3, dc in the next st and in each st around. Join with a sl st in the first st.
Rnd 12: Ch 3, working in the blo, dc in each of the next 3 sts, dc2tog, *dc in each of the next 4 sts, dc2tog; Rpt from * around. Join with a sl st in the top of the 1st st. (50 sts)
Rnd 13: Ch 3, dc in the next st and in each st around. Join with a sl st in the first st.
Rnd 14: Ch 3, working in the blo, dc in each of the next 2 sts, dc2tog, *dc in each of the next 43sts, dc2tog; Rpt from * around. Join with a sl st in the top of the 1st st. (40 sts)
Rnd 15: Ch 3, dc in the next st and in each st around. Join with a sl st in the first st.
Rnd 16: Ch 3, working in the blo, dc in the next st, dc2tog, *dc in each of the next 2 sts, dc2tog; Rpt from * around. Join with a sl st in the top of the 1st st. (30 sts)
Rnd 17: Ch 3, dc in the next st and in each st around. Join with a sl st in the first st.
Rnd 18: Ch 3, dc2tog, * dc in the next st, dc2tog; Rpt from * around. Join with a sl st in the first st. (20 sts)
Rnd 19: Ch 3, dc in the next st and in each st around. Join with a sl st in the first st.
Rnd 20: Ch 2, dc in the next st (counts as a dc2tog), dc2tog in each st around. Join with a sl st in the first st. (10 sts)
Rnd 21: Ch 3, dc in the next st and in each st around. Join with a sl st in the first st.
Fasten off leaving a long tail. Using the long tail, sew the top of the hat closed. Fasten off and weave in your ends. Attach Pompom to the top if desired.
Video Tutorial:
The photographs and pattern contained in this document are the property of Rich Textures Crochet.
This pattern is for personal use only.
No unauthorized reproduction, in whole or in part, or distribution of this pattern or content is permitted. ALL FINISHED PRODUCTS from this pattern can be used for local sales and sold online.
Thank you so much for supporting Rich Textures Crochet! To stay in touch or see more great products, be sure to visit me on Facebook and Instagram (Rich Textures Crochet). Thanks again! Happy Crocheting!

Elf Hat coming soon!


Round 14 says “dc in each of the next 43sts, dc2tog…” I should be “dc in each of the next 3sts, dc2tog…”
Thanks Rita. I just checked the video and discovered what I thought was the case — just as you described. I should have checked the comments section rather than trying to locate the correct spot on the video. It’s a cool hat!
Hi! Row 14. Has a mistake I believe. It should say Rnd 14: Ch 3, working in the blo, dc in each of the next 2 sts, dc2tog, *dc in each of the next 3 sts , dc2tog; Rpt from * around. Join with a sl st in the top of the 1st st. (40 sts)