This post contains affiliate links. This means that when you purchase through one of these links we will receive a small commission at no additional cost to you. Thank you for supporting Rich Texture Crochet!
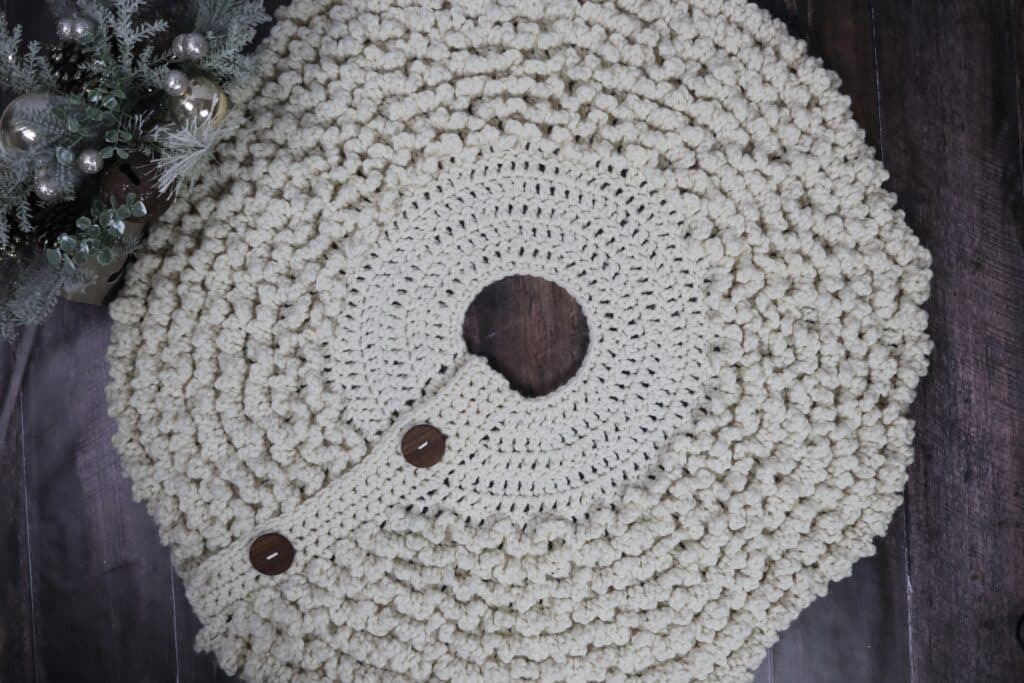
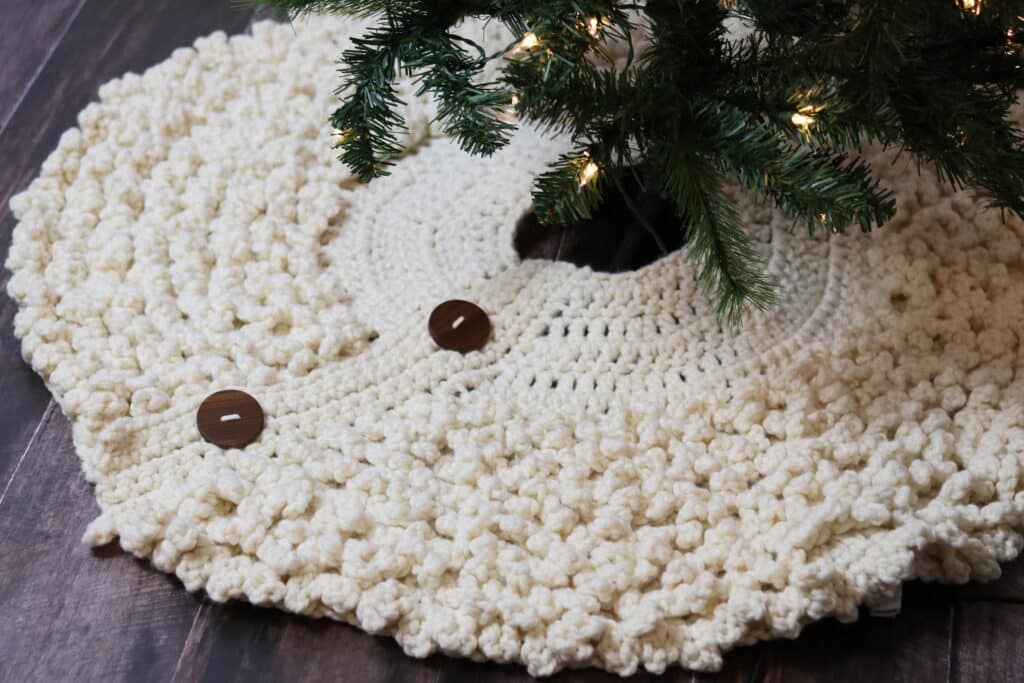
This Cozy Christmas Tree Skirt crochet pattern would look so lovely around the bottom of your tree this year! And there is still time to work one up!
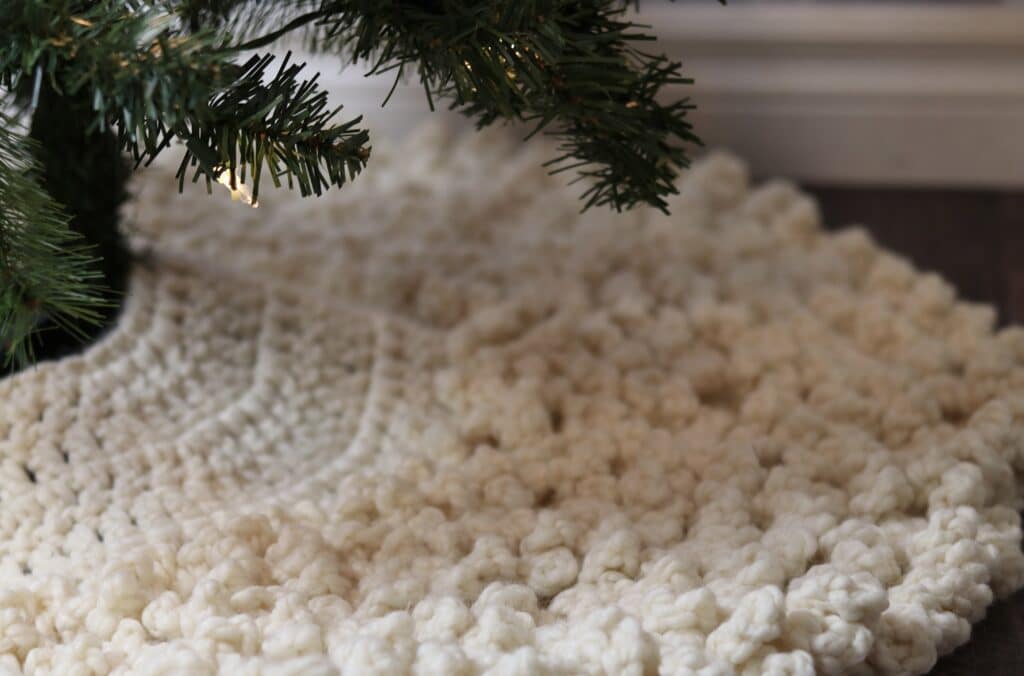
Maybe it is because I am Canadian and we can have our fair share of cold and snow during the Christmas season, but I LOVE a cozy looking Christmas display! This Cozy Tree Skirt is one that your will look forward to curling your toes into because it is so plush!
This Christmas Tree Skirt Crochet Pattern is worked in rows from the centre out. It is an easy pattern to adjust as you can make it smaller or continue working increase rows to make it larger. The plush loop stitches do take a little bit more yarn so if you are adjusting the pattern to make it larger, you will want to have extra super bulky weight yarn on hand.
PDF Copies of this Pattern:
This pattern will be written out in full followed by a full video tutorial below. If you would like to add this pattern to your library, or purchase an ad free PDF, you may do so from either my Etsy or Ravelry Shop linked below:
Click here for the Cozy Christmas Tree Skirt Pattern on Etsy
Click here for the Cozy Christmas Tree Skirt Pattern on Ravelry
Thank you so much for stopping by! I invite you to subscribe to my e-newsletter through the buttons in the side bar and footer. That way you will never miss a new free pattern or stitch tutorial! If you like this Christmas tree skirt pattern, you may also wish to check out the matching Christmas Stocking Pattern: Simply Christmas Stocking Crochet Pattern. It features more of the cozy looking chain loop stitches in the cuff.
Enjoy and happy crocheting!
Sarah
Cozy Christmas Tree Skirt Crochet Pattern:
Skill Level: Easy
Gauge: 6 sts x 8 rows of single crochet = 4 inches
Finished Size: 36 inch diameter (6 inch diameter opening for tree stand)
Yarn: 3 balls Wool-Ease® Thick & Quick® Bonus Bundle by Lion Brand® (80% Acrylic, 20% Wool; 12 oz, 340 g; Approx. 212 yds, 194 m). Super Bulky (6). Colour: Fisherman.
Hook: Size N/P (10 mm) Hook. Adjust hook size if necessary to obtain correct gauge.
Notions: Yarn Needle, stitch marker, 2 large Buttons (shown with 2 inch diameter).
Stitches and Abbreviations:
Blo – Back Loop Only
Ch – Chain
Dc – Double Crochet
Hdc – Half Double Crochet
Rpt – Repeat
Sc – Single Crochet
Sk – Skip
Sl St – Slip Stitch
Yo – Yarn Over
Pattern Notes:
- Pattern is written in American English terms.
- Weave in ends as needed.
- Turn at the end of each row.
- Tree skirt may be made smaller or larger, simply by adjusting the number of rows worked.
- Ch 3 at the start of a row counts as a dc stitch.
Free Crochet Pattern:
Ch 29.
Row 1: Sc in the 2nd ch from your hook and in each ch across. Ch 3 (counts as a dc), turn. (28 sts)
Row 2: Dc in the 1st st, *dc in each of the next 2 sts, 2 dc in the next st; Rpt from * across, ch 3, turn. (38 sts)
Row 3: Dc in the 1st st, *dc in each of the next 3 sts, 2 dc in the next st; Rpt from * across to the final st, dc in the final st, ch 3, turn. (48 sts)
Row 4: Dc in the 1st st, *dc in each of the next 4 sts, 2 dc in the next st; Rpt from * across to the final 2 sts, dc in each of the next 2 sts, ch 3, turn. (58 sts)
Row 5: Dc in the 1st st, *dc in each of the next 5 sts, 2 dc in the next st; Rpt from * across to the final 3 sts, dc in each of the next 3 sts ch 3, turn. (68 sts)
Row 6: Dc in the 1st st, *dc in each of the next 6 sts, 2 dc in the next st; Rpt from * across to the final 4 sts, dc in each of the next 4 sts ch 3, turn. (78 sts)
Row 7: Dc in the 1st st, *dc in each of the next 7 sts, 2 dc in the next st; Rpt from * across to the final 5 sts, dc in each of the next 5 sts ch 5, turn. (88 sts)
Row 8: *Sl st into the blo of the next st, ch 5; Rpt from * across, ch 3, turn.
Row 9: Working in the blo of the dc st 2 rows below all the way around, dc in the 1st st, *dc in each of the next 8 sts, 2 dc in the next st; Rpt from * across to the final 6 sts, dc in each of the next 6 sts ch 3, turn. (98 sts)
Row 10: *Sl st into the blo of the next st, ch 5; Rpt from * across, ch 3, turn.
Row 11: Working in the blo of the dc st 2 rows below all the way around, dc in the 1st st, *dc in each of the next 9 sts, 2 dc in the next st; Rpt from * across to the final 7 sts, dc in each of the next 7 sts ch 3, turn. (108 sts)
Row 12: *Sl st into the blo of the next st, ch 5; Rpt from * across, ch 3, turn.
Row 13: Working in the blo of the dc st 2 rows below all the way around, dc in the 1st st, *dc in each of the next 10 sts, 2 dc in the next st; Rpt from * across to the final 8 sts, dc in each of the next 8 sts ch 3, turn. (118 sts)
Row 14: *Sl st into the blo of the next st, ch 5; Rpt from * across, ch 3, turn.
Row 15: Working in the blo of the dc st 2 rows below all the way around, d in the 1st st, *dc in each of the next 11 sts, 2 dc in the next st; Rpt from * across to the final 9 sts, dc in each of the next 9 sts ch 3, turn. (128 sts)
Row 16: *Sl st into the blo of the next st, ch 5; Rpt from * across, ch 3, turn.
Row 17: Working in the blo of the dc st 2 rows below all the way around, dc in the 1st st, *dc in each of the next 12 sts, 2 dc in the next st; Rpt from * across to the final 10 sts, dc in each of the next 10 sts ch 3, turn. (138 sts)
Row 18: *Sl st into the blo of the next st, ch 5; Rpt from * across, ch 3, turn.
Row 19: Working in the blo of the dc st 2 rows below all the way around, dc in the 1st st, *dc in each of the next 13 sts, 2 dc in the next st; Rpt from * across to the final 11 sts, dc in each of the next 11 sts ch 3, turn. (148 sts)
Row 20: *Sl st into the blo of the next st, ch 5; Rpt from * across, ch 3, turn.
Row 21: Working in the blo of the dc st 2 rows below all the way around, dc in the 1st st, *dc in each of the next 14 sts, 2 dc in the next st; Rpt from * across to the final 12 sts, dc in each of the next 12 sts ch 1, turn. (158 sts)
Row 22: *Sl st into the blo of the next st, ch 5; Rpt from * across, ch 3, turn.
Row 23: Working in the blo of the dc st 2 rows below all the way around, sc in the 1st st and in each st across. Fasten off, weave in your ends. (158 sts)
Edging (Worked along short ends):
Side One:
With the right side facing, join your yarn with a sl st in the corner stitch.
Row 1: Ch 1, Evenly work 26 sc along edge, ch 1, turn. (26 sc)
Rows 2-5: Sc in the 1st st and in each st across. (26 sc)
Fasten off, weave in your ends.
Side Two:
With the right side facing, join your yarn with a sl st in the corner stitch.
Row 1: Ch 1, Evenly work 26 sc along edge, ch 1, turn. (26 sc)
Row 2: Sc in the 1st st and in each st across, ch 1, turn. (26 sc)
Row 3: Sc in the 1st st and in each of the next 4 sts, ch 3, sk the next 3 sts, sc in each of the next 10 sts, ch 3, sk the next 3 sts, sc in each of the final 5 sts. Ch 1, turn.
Row 4: Sc in each of the first 5 sts, sc in each of the next 3 ch sts, sc in each of the next 10 sts, sc in each of the next 3 ch sts, sc in each of the final 5 sts. Ch 1, turn.
Row 5: Sc in the 1st st and in each st across.
Fasten off, weave in your ends. Attach buttons to side one of edges so that they are placed in line with the button holes on side two.
Video Tutorial:
The photographs and pattern contained in this document are the property of Rich Textures Crochet.
This pattern is for personal use only.
No unauthorized reproduction, in whole or in part, or distribution of this pattern or content is permitted. ALL FINISHED PRODUCTS from this pattern can be used for local sales and sold online.
Thank you so much for supporting Rich Textures Crochet! To stay in touch or see more great products, be sure to visit me on Facebook and Instagram (Rich Textures Crochet). Thanks again! Happy Crocheting!