This post contains affiliate links. This means that when you purchase through one of these links we will receive a small commission at no additional cost to you. Thank you for supporting Rich Texture Crochet!
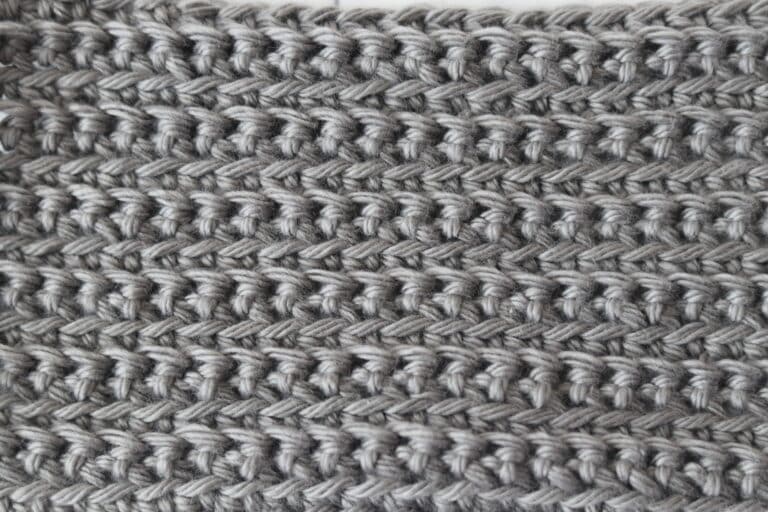
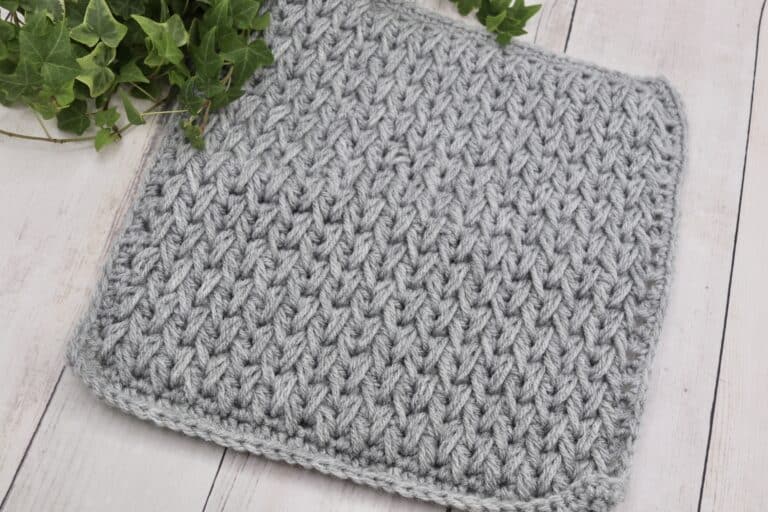
The Swallowtail Stitch Crochet Pattern is over flowing with mesmerizing texture. It would be beautiful in a blanket or other large project!
It doesn’t have to be limited to a large project however, it’s just that a larger project encorperating this stitch would really allow it to shine!
When you break the pattern down it is a two row repeat. You will switch colour after every two rows. Down below I have written it out as a four row repeat simply to encorperate all of the colour changes. Also remember that, even though I have worked the pattern in two colours, you may work it in a single colour or more.

The Materials:
For this tutorial today, I will be using a small amount of Heatherly by KnitPicks and WeCrochet in two colours labelled A and B. You will alternate between these colours throughout the project. In the video tutorial below I will carry my yarn up the side so that I do not have to fasten off after each colour change. But depending on your project, you may have to fasten off and weave in the ends if there is no other way to hide them such as under an edging.
Along with my worsted weight yarn, I will also be working with a 5 mm (H/8) crochet hook.
Barn Quilt Blankets!
If you have a moment, I invite you to check out my book, Barn Quilt Blankets! It is now available for sale in both paperback and ebook format on Amazon! Click on the photo below to learn more:

Swallowtail Stitch Crochet Pattern:
Bpdc – Back Post Double Crochet
Ch – Chain Stitch
Fpdc – Front Post Double Crochet
Fpsc – Front Post Single Crochet
Rpt – Repeat
Sl St – Slip Stitch
Yo – Yarn Over
Yo sl st – Yarn Over Slip Stitch (yo, insert your hook into the next st, yo and draw up a loop and draw that loop through the two loops on your hook. Yarn Over Slip Stitch made.)
Pattern Notes:
This stitch is worked in rows in this tutorial and it may be worked in one colour or many. I will be working this pattern in two colours labelled A and B.
This pattern is written in American crochet terms.
To begin, with colour A, make a slip knot and make a foundation chain. For this stitch, you will need a multiple of 10 stitches, plus 4 for your foundation chain.
For example, with colour A, ch 34.
Row One:
Sc in the 2nd ch from your hook, ch 1, sk the next 3 sts, *4 dc in the next st, dc in each of the next 2 sts, 4 dc in the next st, ch 1**, sk the next 3 sts, sc in the next st, ch 1, sk the next 3 sts; Rpt from * across to the final 4 sts ending the final repeat at **, sk the next 3 sts, sc in the final st, ch 1, turn.
Row Two:
Sc in the top of the 1st st, *fpsc in each of the next 4 sts, ch 1, bpdc, in each of the next 2 sts, ch 1, fpsc in each of the next 4 sts**, sk the next sc; Rpt from * across ending the final repeat at **, sc in the top of the final st and switch to colour B. Ch 1, turn.
Row Three:
With colour B, sc in the 1st st, ch 1, *4 dc in the next ch-1 sp, fpdc in each of the next 2 sts, 4 dc in the next ch-1 sp, ch 1, sk the next 4 sts, sc in the space betweeen the next 2 sts, ch 1, sk the next 4 sts; Rpt from * across to the final st, ch 1, sc in the final st. Ch 1, turn.
Row Four:
Sc in the top of the 1st st, *fpsc in each of the next 4 sts, ch 1, bpdc, in each of the next 2 sts, ch 1, fpsc in each of the next 4 sts**, sk the next sc; Rpt from * across ending the final repeat at **, sc in the top of the final st and switch to colour A. Ch 1, turn.
Row Five:
With colour A, sc in the 1st st, ch 1, *4 dc in the next ch-1 sp, fpdc in each of the next 2 sts, 4 dc in the next ch-1 sp, ch 1, sk the next 4 sts, sc in the space betweeen the next 2 sts, ch 1, sk the next 4 sts; Rpt from * across to the final st, ch 1, sc in the final st. Ch 1, turn.
Row Six:
Sc in the top of the 1st st, *fpsc in each of the next 4 sts, ch 1, bpdc, in each of the next 2 sts, ch 1, fpsc in each of the next 4 sts**, sk the next sc; Rpt from * across ending the final repeat at **, sc in the top of the final st and switch to colour B. Ch 1, turn.
And that’s it!
For the rest of the pattern, repeat rows 3-6. Fasten off, weave in your ends.