
This post contains affiliate links. This means that when you purchase through one of these links we will receive a small commission at no additional cost to you. Thank you for supporting Rich Texture Crochet!
Welcome to week three of the Crazy for Cables Blanket Crochet Along! Today we will be working some beautiful rope cables.
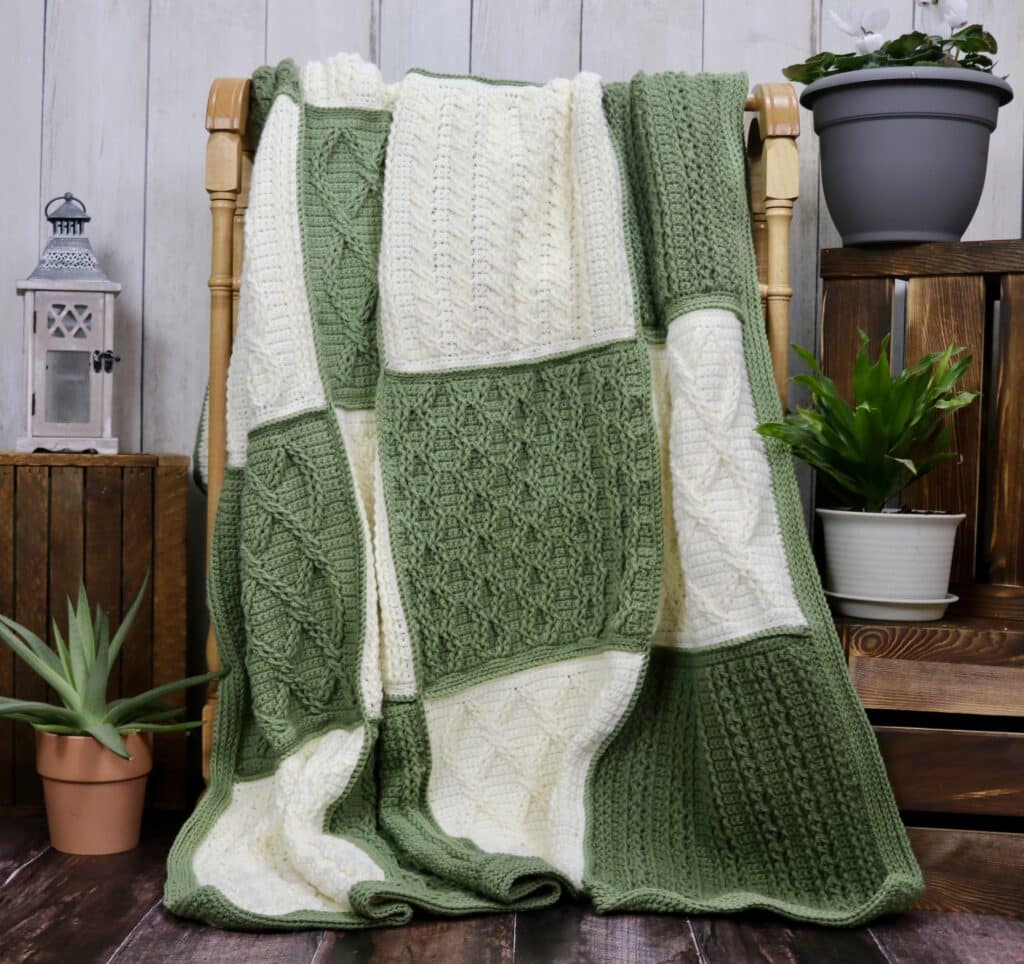
Rope Cables are sometimes referred to as twisted cables. And it’s easy to see why once you catch a glimpse of them! These simple cables look as through they have been twisted as they run along the top of your fabric.
The Rope Cables Blanket Square is fairly easy to work with a simple repeat. The cable texture is all to the front side of your work. For the Crazy for Cables Blanket, you will work four of these crochet squares.
This is the third week in the Crazy for Cables crochet along. If this is your first time hearing about the crochet along, you will want to check out the introduction post here: Crazy for Cables Crochet Along Introduction.
Thus far we have worked two other cabled square crochet patterns. Week one was the Narrow Cable Blanket Square and Week Two was the Crinkle Cable Blanket Square. Each of these squares will remain posted here for free on Rich Textures Crochet. A little further down in this post you will find the links to my Etsy and Ravelry Shops should you wish to purchase the Ad Free PDF.
The Materials:
To work the Crazy for Cables Blanket in its entirety, you will need approximately 5000 yards (a little less) of a medium/worsted weight yarn and a 5 mm crochet hook. For the crochet along I will be using the Pound of Love yarn by Lion Brand. It is a 100% acrylic yarn and each ball is about 1020 yards/932 meters or 16oz/454g. I decided to use two colours (each week I worked two squares in each). Colour A was Olive and I used about 2.5 balls. Colour B was Antique White and I used a little less than two balls. Feel free to work the blanket all as one colour or in two or more, it’s really up to you.
Along with the yarn, you will need a 5mm (H/8) crochet hook. In the video tutorials you will see me using a Birchwood Crochet hook by Rowan Yarn. Another favourite is the Clover Soft Touch crochet hook.

PDF Copies are also Available:
This year for the winter blanket crochet along I decided to provide the PDF at the start of the crochet along for those who wish to follow it instead of following along here on Rich Textures Crochet. The pattern will be provided each week and written out below. It is free, and always will be, to follow here on Rich Textures Crochet. If you would like to add the pattern to your library and purchase the ad free PDF, you may do so through my Etsy and Ravelry shops. Although only the one Crinkle Cable Blanket Square is provided in this post below, you will see that the PDF includes all five of the blanket squares, joining and edging.
CLICK HERE FOR THE CRAZY FOR CABLES BLANKET ON ETSY
CLICK HERE FOR THE CRAZY FOR CABLES BLANKET ON RAVELRY
Thank you so much for stopping by! Remember, if you happen to work on this project, be sure to tag Rich Textures Crochet on social media and use the hashtag #crazyforcablescal so that I might come by and admire it.
Happy Crocheting, see you next week for the next square!
Sarah

Rope Cables Blanket Square Crochet Pattern:
Skill Level: Intermediate
Gauge: 16 sc x 20 rows = 4 inches
Finished Size: Finished blanket measures approximately 50 x 62 inches. Each square is about 12 x 12 inches.
Hook: Size H/8 (5.0mm) crochet hook. Adjust hook size if necessary to obtain correct gauge.
Notions: Yarn Needle, scissors.
Stitches and Abbreviations:
Ch – Chain
Dc – Double Crochet
Fpdc – Front Post Double Crochet
Fpsts – Front Post Stitches
Hdc – Half Double Crochet
Rpt – Repeat
Sc – Single Crochet
Sk – Skip
Sl St – Slip Stitch
Yo – Yarn Over
Pattern Notes:
- This pattern is written in American crochet terms.
- The crochet square motifs are all worked in rows and finished off with a single crochet edging.
- Ch 1 at the beginning of a row does not count as a stitch.
- You will make 4 squares (Two in both colour A and B) of each pattern for the blanket.
- Once 20 squares are complete they are crocheted together. A simple edging is worked around the outer edge.
- Video tutorials for each square can be found under their hiding on my YouTube channel, https://www.youtube.com/c/RichTexturesCrochet/ , under the “Crazy for Cables Crochet Along” playlist.
- As some of the cable instructions are fairly detailed, I have broken the rows down into smaller paragraphs to help with keeping pace.
- NOTE: When working a post stitch around the stitch 2 rows below, the single crochet stitch in the previous row behind the post stitch will always be skipped when working the next stitch such as the single crochet following the post stitch.
Free Crochet Pattern:
Ch 47 (Or a multiple of 6+1 sts)
Row 1: Sc in the 2nd ch from your hook and in each st across. Ch 1, turn. (46 sts)
Row 2: Sc in the 1st st and in each st across. Ch 1, turn.
Row 3: Sc in the 1st st, fpdc in each of the next 2 sts 2 rows below, sc in each of the next 3 sts, *sk the next 2 sts 2 rows below, fpdc in each of the next 2 sts 2 rows below, now working in front of the sts just made, fpdc in each of the previous skipped sts 2 rows below, sc in each of the next 2 sts; Rpt from * across until 4 sts remain, sc in the next st, fpdc in each of the next 2 sts 2 rows below, sc in the final st, ch 1, turn.
Row 4: Sc in the 1st st and in each st across. Ch 1, turn.
Row 5: Sc in the 1st st, fpdc around the posts of each of the next 2 fpdc 2 rows below, sc in each of the next 3 sts, *fpdc around the posts of each of the next 4 fpdc 2 rows below, sc in each of the next 2 sts; Rpt from * across until 4 sts remain, sc in the next st, fpdc in each of the next 2 sts 2 rows below, sc in the final st. Ch 1, turn.
Row 6: Sc in the 1st st and in each st across. Ch 1, turn.
Row 7: Sc in the 1st st, fpdc in each of the next 2 fpdc 2 rows below, sc in each of the next 3 sts, *sk the next 2 fpdc 2 rows below, fpdc in each of the next 2 fpdc 2 rows below, now working in front of the sts just made, fpdc in each of the previous skipped fpdc 2 rows below, sc in each of the next 2 sts; Rpt from * across until 4 sts remain, sc in the next st, fpdc in each of the next 2 fpdc 2 rows below, sc in the final st, ch 1, turn.
Row 8: Sc in the 1st st and in each st across. Ch 1, turn.
Rows 9-52: Repeat rows 5-8 for pattern.
Fasten off. Weave in your ends.
Edging:
Join yarn with a sl st in any corner.
Ch 1, 2 sc in the 1st st, sc in each st across the top of the square, sc in the corner, evenly work 46 sc across the 1st rough edge, sc in the corner, sc in each st across the bottom of the square, sc in the corner, evenly work 46 sc across the final rough side, join with a sl st in the 1st st.
Fasten off, weave in your ends and block your square if desired.
Repeat the above steps until you have four blanket squares completed.


hi… loving the squares but am confused… chaining 47, how is that mulitiple of 6+1? ….36, 42, 48.. there’s no 46 as multiple of 6.
Hello Rebecca, for the Rope Cable itself you will need the multiple of 6+1 and then to make the square I added stitches on either side of the rope cables. This is why my stitch count is different than if you were to just work the cables. If you are trying to change the size of your square you will use the 6 + 1 for each cable and then add the number of stitches you’d like on the sides – if that makes sense 🙂
Thank you.. I stuck to your count.. worked out just fine… on to the next square ?