
This post contains affiliate links. This means that when you purchase through one of these links we will receive a small commission at no additional cost to you. Thank you for supporting Rich Texture Crochet!
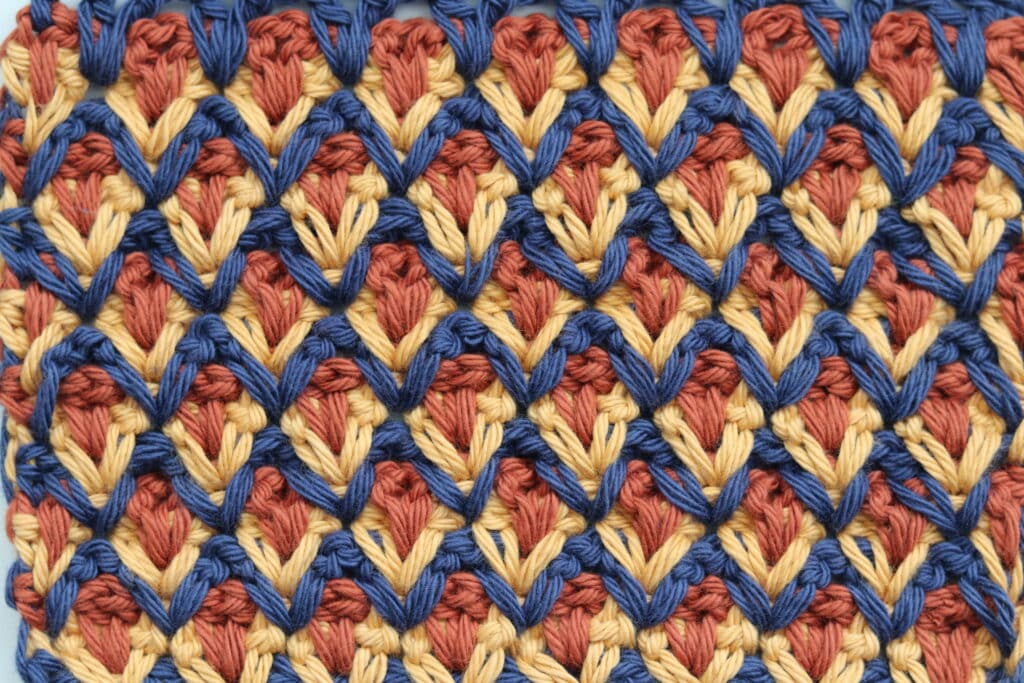
I LOVE this Nesting V Stitch! The texture is absolutely wonderful and it looks amazing when worked in multiple colours!
The stitch is a little bit more on the complicated side, especially when you are first setting up the pattern. But once you get the hang of it, it flows smoothly and the results are excellent. Be sure to check out the full video tutorial below.
The Nesting V stitch is by working spiked v stitches into the chain spaces two rows below. The result is a solid textured fabric that is similar on both sides. At the same time, the fabric is not too dense and has lots of drape.
There are so many possibilities for this stitch, from market bags, to cardigans to blankets. I can’t wait to see how you use it!
This post contains affiliate links. This means that when you make a purchase through one of these links, Rich Textures Crochet will earn a small commission at no additional cost to yourself. Thank you for supporting Rich Textures Crochet!
Materials for this Tutorial:
For this tutorial today I will be using a small amount of Pima Cotton Yarn by Lion Brand Yarn. It is a worsted weight yarn. The hook shown in the video below is a 5 mm birchwood crochet hook by Rowan Yarns. However you may use any hook and yarn combination you choose.
Thank you so much for stopping by! If you enjoy the tutorial below, be sure to also check out some of the many other crochet stitch tutorials on my site and pin this for later! You may wish to start with the Beautiful Shells Stitch | How to Crochet.
The Nesting V Crochet Stitch:
Abbreviations:
Ch – Chain
Dc – Double Crochet
Hdc – Half Double Crochet
Rpt – Repeat
Sc – Single Crochet
Sk – Skip
Sl St – Slip Stitch
Yo – Yarn Over
Notes:
This stitch is worked in rows in this tutorial. You may work the stitch in one colour or many. I will be working the design in three colours: A, B, C.
To begin, make a slip knot and then chain your desired number of chains. For this stitch pattern you will need a multiple of three stitches for your foundation chain plus one (multiples of 3+1).
For example, with colour A, ch 25.
Row One:
Dc in the 5th ch from your hook, ch 1, dc in the same st, * sk the next 2 sts, [dc, ch 1, dc] in the next st (v stitch made);rpt from * across to the final 2 sts, sk the next st, dc in the final st. Drop colour A, join colour B, ch 2, turn.
Row Two:
With colour B, *Working over the ch-1 sp of the v stitch in the row below, [Dc, ch 1, dc] into the same ch-st of the next v stitch in the foundation ch; rpt from * across, hdc in the top of the final turning ch. Drop colour B, join colour C, ch 2, turn.
Row Three:
With colour C, * Working over the ch-1 sp of the v stitch in the row below, [dc, ch 1, dc] in the same ch-1 sp as the next v-stitch 2 rows below (for example, the v stitch worked in colour A); rpt from * across, hdc in the turning ch. Drop colour C, pick up colour A, ch 2, turn.
Row Four:
With Colour A, dc in the sp between the turning ch-2 and the next dc two rows below, * working in the space between the next 2 v sts, [dc, ch 1, dc] between the 2 dc sts two rows below; rpt from * across working a dc in the final sp between the last dc and turning ch 2 rows below, hdc in the final turning ch-2. Drop colour A, pick up colour B, ch 2, turn.
Row Five:
With colour B, dc in the sp between the turning ch-2 and the next dc two rows below, * working over the ch-1 sp of the v stitch in the row below, [dc, ch 1, dc] in the sp between the next 2 v sts 2 rows below; rpt from * across working a dc in the final sp between the last dc and turning ch 2 rows below, hdc in the final turning ch-2. Drop colour B, pick up colour C, ch 2, turn.
Row Six:
With colour C, dc in the sp between the turning ch-2 and the next dc two rows below, * working over the ch-1 sp of the v stitch in the row below, [dc, ch 1, dc] in the same ch-1 sp as the next v-stitch 2 rows below; rpt from * across working a dc in the final sp between the last dc and turning ch 2 rows below, hdc in the final turning ch-2. Drop colour C, pick up colour A, ch 2, turn.
Row Seven:
With Colour A, [dc, ch 1, dc] working in the space between the next double crochet and the next v st 2 rows below, * working in the space between the next 2 v sts, [dc, ch 1, dc] between the 2 dc sts two rows below; rpt from * across, hdc in the final turning ch-2. Drop colour A, pick up colour B, ch 2, turn.
Row Eight:
With Colour B, [dc, ch 1, dc] working over top of the next ch-1 sp of the v stitch below and in the space between the next double crochet and the next v st 2 rows below, * working over top of the next ch-1 sp on the v stitch below and in the space between the next 2 v sts, [dc, ch 1, dc] between the 2 dc sts two rows below; rpt from * across, hdc in the final turning ch-2. Drop colour B, pick up colour C, ch 2, turn.
Continue to Repeat!
From here you will simply need to repeat rows three through to eight for as long as you would like. Fasten off and weave in your ends.
Video Tutorial:
The photographs and pattern contained in this document are the property of Rich Textures Crochet.
This pattern is for personal use only.
No unauthorized reproduction, in whole or in part, or distribution of this pattern or content is permitted. ALL FINISHED PRODUCTS from this pattern can be used for local sales and sold online.
Thank you so much for supporting Rich Textures Crochet! To stay in touch or see more great products, be sure to visit me on Facebook and Instagram (Rich Textures Crochet). Thanks again! Happy Crocheting!


Line one is messed up, when viewed on the web page. However, if one copies and pastes it, the line directions are clear? Not sure how this happened?
But might frustrate some who don’t know the fix.
Thanks for letting me know! I can’t see it in the editor so something must be off I. The coding (not my strong point!!) – I’ll see what I can do!
I have been using your Resting V Stitch for a pair of gloves in a soft autumn colours and it is stunning! Your video is so easy to follow and you have a great voice ?
Is the working of the nesting V stitch any different in the round as opposed to the straight row? I have a pattern for a market bar that uses this stitch that I gave up trying to do because it just didn’t work right. (not your pattern, I just found your page through Pinterest)
Hello Judi! There is a slight difference to it, you can check out this hat pattern and see how I work it in a round (the video tutorial is at the bottom) and it may help 🙂 https://richtexturescrochet.com/lakeside-beanie-crochet-pattern/