This post contains affiliate links. This means that when you purchase through one of these links we will receive a small commission at no additional cost to you. Thank you for supporting Rich Texture Crochet!
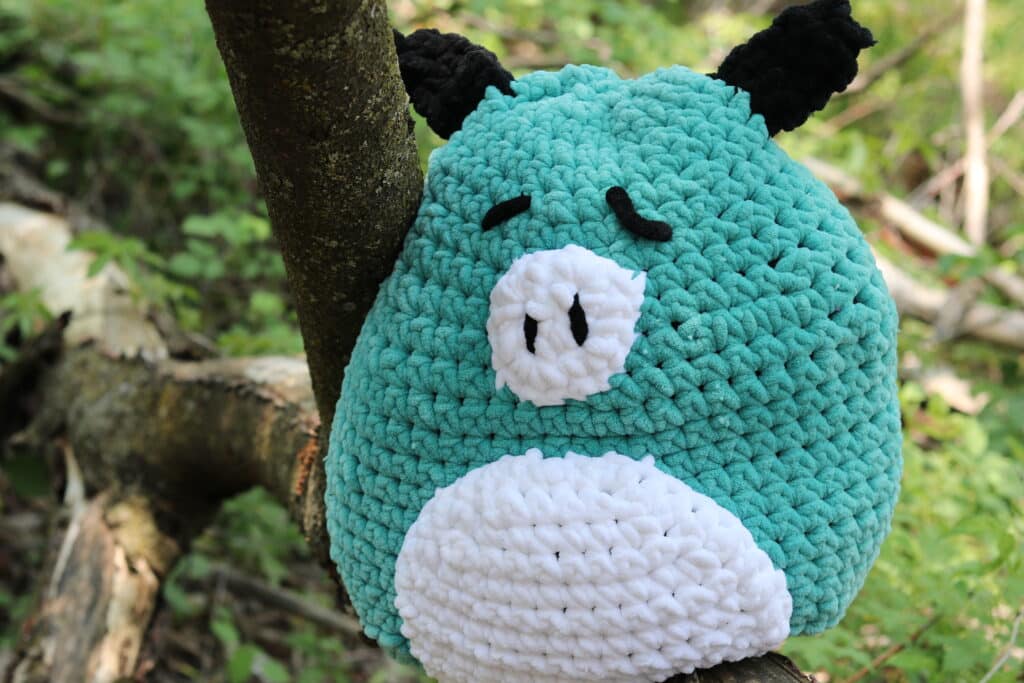
Maple the Monster is the fourth Crochetuggle in this crochet pattern collection!
And, I’m not going to lie, out of all four, Maple is my favourite! Maple the Monster is adorable, super snuggly and I love the melancholy look on his face. The other four animals in this collection are also adorable and if you haven’t already, you will definitely want to check them out including, Digger the Dog Crochet Pattern, Bridgette the Bunny Crochet Pattern, and Brady the Bear Crochet Pattern. Let me know which one is your favourite!
This post contains affiliate links. This means that when you make a purchase through one of these links, Rich Textures Crochet will earn a small commission at no additional cost to yourself. Thank you for supporting Rich Textures Crochet!

Crochetuggles are perfect for snuggling! They are about 16 inches tall and worked in a jumbo sized super soft yarn. This means that they can also be worked up quickly – even in 3-5 hours! Play with their colours and experiment with their facial expressions to create your own crochet cuddly animal buddy.
PDF Copies are also Available:
The pattern will be written out in full below and will forever remain free when viewed here on Rich Textures Crochet, and the written instruction will be followed by a video tutorial. However if you would like to add this pattern to your library or purchase an ad free PDF, you may do so from either my Etsy or Ravelry Shop linked below:
Click Here for the Maple the Monster Pattern on Etsy
Click Here for the Maple the Monster Pattern on Ravelry
Thank you for stopping by and I look forward to seeing you again soon! If you haven’t already, I invite you to explore some of my other popular crochet patterns including the Midwinter Blanket Crochet Pattern and the Orchid Shawl Crochet Pattern.
Happy Crocheting!
Sarah

Maple the Monster Crochet Pattern:
Skill Level: Easy
Gauge: 7 x 7 rounds of sc = 4 inches
Finished Size: Approximately 16 x 13 inches
Yarn: Sweet Snuggles by Loops & Threads® (109 yds/170 m; 250g/8.8 oz; 100% polyester; (4) worsted weight). You will need 2 balls Teal (Colour A), 1/2 ball White (Colour B), small amount of Black (Colour C), small amount of purple (Colour D)
Hook: Size N/15 (10 mm) hook.
Notions: Yarn Needle, 5 stitch markers, poly fill (amount will vary depending on how firm you would like the stuffing. I used approximately 10 oz/crochetuggle. What is a “Crochetuggle”? What you get when you mix crochet with hugs and snuggles!
Stitches and Abbreviations:
Ch – Chain
Rpt – Repeat
Sc – Single Crochet
Sc2tog – Single Crochet Two Stitches Together
Sk – Skip
Sl st – Slip stitch
Yo – Yarn over
Pattern Notes:
- Pattern is written in American English terms.
- Pattern is worked in rounds.
- Ch 1 at beginning of round does not count as stitch.
- Weave in ends as needed.
- Do not turn unless stated otherwise.
- Body of the crochetuggle is worked to start, body parts and accents worked following and sewn/embroidered into place.
- When working the monster’s body, the front of the single crochet stitches will be on the inside of the bear. The “right” side is the backside of the stitch.
Free Crochet Pattern:
Body:
With Colour A, Ch 11
Rnd 1: Sc in 1st (mark this st) and in each across to last, in final st sc 3 (mark 1st and last sts), working along the opposite side of the foundation ch, sc in each across to the last st, 2 sc in the final st (mark 1st st). Do not join (mark the 1st st as your work progresses), do not turn. (22 sts)
Rnd 2: 3 sc in the 1st st (mark the 1st st [and the 1st st of each rnd] and 2nd st), sc across to the next st marker, 3 sc in the next st (mark the 2nd st), sc in each st across to the next st marker, 3 sc in the next st (mark the 2nd st), sc across to the next st marker, 3 sc in the next st (mark the 2nd st), sc across to the 1st st. (30 sts)
Rnd 3: Sc in the 1st st (mark this st) and in each st across to the next st marker, 3 sc in the next st (mark the 2nd st), sc in each st across to the next st marker, 3 sc in the next st (mark the 2nd st), sc across to the next st marker, 3 sc in the next st (mark the 2nd st), sc across to the next st marker, 3 sc in the next st (mark the 2nd st), sc in each st across to the 1st st. (38 sts)
Rnd 4: Rpt rnd 3. (46 sts)
Rnd 5: Rpt rnd 3. (54 sts)
At this time you may remove the 4 corner stitch markers, the marker for the 1st st remains.
Rnds 6-17: Sc in the 1st st (mark this st) and in each st around. Do not join or turn until the end of rnd 15, join with a sl st in the 1st st. (54 sts)
Rnd 18: *Sc in each of the next 7 sts, sc2tog; Rpt from * around. Do not join, do not turn. (48 sts)
Rnd 19: Sc in each st around. Do not turn, do not join. (48 sts)
Rnd 20: *Sc in each of the next 6 sts, sc2tog; Rpt from * around. Do not join, do not turn. (42 sts)
Rnd 21: Sc in each st around. Do not turn, do not join. (42 sts)
Rnd 22: *Sc in each of the next 5 sts, sc2tog; Rpt from * around. Do not join, do not turn. (36 sts)
Rnd 23: Sc in each st around. Do not turn, do not join. (36 sts)
Rnd 24: *Sc in each of the next 4 sts, sc2tog; Rpt from * around. Do not join, do not turn. (30 sts)
Rnd 25: Sc in each st around. Do not turn, do not join. (30 sts)
DO NOT FASTEN OFF. After the following are attached, you will return to the head and finish off.
To attach, spikes and horns, belly and nose proceed as follows. Embroider eyes, nose and mouth.
Belly Patch (Make 1, worked in rows):
With colour B, ch 14.
Row 1: Sc in the 2nd ch from your hook and in each ch across. Ch 1, turn. (13 sts)
Rows 2-7: Sc in the 1st st and in each st across. Ch 1, turn. (13 sts)
Row 8: Sc2tog, sc in each of the next 9 sts, sc2tog. Ch 1, turn. (11 sts)
Row 9: Sc2tog, sc in each of the next 7 sts, sc2tog. Ch 1, turn. (9 sts)
Row 10: Sc2tog, sc in each of the next 5 sts, sc2tog. Ch 1, turn. (7 sts)
Row 11: Sc2tog, sc in each of the next 3 sts, sc2tog. Ch 1, turn. (5 sts)
Final Rnd: Working around the belly patch, sc in each st and at the end of each row around, join with a sl st in the 1st st.
Fasten off, weave in your ends. Place belly in position at the front centre bottom of the crocheuggle. Sew the patch into place using a small amount of colour B.
Nose Patch (Make 1, worked in rounds):
With colour B, ch 2.
Rnd 1: Work 6 sc into the 2nd ch from your hook. Join with a sl st in the 1st st. Ch 1, do not turn. (6 sts)
Rnd 2: 2 sc in each st around. Join with a sl st in the 1st st. Ch 1, do not turn. (12 sts)
Rnd 3: Sc in the 1st st, 2 sc in the next st, *sc in the next st, 2 sc in the next st; Rpt from * around. Join with a sl st in the 1st st. (18 sts)
Fasten off leaving a long tail that you will use to sew the patch in place.
Place nose patch where you would like the nose located and sew into place using the long tail. With a little bit of colour C, embroider the eyes, nose and mouth as desired.
Spikes (Make 3, worked in rounds):
With colour D, ch 2.
Rnd 1: Work 6 sc into the 2nd ch from your hook. Join with a sl st in the 1st st. Ch 1. (6 sts)
Rnd 2: Ch 1, work 2 sc in the 1st st, sc in each of the next 4 sts, 2 sc in the final st, join with a sl st in the 1st st. Ch 1. (8 sts)
Rnd 3:Ch 1, work 2 sc in the 1st st, sc in each of the next 6 sts, 2 sc in the final st, join with a sl st in the 1st st. Ch 1. (10 sts)
Rnd 4: Ch 1, work 2 sc in the 1st st, sc in each of the next 8 sts, 2 sc in the final st, join with a sl st in the 1st st. Ch 1. (12 sts)
Position spikes running vertically along the centre back of your monster and add a little bit of fibre fill under if desired. Using the long tail, sew the spikes into place. Fasten off, weave in your ends.
Close the Top of the Monster head:
Rnd 26: *Sc in each of the next 3 sts, sc2tog; Rpt from * around. Do not join, do not turn. (24 sts)
Rnd 27: Sc in each st around. Do not turn, do not join. (24 sts)
Rnd 28: *Sc in each of the next 2 sts, sc2tog; Rpt from * around. Do not join, do not turn. (18 sts)
Embroider eyes and nose if you have not already. Fill monster with fibre fill to the desired plushiness.
Rnd 29: *Sc in the next st, sc2tog; Rpt from * around. Do not join, do not turn. (12 sts)
Rnd 30: Sc2tog in each st around. Join with a sl st in the 1st st. (6 sts) Fasten off leaving a long tail and use this tail to sew the top of your monster closed.
Fasten off, weave in your ends.
Horns (Worked in rnds, make 2):
With colour C, ch 2.
Rnd 1: Work 5 sc into the 2nd ch from your hook. Do not join but mark the 1st st with a st marker and move as your work progresses. (5 sts)
Rnd 2: Work 2 sc in the 1st st, sc in each of the next 4 sts. Do not join, do not turn. (6 sts)
Rnd 3: Work 2 sc in the 1st st, sc in each of the next 5 sts. Do not join, do not turn. (7 sts)
Rnds 4: Work 2 sc in the 1st st, sc in each of the next 6 sts. Join with a sl st in the top of the 1st st.
Position horns on the top of the monster and add a little bit of fibre fill under if desired. Using the long tail, sew the horns into place. Fasten off, weave in your ends.
Video Tutorial:
The photographs and pattern contained in this document are the property of Rich Textures Crochet.
This pattern is for personal use only.
No unauthorized reproduction, in whole or in part, or distribution of this pattern or content is permitted. ALL FINISHED PRODUCTS from this pattern can be used for local sales and sold online.
Thank you so much for supporting Rich Textures Crochet! To stay in touch or see more great products, be sure to visit me on Facebook and Instagram (Rich Textures Crochet). Thanks again! Happy Crocheting!