
This post contains affiliate links. This means that when you purchase through one of these links we will receive a small commission at no additional cost to you. Thank you for supporting Rich Texture Crochet!
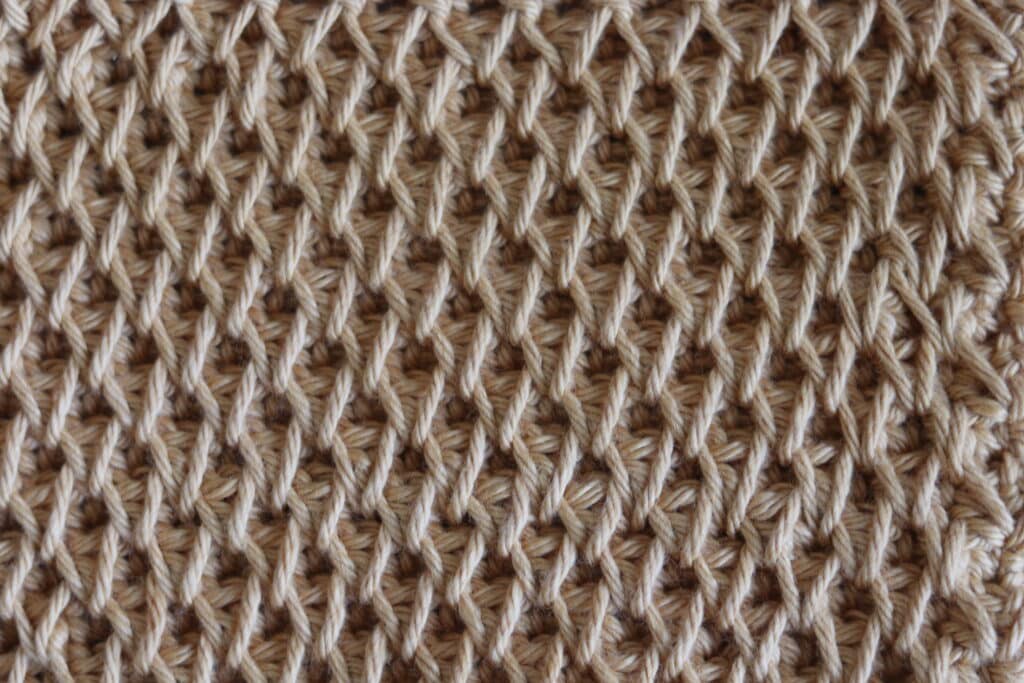
The Honeycomb Smock Stitch creates a solid fabric with a beautiful and unique texture.
This is one stitch pattern however where the side does matter. The smock stitch pattern lands all on one side. This does not mean the other side is not pretty though! The opposite side does feature a texture and look that is similar to a moss or extended moss stitch, it just does not have the honeycomb look.
The fabric is quite dense, and I recommend keeping the stitches loose or going up one size more than the recommended hook size on the yarn label to help prevent the fabric from curling.
This post contains affiliate links. This means that when you make a purchase through one of these links, Rich Textures Crochet will earn a small commission at no additional cost to yourself. Thank you for supporting Rich Textures Crochet!
Materials for this Tutorial:
For this tutorial today I will be using a small amount of Pima Cotton Yarn by Lion Brand Yarn. It is a worsted weight yarn. The hook shown in the video below is a 5 mm birchwood crochet hook by Rowan Yarns. However you may use any hook and yarn combination you choose.
Thank you so much for stopping by! If you enjoy the tutorial below, be sure to also check out some of the many other crochet stitch tutorials on my site and pin this for later! You may wish to start with the Crossed Single Crochet Stitch | How to Crochet.
The Honeycomb Smock Crochet Stitch
Abbreviations:
Ch – Chain
Dc – Double Crochet
Fpsc – Front Post Single Crochet (When you work the front post single crochet stitches you will be inserting your hook around one strand of the post of the previous long single crochet and one strand of the post of the next long single crochet)
Lsc – Long Single Crochet Stitch (A Crochet stitch worked into the space under the next stitch two rows below)
Rpt – Repeat
Sc – Single Crochet
Sk – Skip
Sl St – Slip Stitch
Yo – Yarn Over
Notes:
This stitch is worked in rows in this tutorial. You may work the stitch in one colour or many. I will be working the design in a solid colour.
To begin, make a slip knot and then chain your desired number of chains. For this stitch pattern you will need an even number of stitches for your foundation chain (multiples of 2).
For example, ch 22.
Row One:
Sc in 2nd ch from your hook and each across, ch 1, turn.
Row Two:
Sc in the 1st st and in each st across. Ch 1, turn.
Row Three:
Sc in the 1st st, *Lsc (See “Stitches and Abbreviations” above) over the next st, sc in next st*, repeat from * until the end of the row, ch 1, turn.
Row Four:
Sc in each of the next 2 sts, *fpsc over the next st working around one strand of the previous Lsc and the next Lsc (See notes about working this fpsc in the “Stitches and Abbreviations” above), sc in next st*, repeat from * until you have 1 st left, sc in that last st, ch 1, turn.
Row Five:
Lsc over the very first st, *sc in next, Lsc in next (make sure that when you insert the hook 2 rows below, it comes out inside the upside down V on the other side), repeat from * until the end of the row, ch 1, turn.
Row Six:
Sc in the 1st st, *fpsc over the next st working under the posts of the previous Lsc and next Lsc, sc in next st*, repeat from * until the end of the row, ch 1, turn.
And that’s it!
For the rest of the pattern, repeat rows 3 – 6 until you have the desired length for your project. Fasten off and weave in your ends.
Video Tutorial:
The photographs and pattern contained in this document are the property of Rich Textures Crochet.
This pattern is for personal use only.
No unauthorized reproduction, in whole or in part, or distribution of this pattern or content is permitted. ALL FINISHED PRODUCTS from this pattern can be used for local sales and sold online.
Thank you so much for supporting Rich Textures Crochet! To stay in touch or see more great products, be sure to visit me on Facebook and Instagram (Rich Textures Crochet). Thanks again! Happy Crocheting!


Dear Sarah
Thank you so much for teaching us this stitch.
At first it seems complicated but after a couple of rows it starts to make sense and it looks absolutely gorgeous.
With two different sides but reversible in it’s unique outlook, thick and wonderfully textured – just perfect for warm winter scarfs.
Looking forward to discovering the next textured & not so well known stitch.
Merry Christmas
Breda
I really love the look of this stitch. I can envision using it to make a scarf, shawl or fingerless gloves. Thank you.