
This post contains affiliate links. This means that when you purchase through one of these links we will receive a small commission at no additional cost to you. Thank you for supporting Rich Texture Crochet!
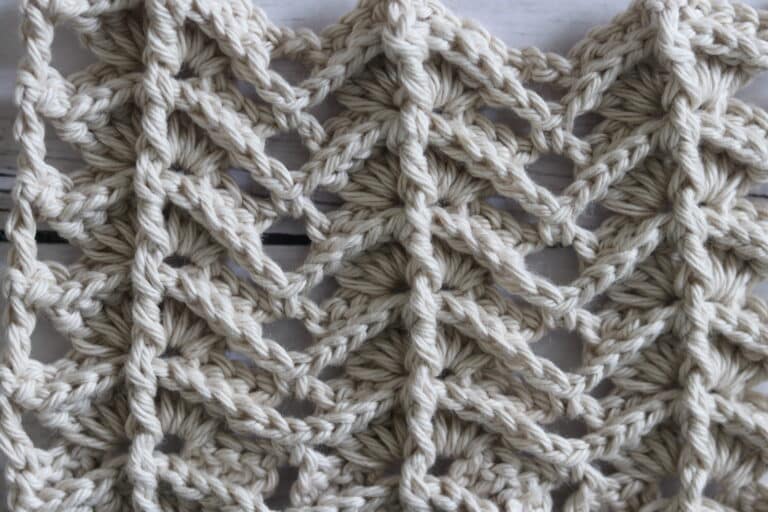
Last week we worked a fairly simple crochet afghan square. This week we will work a more complicated one with the Diagonal Cables Afghan Square.
Welcome to Week Four, option B of the Make it Your Way crochet along!
If this is your first time hearing about the Make it Your Way Crochet Along, I invite you to check out this introduction post that will provide you with all of the details here: Make it Your Way Crochet Along.
This Post contains affiliate links. This means that when you make a purchase through one of these links, Rich Textures Crochet will earn a small commission at no additional cost to yourself. Thank you for supporting Rich Textures Crochet!
To recap the previous week’s afghan square patterns, you’ll find the previous six stitch options here:
Week One, Option A: Spiked Sedge Stitch Afghan Square Crochet Pattern
Week One, Option B: Suzette Afghan Square Crochet Pattern
Week Two, Option A: Almond Afghan Square Crochet Pattern
Week Two, Option B: Extended Moss Stitch Afghan Square Crochet Pattern
Week Three, Option A: Elizabeth Afghan Square Crochet Pattern
Week Three, Option B: Straight Cables Afghan Square Crochet Pattern

The Design:
Like our previous Straight Cables Afghan Square, the Diagonal Cables Afghan square is worked in rows and all of the texture is to the front side. This design is fairly dense and as you work it you may find that the corners will curl just a little bit. Not to worry! A little bit of blocking will allow the stitches to relax a bit and then once your squares are all joined together in the end, there will be no curling at all.
The cables themselves are worked using front post double crochet stitches. The repeat in the pattern is a bit long (11 rows), but once you get the pattern started you will find that it is easy to see and follow without too much reliance on the written pattern.
The Materials:
For this crochet along I have encouraged you to use any worsted weight yarn. Each square will measure approximately 10.5-11 inches and you will make four of them in this stitch pattern to complete the blanket. For those curious, for my blanket I will be using the Vanna’s Choice yarn by Lion Brand Yarn. Along with the yarn you will need a 6 mm (J/10) crochet hook.
PDF Copies:
A PDF of these squares will be available in my Etsy and Ravelry Shops AT THE END of this crochet along. I will post them as two separate blankets, one including the squares for option A and one for Option B. So stay tuned if you are looking for that PDF
Diagonal Cables Afghan Square (Make 4):
Skill Level: Intermediate
Gauge: 13 sts x 15 rows of Pattern = 4 inches
Finished Size: 10.5 x 10.5 inches
Hook: Size J/10 (6 mm) hook.
Notions: Yarn Needle
Abbreviations:
Ch – Chain
Dc – Double Crochet
Fpdc – Front Post Double Crochet
Rpt – Repeat
Sc – Single Crochet
Sk – Skip
Sl St – Slip Stitch
Yo – Yarn Over
Pattern Notes:
- Pattern is written in American English terms.
- Pattern is worked in rows.
- Ch 1 at beginning of row does not count as stitch.
- Turn at the end of each row.
- Weave in ends as needed.
- To change the size of your square, you will need an multiple of 3 stitches for your foundation chain, plus 1.
Free Crochet Pattern:
Ch 34
Row 1: Sc in 2nd ch from your hook and in each st across. Ch 1, turn. (33 sts)
Row 2: Sc in the 1st st and in each st across. Ch 1, turn.
Row 3: Sc in each of the 1st 3 sts, *fpdc around the post of each of the next 3 sts 2 rows below, sc in each of the next 3 sts; Rpt from * across. Ch 1, turn.
Row 4: Sc in the 1st st and in each st across. Ch 1, turn.
Row 5: Sc in each of the 1st 2 sts, *fpdc around the post of each of the next 3 sts 2 rows below, sc in each of the next 3 sts; Rpt from * across to the final st, sc in the final st. Ch 1, turn.
Row 6: Sc in the 1st st and in each st across. Ch 1, turn.
Row 7: Sc in the 1st st, *fpdc around the post of each of the next 3 sts 2 rows below, sc in each of the next 3 sts; Rpt from * across to the final 2 sts, fpdc around the post of the next st 2 rows below, sc in the final st. Ch 1, turn.
Row 8: Sc in the 1st st and in each st across. Ch 1, turn.
Row 9: Sc in the 1st st, *fpdc around the post of each of the next 2 sts 2 rows below, sc in each of the next 3 sts, *fpdc around the post of each of the next 3 sts 2 rows below, sc in each of the next 3 sts; Rpt from * across to the final 3 sts, fpdc around the post of each of the next 2 sts 2 rows below, sc in the final st. Ch 1, turn.
Row 10: Sc in the 1st st and in each st across. Ch 1, turn.
Row 11: Sc in the 1st st, fpdc around the post of the next st 2 rows below, sc in each of the next 3 sts, *fpdc around the post of each of the next 3 sts 2 rows below, sc in each of the next 3 sts; Rpt from * across to the final 4 sts, fpdc around the post of each of the next 3 sts 2 rows below, sc in the final st. Ch 1, turn.
Row 12: Sc in the 1st st and in each st across. Ch 1, turn.
Row 13: Sc in each of the 1st 4 sts, fpdc around the post of each of the next 3 sts 2 rows below, sc in each of the next 3 sts, *fpdc around the post of each of the next 3 sts 2 rows below, sc in each of the next 3 sts; Rpt from * across to the final 5 sts, fpdc around the post of each of the next 3 sts 2 rows below, sc in each of the final 2 sts. Ch 1, turn.
Row 14: Sc in the 1st st and in each st across. Ch 1, turn.
Rows 15 – 38: Repeat Rows 3-14.
Edging:
Join yarn with a sl st in the top corner st, [work 34 sc evenly across, 1 in the corner] 4 times, join with a sl st in the 1st st. Fasten off and weave in your ends.
NOTE: When working your edging along the top and bottom of the square you will have 33 sts instead of 34. This means that at some point as you work across these edges, you will need to add an extra stitch to make the 34.
Video Tutorial:


I’ve made a few of these squares now, and I’ve had to repeat rows 3-14 2 extra times to get an even square. I’ve tried sizing up my hook thinking my tension is too tight, but I keep having the same problem. Instead of 38 Rows as the pattern says, I have 58!! Any tips??