
This post contains affiliate links. This means that when you purchase through one of these links we will receive a small commission at no additional cost to you. Thank you for supporting Rich Texture Crochet!
This Classic Elf Hat Crochet Pattern is sure to bring a smile to your face, and the face of everyone around you!
Welcome! Not too long after I designed the Classic Santa hat crochet pattern, an idea came to mind for a Classic Elf Hat! I decided to work this hat using a few different colours in a fair isle type stitch pattern. I absolutely love how it turned out! It has a classic, light hearted took to it and looks like something you would purchase from a boutique.
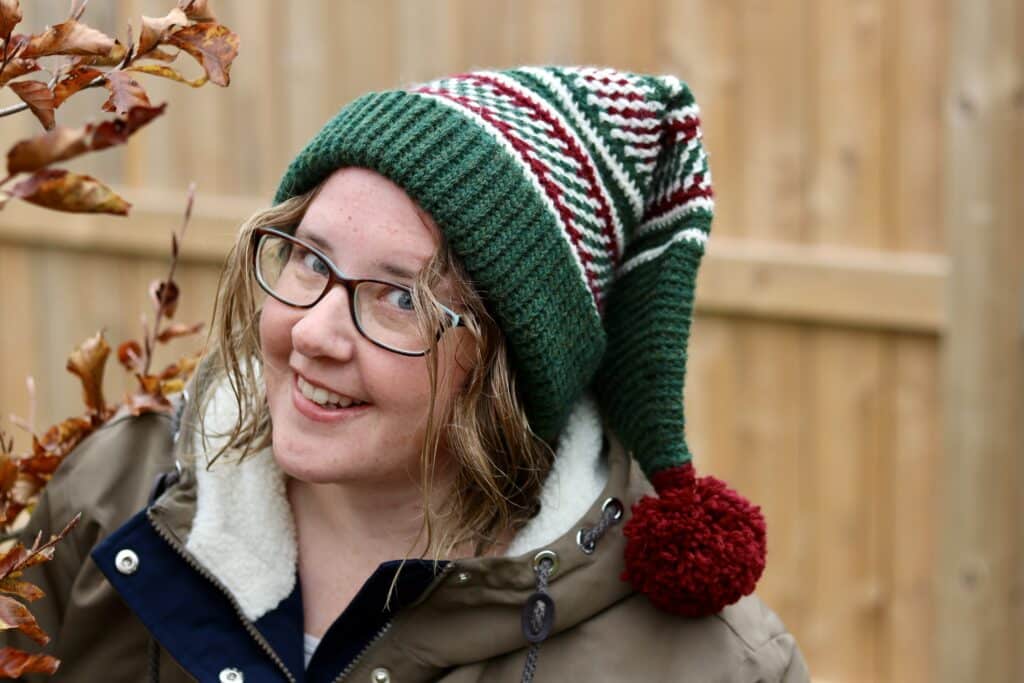
The Classic Elf Hat crochet pattern is worked from the brim up. Similar to my Classic Santa hat I have worked a foldable slip stitch brim. Again, it can be customized. You can change the width so that it is not foldable and if you prefer not to work in slip stitches, you can work single crochet or half double crochet stitches instead.

The Materials:
As mentioned, I have worked the Classic Elf Hat using three different colours of yarn in the Wool Ease by Lion Brand. Wool Ease is a wool and acrylic blend yarn. It is worsted/medium weight and comes in a variety of colours. For this hat I really wanted to go for the deeper, more rich, classic Christmas colours, and I found the wool ease shades perfect. The specific amounts of yarn needed will be included blow and along with the yarn you will need a 5 mm crochet hook. You will see me using the Clover Soft Touch crochet hook in the video tutorial below.

PDF Copies are also Available:
The Classic Elf Hat crochet pattern will be written out in full below followed by the video tutorial. Both are free to follow here on Rich Textures Crochet and on my YouTube channel. However, if you would like to add this pattern to your library and purchase an ad free PDF, you may do so from my Etsy and Ravelry Shops linked below:
CLICK HERE FOR THE CLASSIC ELF HAT ON ETSY
CLICK HERE FOR THE CLASSIC ELF HAT ON RAVELRY
Thank you so much for stopping by! Please don’t forget to sign up for my free email newsletter and I look forward to seeing you again soon!
Happy Crocheting!
Sarah

Classic Elf Hat Crochet Pattern:
Skill Level: Intermediate
Gauge: 17 sts x 16 rows of sc in blo = 4 inches
Finished Size: 9 x 17 inches laid flat, excluding pompom
Hook: Size H/8 (5 mm) Hook. Adjust hook size if necessary to obtain correct gauge
OPTIONAL: Pompom to attach to the top
Stitches and Abbreviations:
Blo – Back Loop Only
Ch – Chain
Dc – Double Crochet
Rpt – Repeat
Sc – Single Crochet
Sc2tog – Single Crochet Two Stitches Together
Sk – Skip
Sl St – Slip Stitch
Yo – Yarn Over
Pattern Notes:
- The Classic Elf Hat Crochet Pattern is written in American English terms.
- Brim of hat is worked in rows, body of hat is worked in rounds.
- Ch 1 at beginning of round does not count as stitch.
- Ch 3 at beginning of round counts as a double crochet.
- Do not turn at the end of each round, unless stated otherwise.
- Weave in ends as needed.
- OPTIONAL: Brim of hat may be worked using either single crochet stitches or half double crochet stitches instead of the slip stitches.
- Brim of the hat may be worked as a fold up which is shown in the photos or you may choose to work a shorter brim and simply start with less chains for the foundation chain.
- To change the size of your hat, you can use any multiple of stitches making note that when it comes to the decrease rounds for the hat top, you may have an uneven stitch count.
Free Classic Elf Hat Crochet Pattern:
Brim (Worked in rows):
With colour A, ch 25.
Row 1: Sl st in the 2nd ch from hook and in each ch across. Ch 1, turn. (24 sl sts)
Row 2: Working in the blo, sl st in each st across. Ch 1, turn. (24 sl sts)
Continue to repeat row 2 until work from the beginning measures approximately 16-17 inches.
Do not fasten off, but fold brim of hat so that two shorter ends meet. Now working through both thicknesses, sl st across working through the blo on each side. Do not fasten off, continue working with the wrong side facing you.
Now working around the edge of the brim, continue working in rounds as follows:
Hat Body (Worked in rounds):
Rnd 1: Ch 1, evenly work 80 sc all the way around. Switch to colour B, join with a sl st in the first st, do not turn. (80 sts)
Rnd 2: With colour B, ch 1, working in the blo of each st, sc in the same st as joining and in each st all the way around; Switch to colour C, join with a sl st in the 1st st.
Rnd 3: With colour C, ch 1, working in the blo of each st, sc in the same st as joining and in each st all the way around; Join with a sl st in the 1st st.
Rnd 4: Ch 1, working in the blo of each st, with colour C sc in the same st as joining, with colour B sc in the next st, *with colour C sc in the next st, with colour B sc in the next st; Rpt from * around, join with a sl st in the 1st st. Drop colour C, join colour A.
Rnd 5: Ch 1, working in the blo of each st, with colour B sc in the same st as joining, with colour A sc in the next st, *with colour B sc in the next st, with colour A sc in the next st; Rpt from * around, join with a sl st in the 1st st.
Rnd 6: Ch 1, working in the blo of each st, with colour A sc in the same st as joining, with colour B sc in the next st, *with colour A sc in the next st, with colour B sc in the next st; Rpt from * around, join with a sl st in the 1st st.
Rnd 7: Ch 1, working in the blo of each st, with colour B sc in the same st as joining, with colour A sc in the next st, *with colour B sc in the next st, with colour A sc in the next st; Rpt from * around, join with a sl st in the 1st st. Drop colour A, pick up colour C.
Rnd 8: Ch 1, working in the blo of each st, with colour C sc in the same st as joining, with colour B sc in the next st, *with colour C sc in the next st, with colour B sc in the next st; Rpt from * around, join with a sl st in the 1st st. Drop colour B.
Rnd 9: With colour C, ch 1, working in the blo of each st, sc in the same st as joining and in each st all the way around; Switch to colour B, join with a sl st in the 1st st.
Rnd 10: With colour B, ch 1, working in the blo of each st, sc in the same st as joining and in each st all the way around; Switch to colour A, join with a sl st in the 1st st.
Rnds 11-12: With colour A, ch 1, working in the blo of each st, sc in the same st as joining and in each st all the way around; Switch to colour B, join with a sl st in the 1st st.
Rnd 13: With colour B, ch 1, working in the blo of each st, sc in the same st as joining and in each st all the way around; Switch to colour A, join with a sl st in the 1st st.
Rnd 14: With colour A, ch 1, working in the blo of each st, sc in the same st as joining and in each st all the way around; Pick up colour B, join with a sl st in the 1st st.
Rnd 15: Ch 1, working in the blo of each st, with colour A sc in the same st as joining, with colour B sc in the next st, *with colour A sc in the next st, with colour B sc in the next st; Rpt from * around, join with a sl st in the 1st st. Drop colour A, pick up colour C.
Rnd 16: Ch 1, working in the blo of each st, with colour B sc in the same st as joining, with colour C sc in the next st, *with colour B sc in the next st, with colour C sc in the next st; Rpt from * around, join with a sl st in the 1st st.
Rnd 17: Ch 1, working in the blo of each st, with colour C sc in the same st as joining, with colour B sc in the next st, *with colour C sc in the next st, with colour B sc in the next st; Rpt from * around, join with a sl st in the 1st st.
Rnd 18: Ch 1, working in the blo of each st, with colour B sc in the same st as joining, with colour C sc in the next st, *with colour B sc in the next st, with colour C sc in the next st; Rpt from * around, join with a sl st in the 1st st. Drop colour C, pick up colour A.
Rnd 19: Ch 1, working in the blo of each st, with colour A sc in the same st as joining, with colour B sc in the next st, *with colour A sc in the next st, with colour B sc in the next st; Rpt from * around, join with a sl st in the 1st st. Drop colour B.
Rnd 20: With colour A, ch 1, working in the blo of each st, sc in the same st as joining and in each st all the way around; Switch to colour B, join with a sl st in the 1st st.
Rnd 21: With colour B, ch 1, working in the blo of each st, sc in the same st as joining and in each st all the way around; Switch to colour A, join with a sl st in the 1st st.
Rnds 22-23: With colour A, ch 1, working in the blo of each st, sc in the same st as joining and in each st all the way around; Switch to colour B, join with a sl st in the 1st st.
Rnd 24: With colour B, ch 1, working in the blo of each st, sc in the same st as joining and in each st all the way around; Switch to colour C, join with a sl st in the 1st st.
Rnd 25: With colour C, ch 1, working in the blo of each st, sc in each of the 1st 7 sts, sc2tog, *sc in each of the next 7 sts, sc2tog; Rpt from * around until 8 sts remain, sc in each of the final 8 sts, join with a sl st in the 1st st, pick up colour B. (72 sts)
Rnd 26: Ch 1, working in the blo of each st, with colour C sc in the same st as joining, with colour B sc in the next st, *with colour C sc in the next st, with colour B sc in the next st; Rpt from * around, join with a sl st in the 1st st. Drop colour C, pick up colour A.
Rnd 27: Ch 1, working in the blo of each st, with colour B sc in the same st as joining, with colour A sc in the next st, *with colour B sc in the next st, with colour A sc in the next st; Rpt from * around, join with a sl st in the 1st st.
Rnd 28: Ch 1, working in the blo of each st, with colour A sc in the same st as joining, with colour B sc in the next st, *with colour A sc in the next st, with colour B sc in the next st; Rpt from * around, join with a sl st in the 1st st.
Rnd 29: Ch 1, working in the blo of each st, with colour B sc in the same st as joining, with colour A sc in the next st, *with colour B sc in the next st, with colour A sc in the next st; Rpt from * around, join with a sl st in the 1st st. Drop colour A, pick up colour C.
Rnd 30: Ch 1, working in the blo of each st, with colour C sc in the same st as joining, with colour B sc in the next st, *with colour C sc in the next st, with colour B sc in the next st; Rpt from * around, join with a sl st in the 1st st. Drop colour B.
Rnd 31: With colour C, ch 1, working in the blo of each st, sc in each of the 1st 6 sts, sc2tog, *sc in each of the next 6 sts, sc2tog; Rpt from * around, join with a sl st in the 1st st, pick up colour B, fasten off colour C. (63 sts)
Rnd 32: With colour B, ch 1, working in the blo of each st, sc in the same st as joining and in each st all the way around; Switch to colour A, join with a sl st in the 1st st.
Rnds 33-34: With colour A, ch 1, working in the blo of each st, sc in the same st as joining and in each st all the way around; Switch to colour B, join with a sl st in the 1st st.
Rnd 35: With colour B, ch 1, working in the blo of each st, sc in each of the 1st 5 sts, sc2tog, *sc in each of the next 5 sts, sc2tog; Rpt from * around, join with a sl st in the 1st st, pick up colour A, fasten off colour B. (54 sts)
Rnds 36-38: With colour A, ch 1, working in the blo of each st, sc in the same st as joining and in each st all the way around, join with a sl st in the 1st st.
Rnd 39: Ch 1, working in the blo of each st, sc in each of the 1st 4 sts, sc2tog, *sc in each of the next 4 sts, sc2tog; Rpt from * around, join with a sl st in the 1st st. (45 sts)
Rnds 40-42: Ch 1, working in the blo of each st, sc in the same st as joining and in each st all the way around, join with a sl st in the 1st st.
Rnd 43: Ch 1, working in the blo of each st, sc in each of the 1st 3 sts, sc2tog, *sc in each of the next 3 sts, sc2tog; Rpt from * around, join with a sl st in the 1st st. (36 sts)
Rnds 44-46: Ch 1, working in the blo of each st, sc in the same st as joining and in each st all the way around, join with a sl st in the 1st st.
Rnd 47: Ch 1, working in the blo of each st, sc in each of the 1st 2 sts, sc2tog, *sc in each of the next 2 sts, sc2tog; Rpt from * around, join with a sl st in the 1st st. (27 sts)
Rnds 48-50: Ch 1, working in the blo of each st, sc in the same st as joining and in each st all the way around, Switch to colour C, join with a sl st in the 1st st.
Rnd 51: With colour C, ch 1, working in the blo of each st, sc in the same st as joining, sc2tog, *sc in the next st, sc2tog; Rpt from * all the way around. Join with a sl st in the 1st st. (18 sts)
Rnds 52-54: Ch 1, working in the blo of each st, sc in the same st as joining and in each st all the way around. Join with a sl st in the 1st st.
Rnd 55: With colour C, ch 1, working in the blo of each st, sc2tog in each st all the way around. Join with a sl st in the 1st st. (9 sts)
Rnds 56-58: Ch 1, working in the blo of each st, sc in the same st as joining and in each st all the way around. Join with a sl st in the 1st st.
Fasten off leaving a long tail. Using the long tail, sew the top of the hat closed. Fasten off and weave in your ends. Attach Pompom to the top if desired.
Classic Elf Hat Crochet Pattern Video Tutorial:
The photographs and pattern contained in this document are the property of Rich Textures Crochet.
This pattern is for personal use only.
No unauthorized reproduction, in whole or in part, or distribution of this pattern or content is permitted. ALL FINISHED PRODUCTS from this pattern can be used for local sales and sold online.
Thank you so much for supporting Rich Textures Crochet! To stay in touch or see more great products, be sure to visit me on Facebook and Instagram (Rich Textures Crochet). Thanks again! Happy Crocheting!


I think you outdid yourself on this elf hat. I’m not one to work patterns in my crochet, but this is certainly tempting me. Keep up the great work!