This post contains affiliate links. This means that when you purchase through one of these links we will receive a small commission at no additional cost to you. Thank you for supporting Rich Texture Crochet!
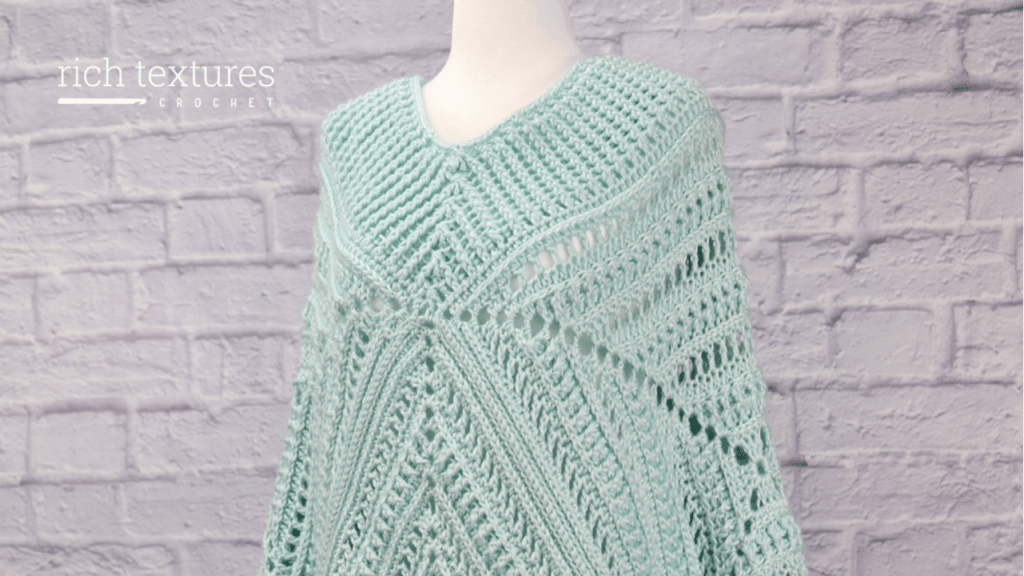
This Wandering Poncho will keep you cozy no matter where your travels will take you!
And the construction is so simple! The pattern itself is comprised of four individual squares that are crocheted together at the end. An edging is then added to the neckline and edges to complete the look.
Best of all, there is so much gorgeous texture! The texture in the design is created using a variety of stitches including half double crochet stitches worked in the third loop and front and back post double crochet stitches. I have graded the pattern at an intermediate skill level, but don’t hesitate to consult the free video tutorial following the written pattern below if you get stuck!
This post contains affiliate links. This means that when you make a purchase through one of these links, Rich Textures Crochet will earn a small commission at no additional cost to yourself. Thank you for supporting Rich Textures Crochet!

The Materials:
For this design I have used Wander Yarn by Furls Crochet (and a huge thank you to them for providing me with yarn support for this design). Wander Yarn is a super soft 100% acrylic yarn that comes in a variety of colours. It is so soft and silky! For the size small/medium you will need approximately 10 balls. For the size Large/X-Large you will need approximately 12 balls.
You will also need a 5.5 mm crochet hook. In the video tutorial below you will see me using a Wooden Streamline Hook in Ebony also by Furls Crochet.
PDF Copies:
The pattern will be written out in full below followed by a free video tutorial. But there are also PDF Copies available! You will find them through my Etsy and Ravelry Shops linked below:
Click Here for the Wandering Poncho on Etsy
Click Here for the Wandering Poncho on Ravelry
Thank you so much for stopping by! Curious to see other designs that have been worked in Wander by Furls Crochet? You may also wish to check out the Daydreamer Throw Crochet Pattern.
Thank you for stopping by and happy crocheting!
Sarah

The Wandering Crochet Poncho:
Skill Level: Intermediate
Gauge: 16 sts x 12 rows of fpdc/bpdc = 4 inches
Finished Size: Ladies Small/Medium: To fit Bust 32-38 inches, 24 inch length; Ladies Large/X-Large: To fit Bust 40-46 Inches, 34 inch length.
Hook: Size I/9 (5.5 mm) Hook. Adjust hook size if necessary to obtain correct gauge
Stitches and Abbreviations:
Blo – Back Loop Only
Bpdc – Back Post Double Crochet
Bpdc3tog – Back Post Double Crochet Three Stitches Together
Ch – Chain
Dc – Double Crochet
Dc3tog – Double Crochet Three Stitches Together
Fpdc – Front Post Double Crochet
Fpdc3tog – Front Post Double Crochet Three Stitches Together
Hdc – Half Double Crochet
Rpt – Repeat
Sc – Single Crochet
Sk – Skip
Sl St – Slip Stitch
Yo – Yarn Over
Pattern Notes:
- Pattern is written in American English terms.
- Pattern is worked in rounds.
- Do not turn at the end of the round but continue working in the same direction.
- Ch 1 at beginning of round does not count as stitch.
- Ch 3 at beginning of round counts as a double Crochet.
- You will need to make 4 squares that are then crocheted together. An edging is added at the end.
- This pattern includes 2 sizes: Ladies Small/Medium and Large/X-Large.
- Weave in ends as needed.
Free Crochet Pattern:
Ch 4, join with a sl st in the first st to make a ring.
Rnd 1: Ch 3 (counts as a dc), 2 dc in ring, [ch 2, 3 dc in ring] 3 times, ch 2, join with a sl st in the first st. Do not turn. (12 dc)
Rnd 2: Ch 1. Ch 1, *hdc in each st across to the ch-2 sp, (2 hdc, ch 2, 2 hdc) in the next ch-2 sp; rpt from * around, (2 hdc, ch 2, 2 hdc) in the next ch-2 sp, join with a sl st in the first st. (28 sts)
Rnd 3: Ch 1, *working in the 3rd loop of each st around, hdc in each st across to the ch-2 sp, *(2 hdc, ch 2, 2 hdc) in the next ch-2 sp; rpt from * around, hdc in each remaining st, join with a sl st in the 1st st. (44 sts)
Rnd 4: Ch 1, *[fpdc around the next st, bpdc around the next st, fpdc around the next st] across to the ch-2 sp, (2 dc, ch 2, 2 dc) in the next ch-2 sp; rpt from * around, [fpdc around the next st, bpdc around the next st] to the 1st st, join with a sl st in the 1st st. (60 sts)
Rnd 5: Ch 1, Ch 1, *[fphdc around the next st, bphdc around the next st, fphdc around the next st] across to the ch-2 sp, (2 hdc, ch 2, 2 hdc) in the next ch-2 sp; rpt from * around, [fphdc around the next st, bphdc around the next st] to the 1st st, join with a sl st in the 1st st. (76 sts)
Rnd 6: Ch 1, *working in the 3rd loop of each st around, hdc in each st across to the ch-2 sp, *(2 hdc, ch 2, 2 hdc) in the next ch-2 sp; rpt from * around, hdc in each remaining st, join with a sl st in the 1st st. (92 sts)
Rnd 7: Ch 4 (counts as a dc, ch 1), sk the next st, *[dc in the next st, ch 1, sk the next st] across to the ch-2 sp, (2 dc, ch 2, 2 dc) in the next ch-2 sp; rpt from * around, [dc in the next st, ch 1, sk the next st] in the remaining sts, join with a sl st in the 3rd st of the starting ch-4. (108 sts and ch-1 sps)
Rnd 8: Ch 1, *hdc in each st and ch-1 sp across to the ch-2 sp, (2 hdc, ch 2, 2 hdc) in the next ch-2 sp; rpt from * around, hdc in each st and ch-1 sp across to the 1st st, join with a sl st in the 1st st. (124 sts)
For SIZE SMALL/MEDIUM (each square blocked to size 16.5 x 16.5 inches): Repeat rnds 3-8 once, repeat rnd 3 once more.
For SIZE LARGE/X-LARGE (each square blocked to size 20 x 20 inches): Repeat rnds 3-8 twice, repeat rnd 3 once more.
Fasten off, weave in ends. Repeat until you have a total of four squares. Block squares to the size above.
To Join your squares:
Place squares in an L-shape with the right side facing. Once in the L-shape join them together by joining your yarn with a sl st. Working in the blo of both thickness, sl st across. Fasten off, weave in your ends and repeat until all squares are joined.
Next fold the long part of the L-shape dawn so that the wrong sides are facing and that the top of the L meets with the bottom edge of the L. Now fold the short end of the L (One block) in half so that it meets the other long end that has been folded down in back. Join yarn and sl st across where the two ends meet. Your Poncho should now have a V shape.
Neckline:
At the neck opening, join yarn with a sl st.
Rnd 1: Ch 3, dc in each st across to the st immediately before the front corner, dc3tog inserting your hook in the next st, the ch-2 sp and the next st, dc across to the st immediately before the back corner, dc3tog inserting your hook in the next st, the ch-2 sp and the next st, dc across and join with a sl st in the 1st st. Ch 1. Do not turn.
Rnds 2-7: Fpdc around the same st as joining, *[bpdc around the next st, fpdc around the next st] across to the st immediately before the dc3tog, bpdc3tog (or fpdc3tog depending on pattern) over the next 3 sts; rpt around and join with a sl st in the 1st st. Ch 1. Do not turn.
For Size Small/Medium go to NEXT ROUND.
For Size Large/X-Large, work 4 more rnds repeating rnd 2, then go to NEXT ROUND.
Next Round: Sc in each st around. Join with a sl st in the first st. Fasten off, weave in your ends.
Edging (all sizes):
At the bottom edge, join yarn with a sl st.
Rnd 1: Ch 3, *dc in each st across to the ch-2 sp, 3 dc in the ch-2 sp; Rpt from * around, join with a sl st in the 1st st. Ch 1. Do not turn.
Rnds 2-4: Fpdc around the same st as joining, *[bpdc around the next st, fpdc around the next st] across to 2nd st in set of 3 dc in the ch-2 sp, [fpdc, bpdc, fpdc] around the post of the middle st (note: begin this set with which ever stitch follows next in the pattern. i.e. it may be bpdc, fpdc, bpdc); rpt from * around, join with a sl st in the 1st st. Ch 1. Do not turn.
Video Tutorial:
The photographs and pattern contained in this document are the property of Rich Textures Crochet.
This pattern is for personal use only.
No unauthorized reproduction, in whole or in part, or distribution of this pattern or content is permitted. ALL FINISHED PRODUCTS from this pattern can be used for local sales and sold online.
Thank you so much for supporting Rich Textures Crochet! To stay in touch or see more great products, be sure to visit me on Facebook and Instagram (Rich Textures Crochet). Thanks again! Happy Crocheting!