
This post contains affiliate links. This means that when you purchase through one of these links we will receive a small commission at no additional cost to you. Thank you for supporting Rich Texture Crochet!
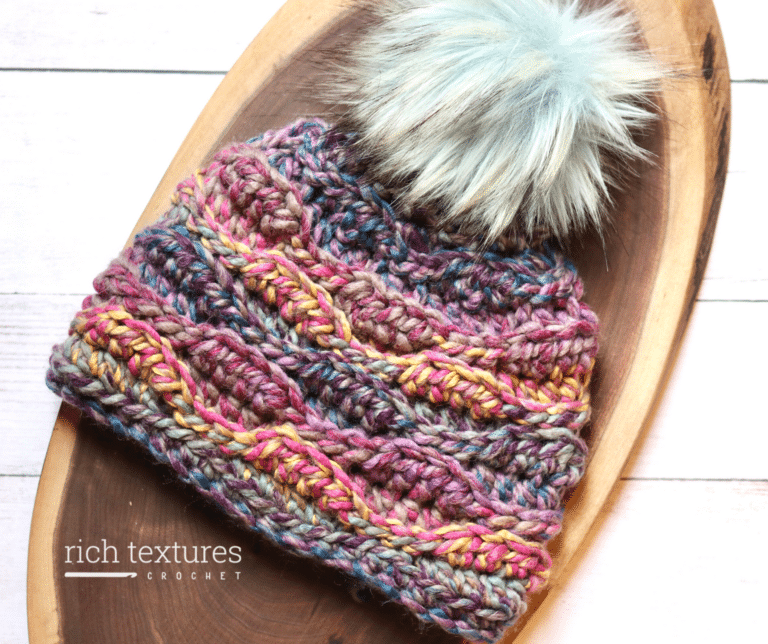
The McKenzie Hat crochet pattern features the beautiful texture of the herringbone single crochet stitch.
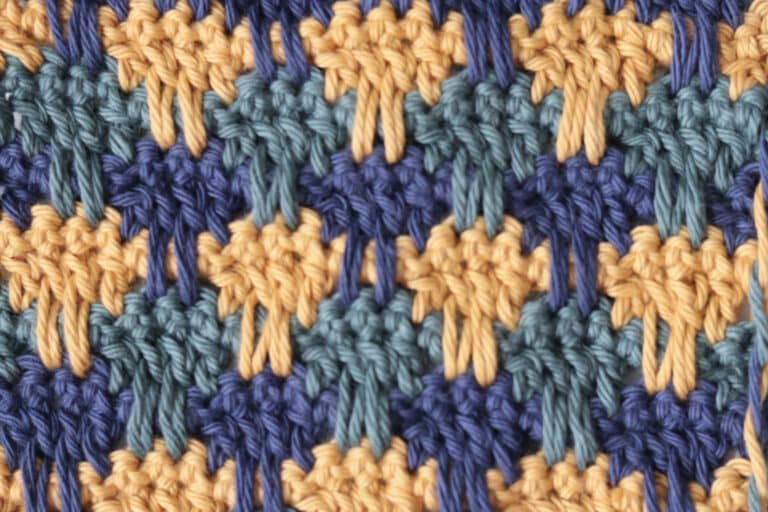
The Herringbone Single Crochet stitch is a beautiful stitch that looks as though it has been braided. The stitch is not too hard to work, although it is worked slightly differently depending on if you are working it from the right side of your fabric or the wrong side. Once you get the hang of working the stitch, you will love the results!
The McKenzie Hat is worked mostly in rounds and from the brim up to the crown. Here I have sized it to fit an adult head with a 20-22 inch circumference head, but I will also provide some stitch multiples down below in case you wish to change the size.

The McKenzie Hat crochet pattern is worked using a worsted or medium weight yarn. In my sample one I have used a 100% acrylic yarn called Heartland by Lion Brand. I have worked it in a beautiful burnt orange colour which is perfect for fall! The yarn itself is very soft and comes in some gorgeous hues. Along with the yarn you will need a 5 mm crochet hook and, if you desire, a pompom for the top. It can be worn without a pompom, it’s up to you. For the hat you will not use the full ball of yarn and you will have enough left over should you wish to make a yarn pompom.

PDF Downloads are available:
The crochet pattern for the McKenzie Hat will be written out in full below followed by a free video tutorial. It will always be free to follow here on Rich Textures Crochet. If, however, you would like to add this pattern to your library and purchase an ad free PDF, you may do so from my Etsy and Ravelry Shops linked below:
CLICK HERE FOR THE MCKENZIE HAT ON ETSY
CLICK HERE FOR THE MCKENZIE HAT ON RAVELRY
Thank you so much for stopping by! Please do not forget to sign up for my email newsletter! If you enjoyed this pattern you may also wish to check out the Little Rock Slouch Hat or the Winter Beanie Crochet Pattern.
Enjoy!
Sarah

McKenzie Hat Crochet Pattern:
Skill Level: Intermediate
Gauge: 16 sts x 16 rows of hdc in 3rd loop = 4 inches
Finished Size: 9 x 9.5 inches laid flat; 20-22 inch circumference
Yarn: Heartland by Lion Brand Yarn (100% acrylic; 5 oz/142g; 251 yds/230 m); 1 ball Yosemite
Hook: Size H/8 (5 mm) Hook. Adjust hook size if necessary to obtain correct gauge.
Notions: Yarn Needle.
Stitches and Abbreviations:
3rd Lp – Third Loop (Looking at the back of the hdc st, this is the loop that runs parallel to and just under the back loop of the stitch.)
Blo – Back Loop Only
Ch – Chain
Dc – Double Crochet
Hdc – Half Double Crochet
Hdc2tog – Half Double Crochet Two Stitches Together
Hbsc – Herringbone Single Crochet (On the front side of your work, insert your hook through the vertical bar of the post of the stitch just worked, insert hook into the next stitch and draw up a loop. Yarn over, draw through all three loops on the hook.)
Hbsc2tog – Herringbone Single Crochet Two Stitches Together (On the front side of your work, insert your hook through the vertical bar of the post of the stitch just worked, insert hook into the next stitch and draw up a loop, insert your hook into the next st, yarn over and draw up a loop. Yarn over, draw through all four loops on the hook.)
Reverse Hbsc – Reverse Herringbone Stitch (Bring your yarn to the front of your work, at the back of your work, insert your hook through the vertical bar of the post of the stitch just worked working from right to left. Insert you hook into the next stitch working from back to front, yarn over and draw up a loop. Yarn over and draw through all three loops on your hook.)
Reverse Hbsc2tog – Reverse Herringbone Two Stitches Together (Bring your yarn to the front of your work, at the back of your work, insert your hook through the vertical bar of the post of the stitch just worked working from right to left. Insert you hook into the next stitch working from back to front, yarn over and draw up a loop, insert your hook into the next st, yarn over and draw up a loop. Yarn over, draw through all four loops on the hook.)
Reverse Sc – Reverse Single Crochet (bring your yarn in front of your work, insert your hook under both loops, working from back to front of the next stitch, yarn over and draw up a loop, yarn over and draw through both loops on your hook.)
Rpt – Repeat
Sc – Single Crochet
Sk – Skip
Sl St – Slip Stitch
Yo – Yarn Over
Pattern Notes:
- Pattern is written in American English terms.
- Pattern is worked in rounds.
- Turn your work as instructed
- Ch 1 at the beginning of the round does not count as a stitch.
- Weave in ends as needed.
- To change the size of your hat you will need a multiple of 2 stitches for the first round of your hat body.
Free Crochet Pattern:
Ch 10
Row 1: Sl st in the 2nd ch from hook and in each ch across. Ch 1, turn. (9 sl sts)
Row 2: Working in the blo, sl st in each st across. Ch 1, turn. (9 sl sts)
Continue to repeat row 2 until work from the beginning measures approximately 16-17 inches.
Do not fasten off, but fold brim of hat so that two shorter ends meet. Now working through both thicknesses, sl st across working through the blo on each side. Do not fasten off. Turn work right side out (so that the right side is facing you and the slip stitch seam is on the inside).
Now working around the edge of the brim, continue working in rounds as follows:
Hat Body (Worked in rounds):
Rnd 1: Ch 1, evenly work 72 hdc all the way around, join with a sl st in the first st, Do not turn. (72 sts)
Rnd 2: Ch 1, working in the 3rd loop all the way around, hdc in the same st as joining and in each st. Join with a sl st in the 1st st. Do not turn.
Rnd 3: Ch 1, working in the 3rd loop all the way around, sc in the same st as joining, hbsc in the next st and in each st around. Join with a sl st in the 1st st. Ch 1, Turn.
Rnd 4: Reverse sc (see “stitches and abbreviations”) in the first st, reverse hbsc in each st around, join with a sl st in the first st. Ch 1, turn.
Rnd 5: Sc in the same st as joining, hbsc in each st around. Ch 1, turn.
Rnd 6: Reverse Sc in the same st as joining, reverse hbsc in each st around, join with a sl st in the first st. Ch 1, turn.
Rnd 7: Sc in the first st, hbsc in each st around, join with a sl st in the first st. Ch 1, turn.
Rnd 8: Reverse sc in the first st, hbsc in each st around, join with a sl st in the first st. Ch 1, turn.
Rnd 9: Ch 1, hdc in the same st as joining and in each st around. Join with a sl st in the 1st st. Do not turn.
Rnds 11-18: Repeat rnds 2-9 once more.
Rnd 19: Ch 1, working in the 3rd loop all the way around, hdc in the same st as joining and in each st. Join with a sl st in the 1st st. Do not turn.
Rnd 20: Ch 1, sc in the same st as joining, hbsc in each of the next 5 sts, hbsc2tog, *hbsc in each of the next 6 sts, hbsc2tog; Rpt from * around, join with a sl st in the 1st st. Ch 1, turn. (63 sts)
Rnd 21: Reverse sc in the same st as joining, reverse hbsc in each of the next 4 sts, reverse hbsc2tog, * reverse hbsc in each of the next 5 sts, reverse hbsc2tog; Rpt from * around, join with a sl st in the 1st st. Ch 1, turn. (54 sts)
Rnd 22: Ch 1, sc in the same st as joining, hbsc in each of the next 3 sts, hbsc2tog, *hbsc in each of the next 4 sts, hbsc2tog; Rpt from * around, join with a sl st in the 1st st. Ch 1, turn. (45 sts)
Rnd 23: Reverse sc in the same st as joining, reverse hbsc in each of the next 2 sts, reverse hbsc2tog, * reverse hbsc in each of the next 3 sts, reverse hbsc2tog; Rpt from * around, join with a sl st in the 1st st. Ch 1, turn. (36 sts)
Rnd 24: Hdc in the same st as joining and in the next st, hdc2tog, *hdc in each of the next 2 sts, hdc2tog; Rpt from * around, join with a sl st in the 1st st. (27 sts)
Rnd 25: Ch 1, working in the 3rd loop all the way around, hdc in the same st as joining, hdc2tog, *hdc in the next st, hdc2tog; Rpt from * around, join with a sl st in the 1st st. (18 sts)
Rnd 26: Ch 1, working in the 3rd loop all the way around, hdc2tog in the same st as joining and in each st around. Join with a sl st in the 1st st. (9 sts)
Fasten off leaving a long tail. Use the long tail to sew the top of your beanie closed. Weave in your ends.


Hi Sarah,
I have a question and a doubt concerning the McKenzie Hat. In the video you work the HBSC in the third loop ( and you say the same in the written explanation of the pattern. Then we have to repeat rounds three and four, but in the video you don’t work round three hbsc in the third loop. Neither in the written pattern you say to do it. So, which one is correct? Round three always in the third loop or not? To me it seems more logic not to work it in that loop, which means not even the first real round three. Am I right?
Thank you for the lovely patterns and videos you give us.
Bye
Susanna from Italy
There is no round 10 in the pattern? it jumps straight from 9 to 11 both in the written instruction and the video. It gave me a real scare when i was counting my rounds, i thought i missed a row. Not a big deal tho. The hat is coming out very nicely so far, thank you for the pattern.