This post contains affiliate links. This means that when you purchase through one of these links we will receive a small commission at no additional cost to you. Thank you for supporting Rich Texture Crochet!
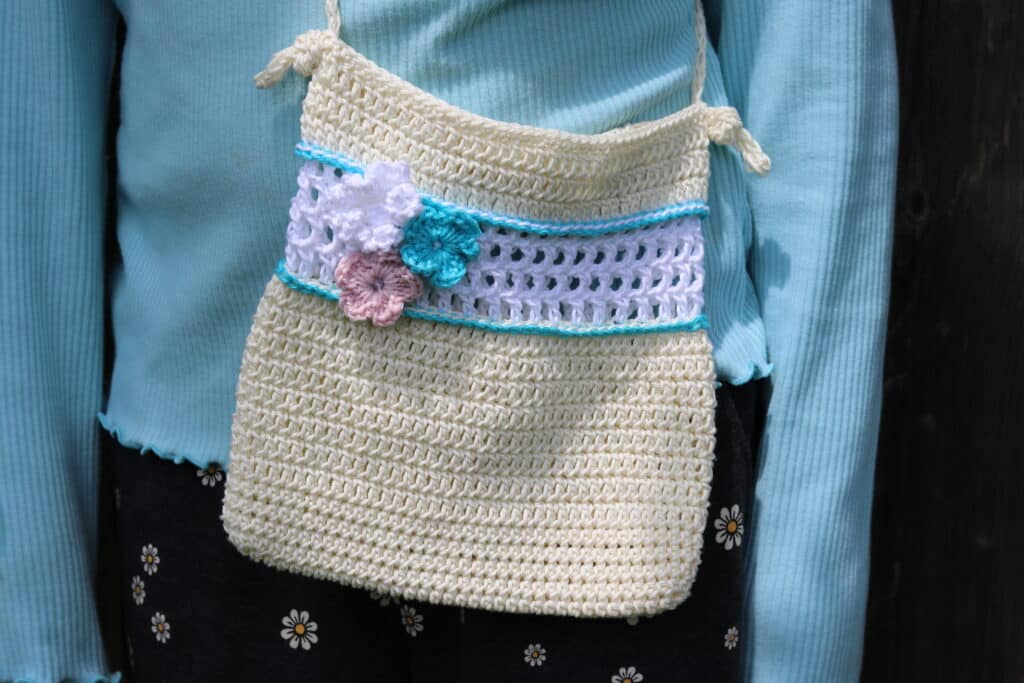
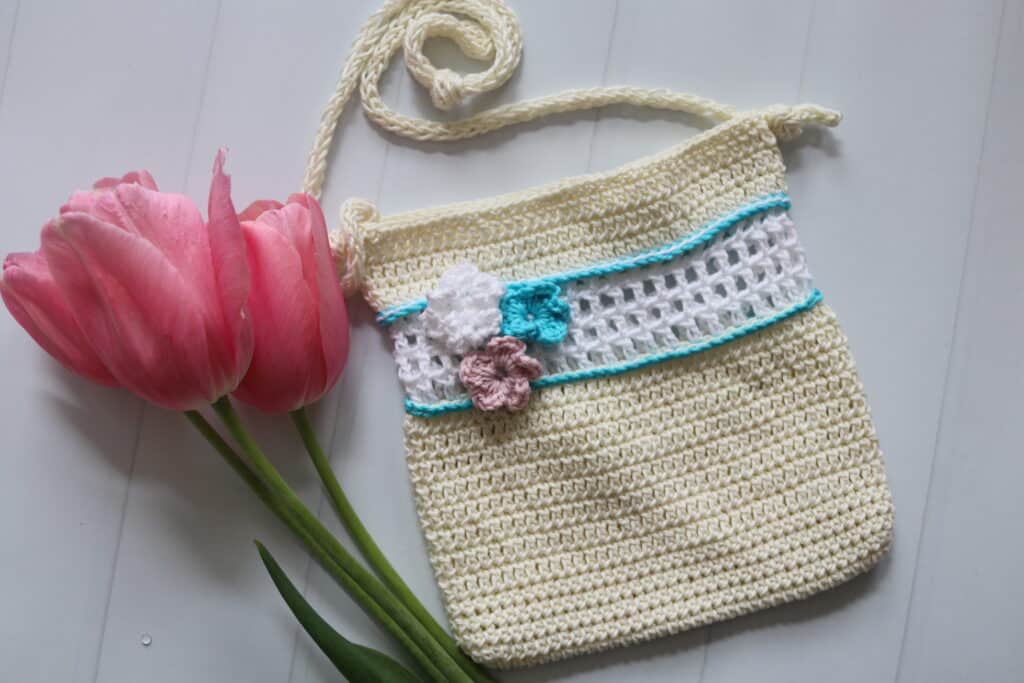
This little Flower Girl Purse is perfect for little treasures. This easy crochet pattern is easily customized!
My daughter loves to pack a small purse when we go on an outing. This little bag is perfect for her coloured pencils, diary and a small plush animal. The bag may be customized according to colour or by the number and type of flowers you adorn it with. By adjusting the length of your I-cord handle, you can make it a shoulder bag, hand bag or somewhere in between!
This post contains affiliate links. This means that when you make a purchase through one of these links, Rich Textures Crochet will earn a small commission at no additional cost to yourself. Thank you for supporting Rich Textures Crochet!
The Design:
This Flower Girl Crochet Purse is easy to work. The bag itself is worked in rounds and all as one piece. After the bag is complete you will work some individual flowers that are sewn on after (all the patterns are included below!). The I-cord is also crocheted and can be worked to the desired length. I simply tied mine on with a couple of decorative knots.

The Materials:
I have worked my purse in a 100% cotton yarn called Glace by Rowan Yarns. They generously sent me an assortment of their yarn to try (thank you!) and this was the first to fly onto my hook. Its a smooth cotton that is great for accessories such as this bag!
Along with the cotton I used a 3.5 mm crochet hook. In the video tutorial below you will see me working with a birchwood handled crochet hook also by Rowan Yarns.
PDF Copies:
This pattern will be written out in full followed by a full video tutorial below. If you would like to add this pattern to your library, or purchase an ad free PDF, you may do so from either my Etsy or Ravelry Shop linked below:
Click Here for the Flower Girl Purse on Etsy
Click Here for the Flower Girl Purse on Ravelry
Thank you so much for stopping by and if you LOVE this pattern, you may also LOVE the Traveller Market Bag Crochet Pattern which is another great bag crochet pattern on this site!
Happy Crocheting!
Sarah
The Flower Girl Purse Crochet Pattern:
Skill Level: Easy
Gauge: 22 dc x 11 rows = 4 inches
Finished Size: Approximately 7 x 7 inches
Yarn: Cotton Glace by Rowan® (126 yds/115 m; 50g; 100% cotton; (2 weight). You will need small amounts of 3 colours (Bleached/Colour B; Aqua/Colour C; Shell/Colour D), and 1 ball Ecru (Colour A)
Hook: Size E/4 (3.5 mm) hook.
Notions: Yarn Needle
Stitches and Abbreviations:
Blo – Back Loop Only
Ch – Chain
Dc – Double Crochet
Hdc – Half Double Crochet
Rpt – Repeat
Sc – Single Crochet
Sk – Skip
Sl st – Slip stitch
Yo – Yarn over
Pattern Notes:
- Pattern is written in American English terms.
- Pattern is worked in rounds.
- Flowers are optional and crochet separately before being sewn on.
- Ch 1 at beginning of row does not count as stitch.
- Ch 3 counts as a double crochet stitch.
- Weave in ends as needed.
- Do not turn unless stated otherwise.
Free Crochet Pattern:
Bag:
With Colour A, ch 35.
Rnd 1: Hdc in the 2nd ch from your hook and in each ch across to the final st, work 3 hdc in the final st, working across the opposite side you your foundation chain, hdc in each st across to the final st, 2 hdc in the final st. Join with a sl st. Do not turn. (70 sts)
Rnds 2-4: Ch 1, hdc in each st around. Join with a sl st in the 1st st.
Rnds 5-12: Ch 3 (counts as a dc), dc in the next st and in each st around. Join with a sl st in the 1st st. In the final st of rnd 12 switch to colour B.
Rnd 13: With colour B and working in the blo all the way around, ch 4, sk the next st, *dc in the next st, ch 1, sk the next st; Rpt from * around. Join with a sl st in the 3rd ch of the starting ch-4.
Rnds 14-16: Working under both loops, ch 4, sk the next ch-1 sp, *dc in the next st, ch 1, sk the next ch-1 sp; Rpt from * around. Join with a sl st in the 3rd ch of the starting ch-4. At the end of rnd 16 switch to colour A in the final st.
Rnd 17: With colour A and working in the blo all the way around, ch 3 (counts as a dc), *dc in the next ch st, dc in the next dc; rpt from * around, join with a sl st in the 1st st.
Rnds 18-19: Ch 3 (counts as a dc), dc in the next st and in each st around. Join with a sl st in the 1st st.
Rnd 20: Ch 1, sc in the 1st st and in each st around. Join with a sl st in the 1st st.
Fasten off, weave in your ends.
Add a touch of colour and texture:
With colour C, join with a sl st in any st under the front loop only of round 12, sl st in each st all the way around. Join in the 1st st and fasten off. Repeat working in the front loop only of round 16. (NOTE: I found it looked cleanest when I joined at the edges of the bag. I used my yarn needle to join the stitches instead of the traditional sl st.)
Flower #1 (Make 2):
I made one flower in each colour C and D
Ch 4, join with a sl st in the 1st ch to make a ring.
Rnd 1: (Ch 2, 3 dc in ring, ch 2, sl st into ring) 5 times.
Fasten off leaving a long tail. Use the long tail to sew flower onto bag.
Flower #2 (Make 1):
Ch 4, join with a sl st in the 1st ch to make a ring.
Rnd 1: Ch 1, 12 sc in ring. Join in the front loop only of the 1st st.
Rnd 2: Working in the front loop only, ch 1, (sc, ch 3) twice in each sc around. Join with a sl st in the 1st st.
Fasten off leaving a long tail. Use the long tail to sew flower onto bag.
Make An i-cord:
My cord was approximately 45 inches long for a longer strap (sized for an 8-10 year old) – adjust as needed.
With colour A, ch 3. Insert hook into 2nd ch from hook, yo and draw up a loop, insert hook into next ch, yo and draw up a loop (3 loops on hook). * Drop 2 loops from hook (be sure to hold these loops in order that they do not slip away!), yo and draw through the remaining loop on your hook. Insert hook into first dropped loop, yo and draw through (2 loops on hook). Insert hook into second dropped loop, yo and draw through (3 loops on hook).
Repeat the above from * until your cord has reached the desired length. Cut yarn and pull through the 3 loops on you hook to fasten off.
Attach i-cord at each side of the bag. I thread it through and then tied it in a large decorative knot at each side.
Weave in any remaining ends!
Video Tutorial:
The photographs and pattern contained in this document are the property of Rich Textures Crochet.
This pattern is for personal use only.
No unauthorized reproduction, in whole or in part, or distribution of this pattern or content is permitted. ALL FINISHED PRODUCTS from this pattern can be used for local sales and sold online.
Thank you so much for supporting Rich Textures Crochet! To stay in touch or see more great products, be sure to visit me on Facebook and Instagram (Rich Textures Crochet). Thanks again! Happy Crocheting!