This post contains affiliate links. This means that when you purchase through one of these links we will receive a small commission at no additional cost to you. Thank you for supporting Rich Texture Crochet!
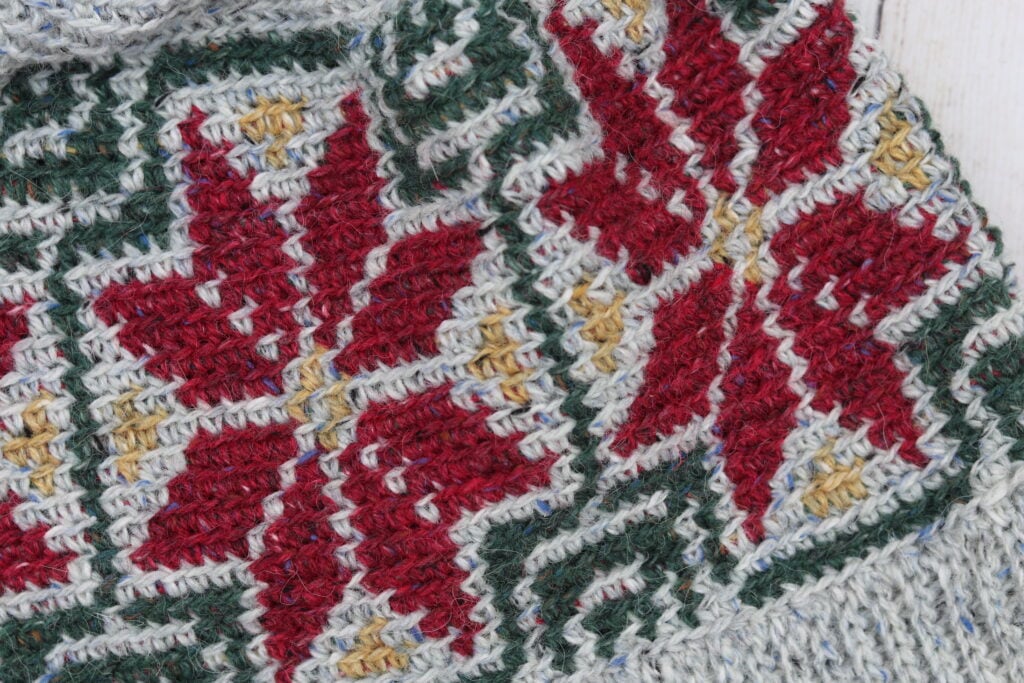
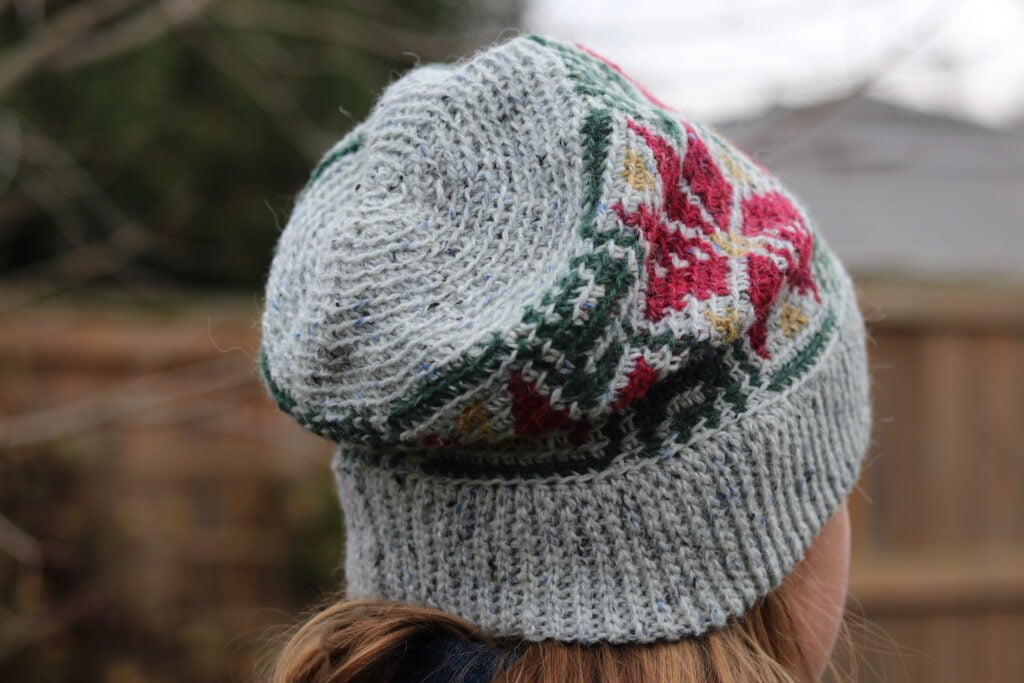
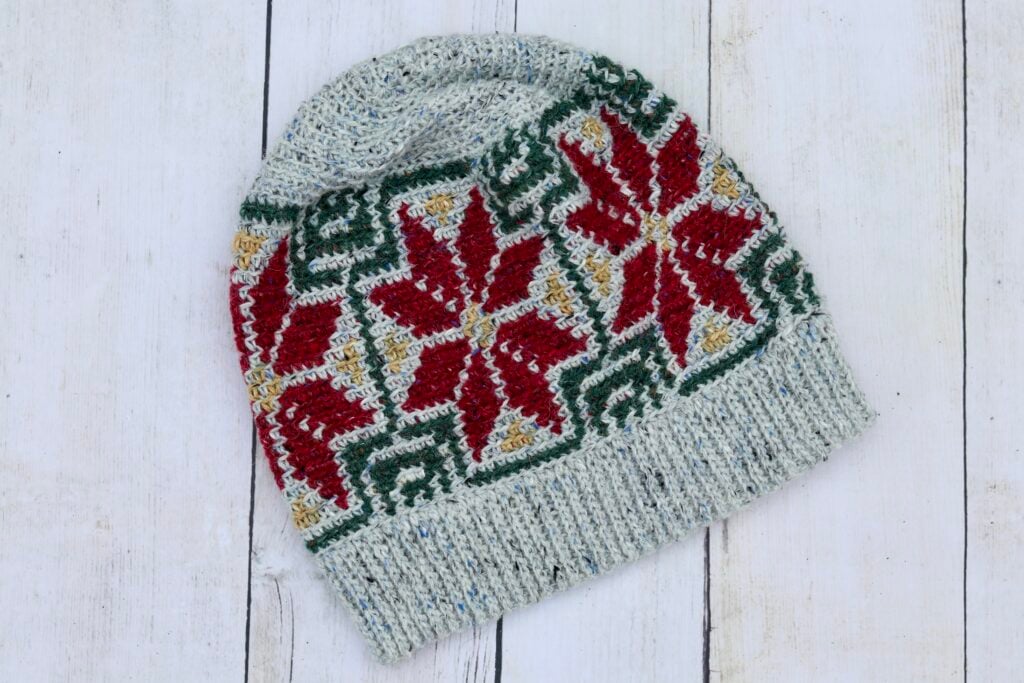
Learn how to crochet stunning colour work with this easy to work Poinsettia Beanie Crochet Pattern!
Over the past several months, I have become obsessed with working with colour in my crochet hats and, in this case, cowls!
The Poinsettia Beanie crochet pattern today is part of a holiday set of which the matching cowl will be available by the end of the week.
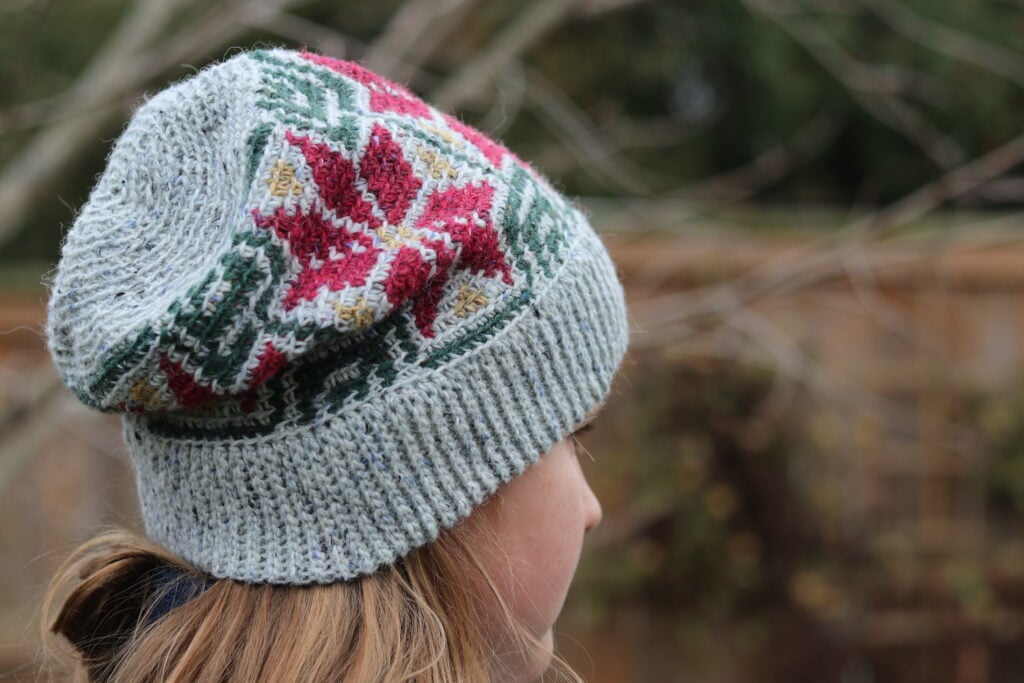
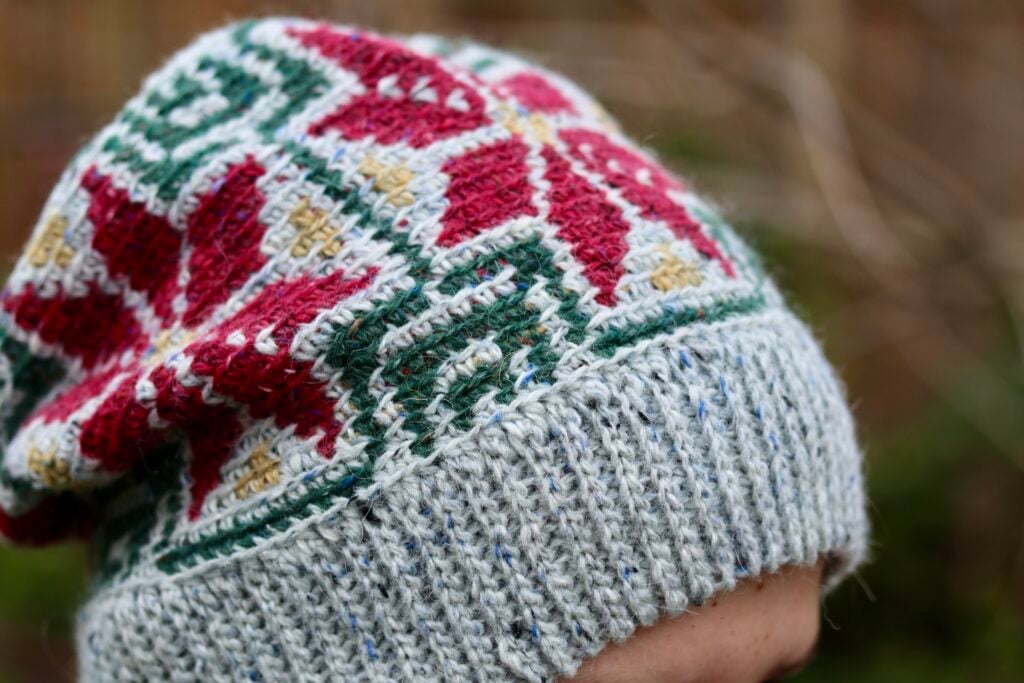
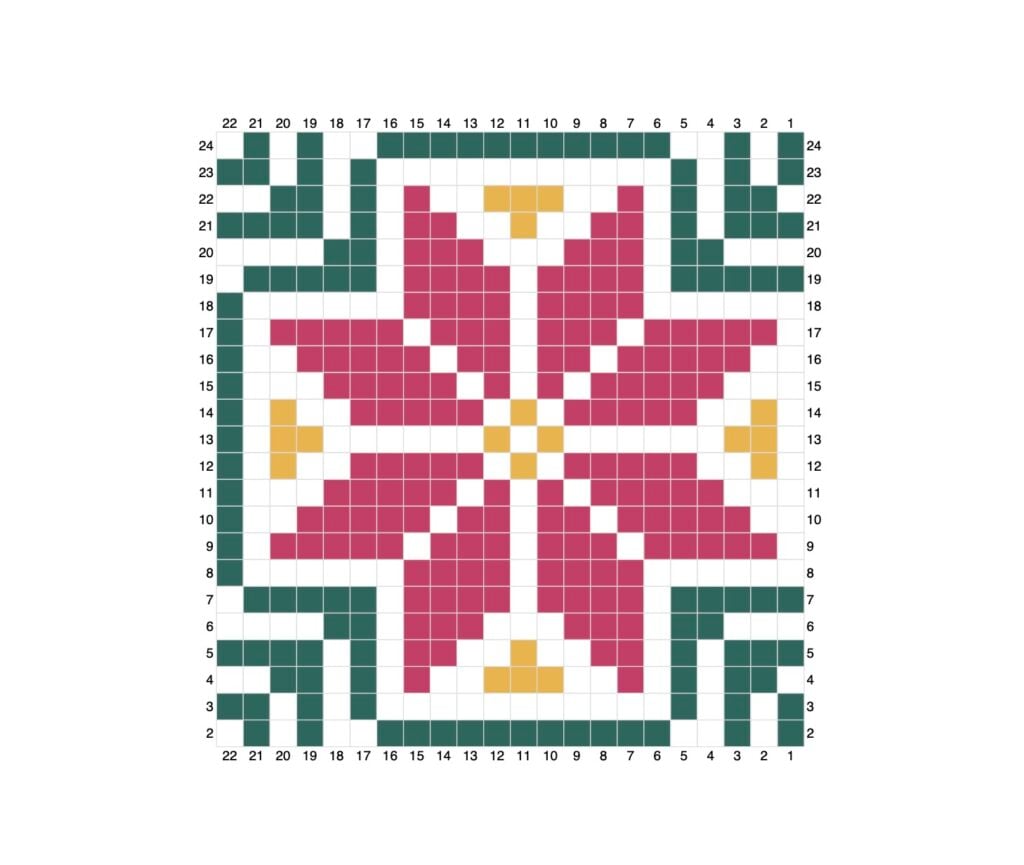
Working a complex colour work design can feel daunting at first. Changing colours can feel and be a bit awkward, but with a little repetition it will become second nature. Down below you’ll find some helpful information about how I prefer to change colours. The colour changes in the pattern are represented in a colour chart below.
The Poinsettia Beanie crochet pattern is worked from the bottom with a slip stitch brim to the top. The majority of the hat is worked in single crochet stitches in the back loop only. The size provided below is for an adult head with a 20-22 inch circumference. Under the pattern notes you will find some tips on adjusting the size.
Materials Needed to Crochet this Beanie:
For this hat you are going to need a light DK weight yarn in four different colours. In the photos, video tutorial and written pattern below I am working with the Felted Tweed Yarn by Rowan. It is a wool blended yarn with a beautiful array of colour options! It creates a gorgeous, premium, light weight hat!
Along with the yarn you will need a 3.5 mm crochet hook. In the video tutorial below I will be working with a birchwood hook, also by Rowan.
PDF Copies are available:
This crochet pattern will be written out in full below followed by a free video tutorial. The pattern is free to follow on my site and will always be free! If, however, you would like a printable copy, you may purchase one from my Etsy and Ravelry Shops linked below:
CLICK HERE TO PURCHASE THE POINSETTIA CROCHET PATTERN ON ETSY
CLICK HERE TO PURCHASE THE POINSETTIA CROCHET PATTERN ON RAVELRY
Thank you so much for stopping by! Please don’t forget to sign up for my email newsletter so that you never miss a new free crochet pattern. If you’d like to try another crochet beanie, you may wish to try the Stepping Stone Hat crochet pattern. It also features some colour work worked in stripes with a worsted weight yarn.
Happy Crocheting!
Sarah
Did you know? I now have four crochet pattern books available on Amazon in paperback and ebook format! You can check them all out on my storefront here: Sarah Thompson Author Profile
Poinsettia Beanie Crochet Pattern:
Skill Level: Intermediate
Gauge: 23 sts x 16 rows of sc blo = 4 inches
Finished Size: Approximately 10 x 10 inches laid flat; 20-22 inch circumference to fit an adult head, excluding pompom
Yarn: Felted Tweed by Rowan® (191 yds/175 m; 50g; 50% wool, 25% Alpaca, 25% Viscose; (Light DK weight). You will need 4 colours: 1 Ball Alabaster/197 (Colour A), 0.5 ball Pine/158 (Colour B), 0.5 ball Rage/150 (Colour C), and approximately 30 yards Mineral/181 (Colour D)
Hook: Size E/4 (3.5 mm) hook.
Notions: Yarn Needle
Stitches and Abbreviations:
Blo – Back Loop Only
Ch – Chain
Dc – Double Crochet
Rpt – Repeat
Sc – Single Crochet
Sc2tog – Single Crochet Two Stitches Together
Sk – Skip
Sl st – Slip stitch
Yo – Yarn over
Pattern Notes:
- Pattern is written in American English terms.
- Pattern is worked in rounds from the brim (worked in rows) to the top.
- Ch 1 at beginning of round does not count as stitch.
- Weave in ends as needed.
- Do not turn unless stated otherwise.
- Due to the colour work in this pattern to change the size, I recommend first trying a larger hook size to make the hat larger or a smaller hook size to make it smaller. Alternatively, you may wish to add extra stitches in between the flowers. The flower motif is a total of 22 sts.
- The instructions for the colour work in the hat will be provided in chart form.
- In the chart below each single box equals 1 single crochet stitch.
- Single crochet stitches are always worked in the back loop only all the way around.
- The chart will always be read in the same direction (i.e. always right to left, or if left handed, left to right).
- At the end of each round you will return to the start of the chart and work the next row in the chart.
- Chart begins at round 2 of the hat body in the written instructions.
Free Crochet Pattern:
Brim (Worked in rows):
With colour A, ch 13.
Row 1: Sl st in the 2nd ch from hook and in each ch across. Ch 1, turn. (12 sl sts)
Row 2: Working in the blo, sl st in each st across. Ch 1, turn. (12 sl sts)
Continue to repeat row 2 until work from the beginning measures approximately 16-17 inches.
Do not fasten off, but fold brim of hat so that two shorter ends meet. Now working through both thicknesses, sl st across working through the blo on each side. Do not fasten off, turn work so that the right side is facing you.
Now working around the edge of the brim, continue working in rounds as follows:
Hat Body (Worked in rounds):
Rnd 1: Ch 1, evenly work 110 hdc all the way around the rough edge of your hat brim. Join with a sl st in the 1st st. Do not turn. (110 sts)
Rnds 2-23: Work the following colour chart beginning at the bottom of the chart on row 2. Always work in the same direction. Each single box equals 1 sc st. Sc sts are to be worked in the blo for the entire pattern. The Poinsettia chart will repeat itself 5 times in the hat body round. At the end of each round, join with a sl st in the top of the 1st st. Ch 1, do not turn.
TIPS FOR CHANGING COLOURS:
- I like to change colours in the top of the previous stitch to the new colour. For example, if working in colour A, when I come to the final stitch before the colour B change, with colour A, insert your hook into the final colour A stitch, yarn over and draw up a loop. Drop colour A, place colour B on the hook and pull through to complete the single crochet. Now work the next stitch in the new colour.
- Instead of fastening off each colour when it is not in use, simply carry the non-working colour in behind your work and stitch over top hiding it within the stitch. When using this method, be careful to not pull the yarn in back too tight, as it can cause the fabric to bunch.
- On my YouTube channel linked below, you will find a full video tutorial for this pattern where I demonstrate my changing colour technique and tips for following the colour chart.
At the end of rnd 24, continue as follows:
Rnd 25: Ch 1, working in the blo all the way around, sc in each of the 1st 6 sts, sc2tog, *sc in each of the next 6 sts, sc2tog; Rpt from * around, sc in each of the final 6 sts. Join with a sl st in the top of the 1st st. Do not turn. (97 sts)
Rnd 26: Ch 1, working in the blo all the way around, sc in the 1st st and in each st around. Join with a sl st in the 1st st. (97 sts)
Rnd 27: Ch 1, working in the blo all the way around, sc in each of the 1st 5 sts, sc2tog, *sc in each of the next 5 sts, sc2tog; Rpt from * around, sc in each of the final 6 sts. Join with a sl st in the 1st st. Do not turn. (84 sts)
Rnd 28: Ch 1, working in the blo all the way around, sc in the 1st st and in each st around. Join with a sl st in the 1st st. (84 sts)
Rnd 29: Ch 1, working in the blo all the way around, sc in each of the 1st 4 sts, sc2tog, *sc in each of the next 4 sts, sc2tog; Rpt from * around. Join with a sl st in the 1st st. Do not turn. (70 sts)
Rnd 30: Ch 1, working in the blo all the way around, sc in the 1st st and in each st around. Join with a sl st in the 1st st. (70 sts)
Rnd 31: Ch 1, working in the blo all the way around, sc in each of the 1st 3 sts, sc2tog, *sc in each of the next 3 sts, sc2tog; Rpt from * around. Join with a sl st in the 1st st. Do not turn. (56 sts)
Rnd 32: Ch 1, working in the blo all the way around, sc in the 1st st and in each st around. Join with a sl st in the 1st st. (56 sts)
Rnd 33: Ch 1, working in the blo all the way around, sc in each of the 1st 2 sts, sc2tog, *sc in each of the next 2 sts, sc2tog; Rpt from * around. Join with a sl st in the 1st st. Do not turn. (42 sts)
Rnd 34: Ch 1, working in the blo all the way around, sc in the 1st st and in each st around. Join with a sl st in the 1st st. (42 sts)
Rnd 35: Ch 1, working in the blo all the way around, sc in the 1st st, sc2tog, *sc in the next st, sc2tog; Rpt from * around. Join with a sl st in the 1st st. Do not turn. (28 sts)
Rnd 36: Ch 1, working in the blo all the way around, sc in the 1st st and in each st around. Join with a sl st in the 1st st. (28 sts)
Rnd 37: Ch 1, working in the blo all the way around, sc2tog around. Join with a sl st in the 1st st. (14 sts)
Rnd 38: Ch 1, working in the blo all the way around, sc in the 1st st and in each st around. Join with a sl st in the 1st st. (14 sts)
Fasten off leaving a long tail. Use the long tail to sew the top of your hat closed. Weave in your ends.
Video Tutorial:
The photographs and pattern contained in this document are the property of Rich Textures Crochet.
This pattern is for personal use only.
No unauthorized reproduction, in whole or in part, or distribution of this pattern or content is permitted. ALL FINISHED PRODUCTS from this pattern can be used for local sales and sold online.
Thank you for supporting Rich Textures Crochet! To stay in touch, be sure to visit me on Facebook and Instagram. Thanks again! Happy Crocheting!