This post contains affiliate links. This means that when you purchase through one of these links we will receive a small commission at no additional cost to you. Thank you for supporting Rich Texture Crochet!
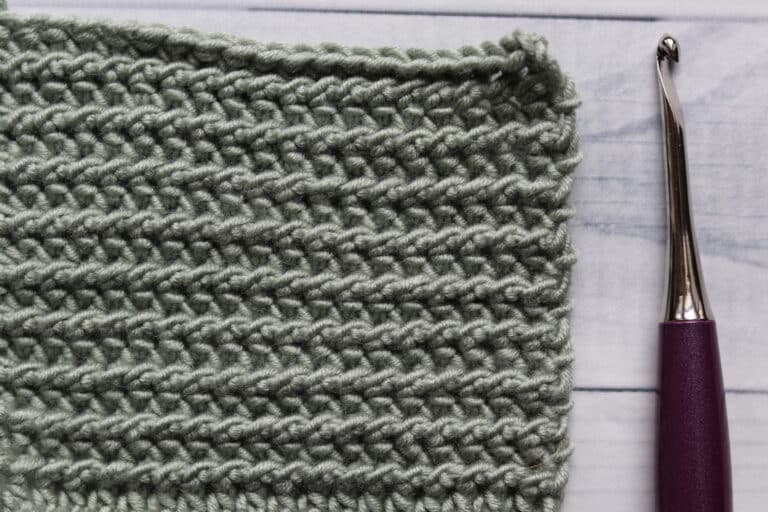
The Extended Moss crochet stitch sets the tone in this farmhouse Linen Love Dishcloth crochet pattern!
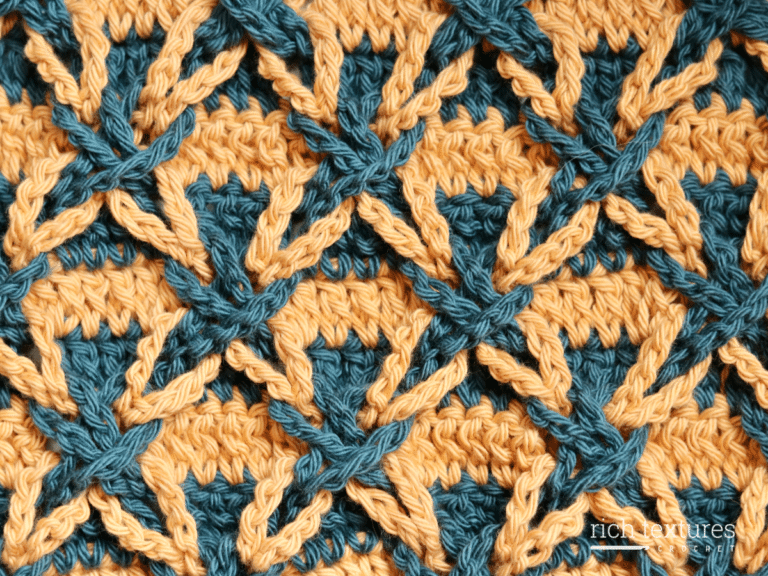
I have long been a fan of the extend moss stitch. It has a woven like texture that is the same on both sides, it is easy to work with satisfying results. And it looks wonderful in this rustic crochet dishcloth!

I love crocheting dishcloths. They make a great “in between” project as I am working on a larger one. They are practical as I use them around my own home, and they make great additions to gifts for my friends and families.
Several years ago as I sold my crochet items locally, they were always a requested item for custom makes and at markets, especially around the holidays. There are so many reasons to crochet dishcloths!

Our design today is simple in that it is all one solid texture, finished off with a simple half double crochet edging. The edging sets off the texture that makes up the design and gives it a nice clean finish.
I have worked my crochet dishcloths as a solid colour, but if you have some worsted weight cotton scraps or smaller amount lying around, I invite you to use these and make a scrappy crochet washcloth with multiple colours.

HAVE YOU HEARD? I have a new book out including 102 crochet stitches focused on texture and colour! If you love learning new crochet stitches, this book is for you! It is available on Amazon in ebook, paperback and hardcover formats. Learn more about it here: Intermediate Crochet Stitches
PDF Copies of this crochet pattern:
The crochet pattern for the Linen Love Dishcloth will be written out in full below. However, if you would like to add this pattern to your library or purchase an ad-free PDF, you can do so from my Etsy and Ravelry shops linked below:
CLICK HERE TO PURCHASE THE PDF FOR THE LINEN LOVE DISHCLOTH ON ETSY
CLICK HERE TO PURCHASE THE PDF FOR THE LINEN LOVE DISHCLOTH ON RAVELRY
Thank you so much for stopping by! While here, you may also want to check out the Granite Gem Dishcloth Crochet Pattern, another great crochet dishcloth pattern. Don’t forget to sign up for my email newsletter below so that you never miss a new free crochet pattern.
Happy Crocheting!
Sarah

Barn Quilt Blankets is a collection of five blanket crochet patterns that feature a beautiful geometric designs. The book is now available in both paperback and ebook formats on Amazon! You can read about it here: BARN QUILT BLANKETS

Linen Love Dishcloth Crochet Pattern:
Skill Level: Easy
Gauge: 15 sts x 22 rows of pattern = 4 inches
Finished Size: Approximately 8.5 x 8.5 inches
Yarn: Dishie Worsted Weight by KintPicks/WeCrochet ® (190 yds; 100g; 100% cotton; (4) worsted weight). You will need approximately 120 yards per dishcloth.
Hook: Size H/8 (5 mm) hook. Notions: Yarn Needle
Stitches and Abbreviations:
3rd Loop – Looking at the back of your hdc, you will see a loop that runs under your back loop. This loop that runs under the back loop is your “3rd loop.”
Ch – Chain
Hdc – Half Double Crochet
Rpt – Repeat
Sc – Single Crochet
Sk – Skip
Sl st – Slip stitch
Spiked Hdc – Spiked Half Double Crochet (Work a hdc st inserting your hook in the space under the next st)
Yo – Yarn over
Pattern Notes:
- Pattern is written in American English terms.
- Pattern is worked in rows, edging in rounds.
- Ch 1 at beginning of row does not count as stitch.
- Weave in ends as needed.
- To change the size of your dishcloth, you will need an even number of stitches.

Free Crochet Pattern:
Ch 30.
Row 1: Sc in the 2nd ch from your hook, sc in the next st and each remaining st across. Ch 1, turn. (29 sts)
Row 2: Sc in the 1st st, *ch 1, sk the next st, spiked hdc under the next st into the foundation ch; Rpt from * across until you come to the final 2 sts, ch 1, sk the next st, sc in the final st. Ch 1, turn.
Row 3: Sc in the 1st st, *sc in the next ch-1 sp, sc working in front of the next st inserting your hook under the top two loops of the post of the next spike hdc; Rpt from * across ending with an sc in the final ch-1 sp and in the top of the final st. Ch 1, turn.
Row 4: Sc in the 1st st, *spiked hdc in the next skipped st 3 rows below, ch 1, sk the next st; Rpt from * across ending with a sc in the top of the final st. Ch 1, turn.
Row 5: Sc in the 1st st, *sc working in front of the next st insert your hook under the top two loops of the post of the next spike hdc, sc in the next ch-sp; Rpt from * across to the final st, sc in the top of the final st. Ch 1, turn.
Row 6: Sc in the 1st st, *ch 1, sk the next st, spiked hdc into the next sipped st 3 rows below; Rpt from * across until you come to the final 2 sts, ch 1, sk the next st, sc in the final st. Ch 1, turn.
Row 7: Sc in the 1st st, *sc in the next ch-1 sp, sc working in front of the next st inserting your hook under the top two loops of the post of the next spike hdc; Rpt from * across ending with an sc in the final ch-1 sp and in the top of the final st. Ch 1, turn.
Rows 8-39: Repeat rows 4-7 eight times. Ch 1, turn.
Row 40: Repeat Row 4.
Row 41: Sc in the 1st st, *sc working in front of the next st inserting your hook under the top two loops of the post of the next spike hdc, sc working over the next ch-1 sp and into the top of the st below; Rpt from * across ending with an sc in the top of the final st. Ch 1, turn.
Edging (Worked in rounds):
With right side facing:
Rnd 1: Work 3 hdc in the 1st corner st, hdc in each st across, hdc in the next corner, evenly work 29 hdc along the side, hdc in the next corner, hdc in each st across the bottom, hdc in the corner, evenly work 28 hdc along the final edge. Join with a sl st in the top of the 1st st. Do not turn.
Rnd 2: Ch 1, working in the 3rd loop all the way around, hdc in each st around working 3 hdc in the 3rd loop of each corner st. Join with a sl st in the top of the 1st st.
Fasten off and weave in your ends.
Video Tutorial:
This pattern is for personal use only.
No unauthorized reproduction, in whole or in part, or distribution of this pattern or content is permitted. ALL FINISHED PRODUCTS from this pattern can be used for local sales and sold online.
Thank you so much for supporting Rich Textures Crochet! To stay in touch or see more great products, be sure to visit me on Facebook and Instagram (Rich Textures Crochet). Thanks again! Happy Crocheting!