
This post contains affiliate links. This means that when you purchase through one of these links we will receive a small commission at no additional cost to you. Thank you for supporting Rich Texture Crochet!
Hello and welcome to Learn to Crochet with RTC! Today we will learn how to make a chain stitch.
If you are familiar with knitting, then you will know the term “cast on,” which is simply the act of picking up loops (ok maybe not so simple) that will form the stitches along your knitting needle.
In crochet, the equivalent to “casting on” would be the foundation chain which is made up of individual chain stitches. It forms the base of your crochet project.
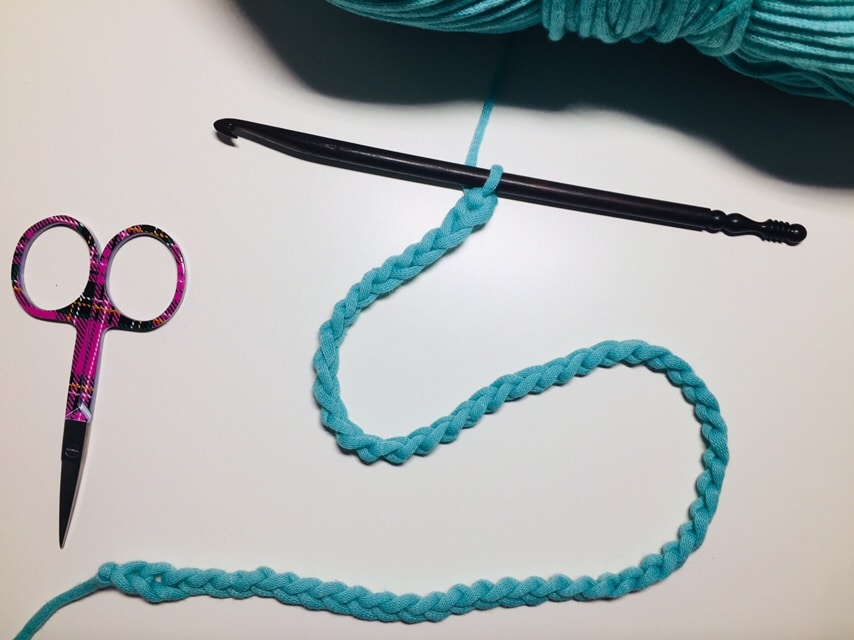
Many patterns, at the start will give you an instruction that reads something like “Ch 25.” The number will vary depending on your project. This is your foundation chain.
In a crochet pattern the abbreviation “ch” stands for chain stitch.
Occasionally in the middle of a row/round/pattern you will see an instruction that reads something similar, such as “ch 3.” Therefore chain stitches are not only found at the beginning of your project in the foundation chain but can also be placed throughout to create unique stitches and designs in your fabric.
Now that we know how important chain stitches are in crochet, let’s take a closer look at how to make one. Following this picture tutorial you will also find a free video tutorial demonstrating the stitch.
Step One: Make a slip knot.
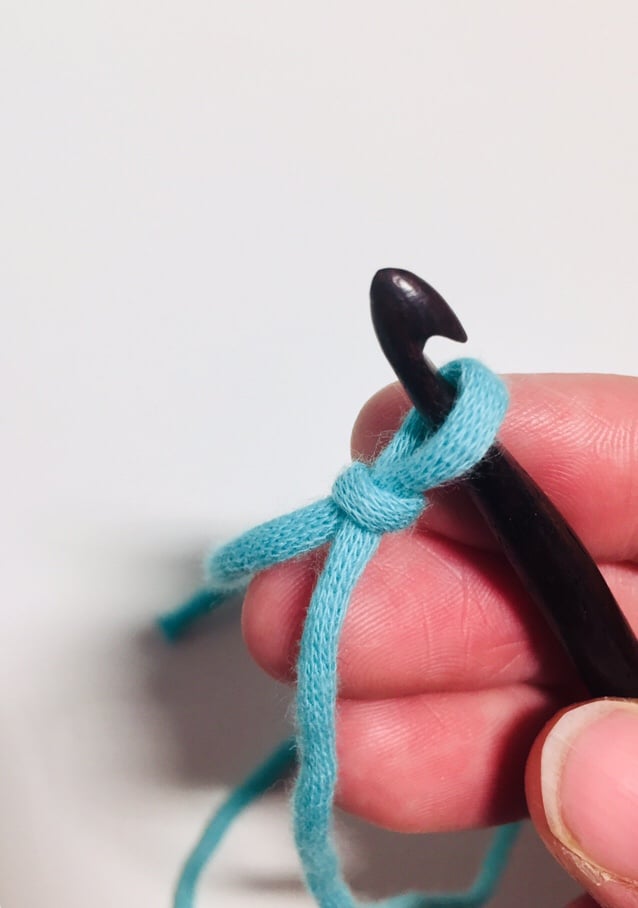
If you are unsure of how to make a slip knot, please check out my tutorial here: Crochet Beginnings Session 1: How to make a slip knot (and hold your hook and yarn!)
Step Two:


If your are right handed, holding your yarn in your left hand and hook in your right (opposite if you are left handed), wrap the yarn over the top of your crochet hook bringing the yarn toward yourself.
Step Three:


Pull your hook through the loop of your slip knot, taking hold of the yarn with your hook and bringing it through the loop also. Pull that new loop up just a little bit. One chain stitch is now made!
To continue making chain stitches, simply repeat steps two and three until you have the number of chain stitches called for.
After you have completed several (or more!) chain stitches, take a moment to admire your work and make note of a few things.
Looking at your chain you will see that there are two sides to it. One side (the top – Pictured below on the left) will look like little V’s all strung together. The underside (Pictured below on the right) will look like a series of bumps, each bump directly behind each V. When you count your stitches, each V (And coordinating bump is counted as one chain stitch. In the photos below you will count nine (9) chain stitches.


When you begin working into these chain stitches that form your foundation chain and begin building on them you will work into these back bumps (although some people will work into the V’s.
You may find making chain stitches a little awkward at first. Remember this is all new! Eventually, as you practice, your will find that the yarn and hook are less awkward to hold and that your chain stitches become a little bit more uniform. It is important that you work toward making each stitch roughly the same size, keeping them loose, but not too loose.
Try not to let the chain twist too much, although some twisting is inevitable as we will look at ways to untwist it next session when we begin to work into the foundation chain.
Have fun! Go ahead and make some chains until your are feeling confident! And I look forward to showing you the next step in your Learn to Crochet journey soon!
Ready to move on to a single crochet stitch? You’ll find the free tutorial here: Learn to Crochet: How to make a Single Crochet
If you are enjoying this series, please like follow Rich Textures Crochet on Facebook (HERE) where you will find some great patterns, tutorials and inspiration.
Happy Crocheting!
Sarah


2 Comments