
This post contains affiliate links. This means that when you purchase through one of these links we will receive a small commission at no additional cost to you. Thank you for supporting Rich Texture Crochet!
Hello and welcome to Rich Textures Crochet! Today we are going to learn how to crochet the beautiful Comfort and Joy Christmas Stocking!
This season I have really been enjoying experimenting with colour in my projects. A few weeks ago I released a series of Christmas Bauble Crochet patterns (you can find the last one here: Christmas Heart Bauble Free Crochet Pattern) and this crochet Christmas Stocking uses a similar technique.
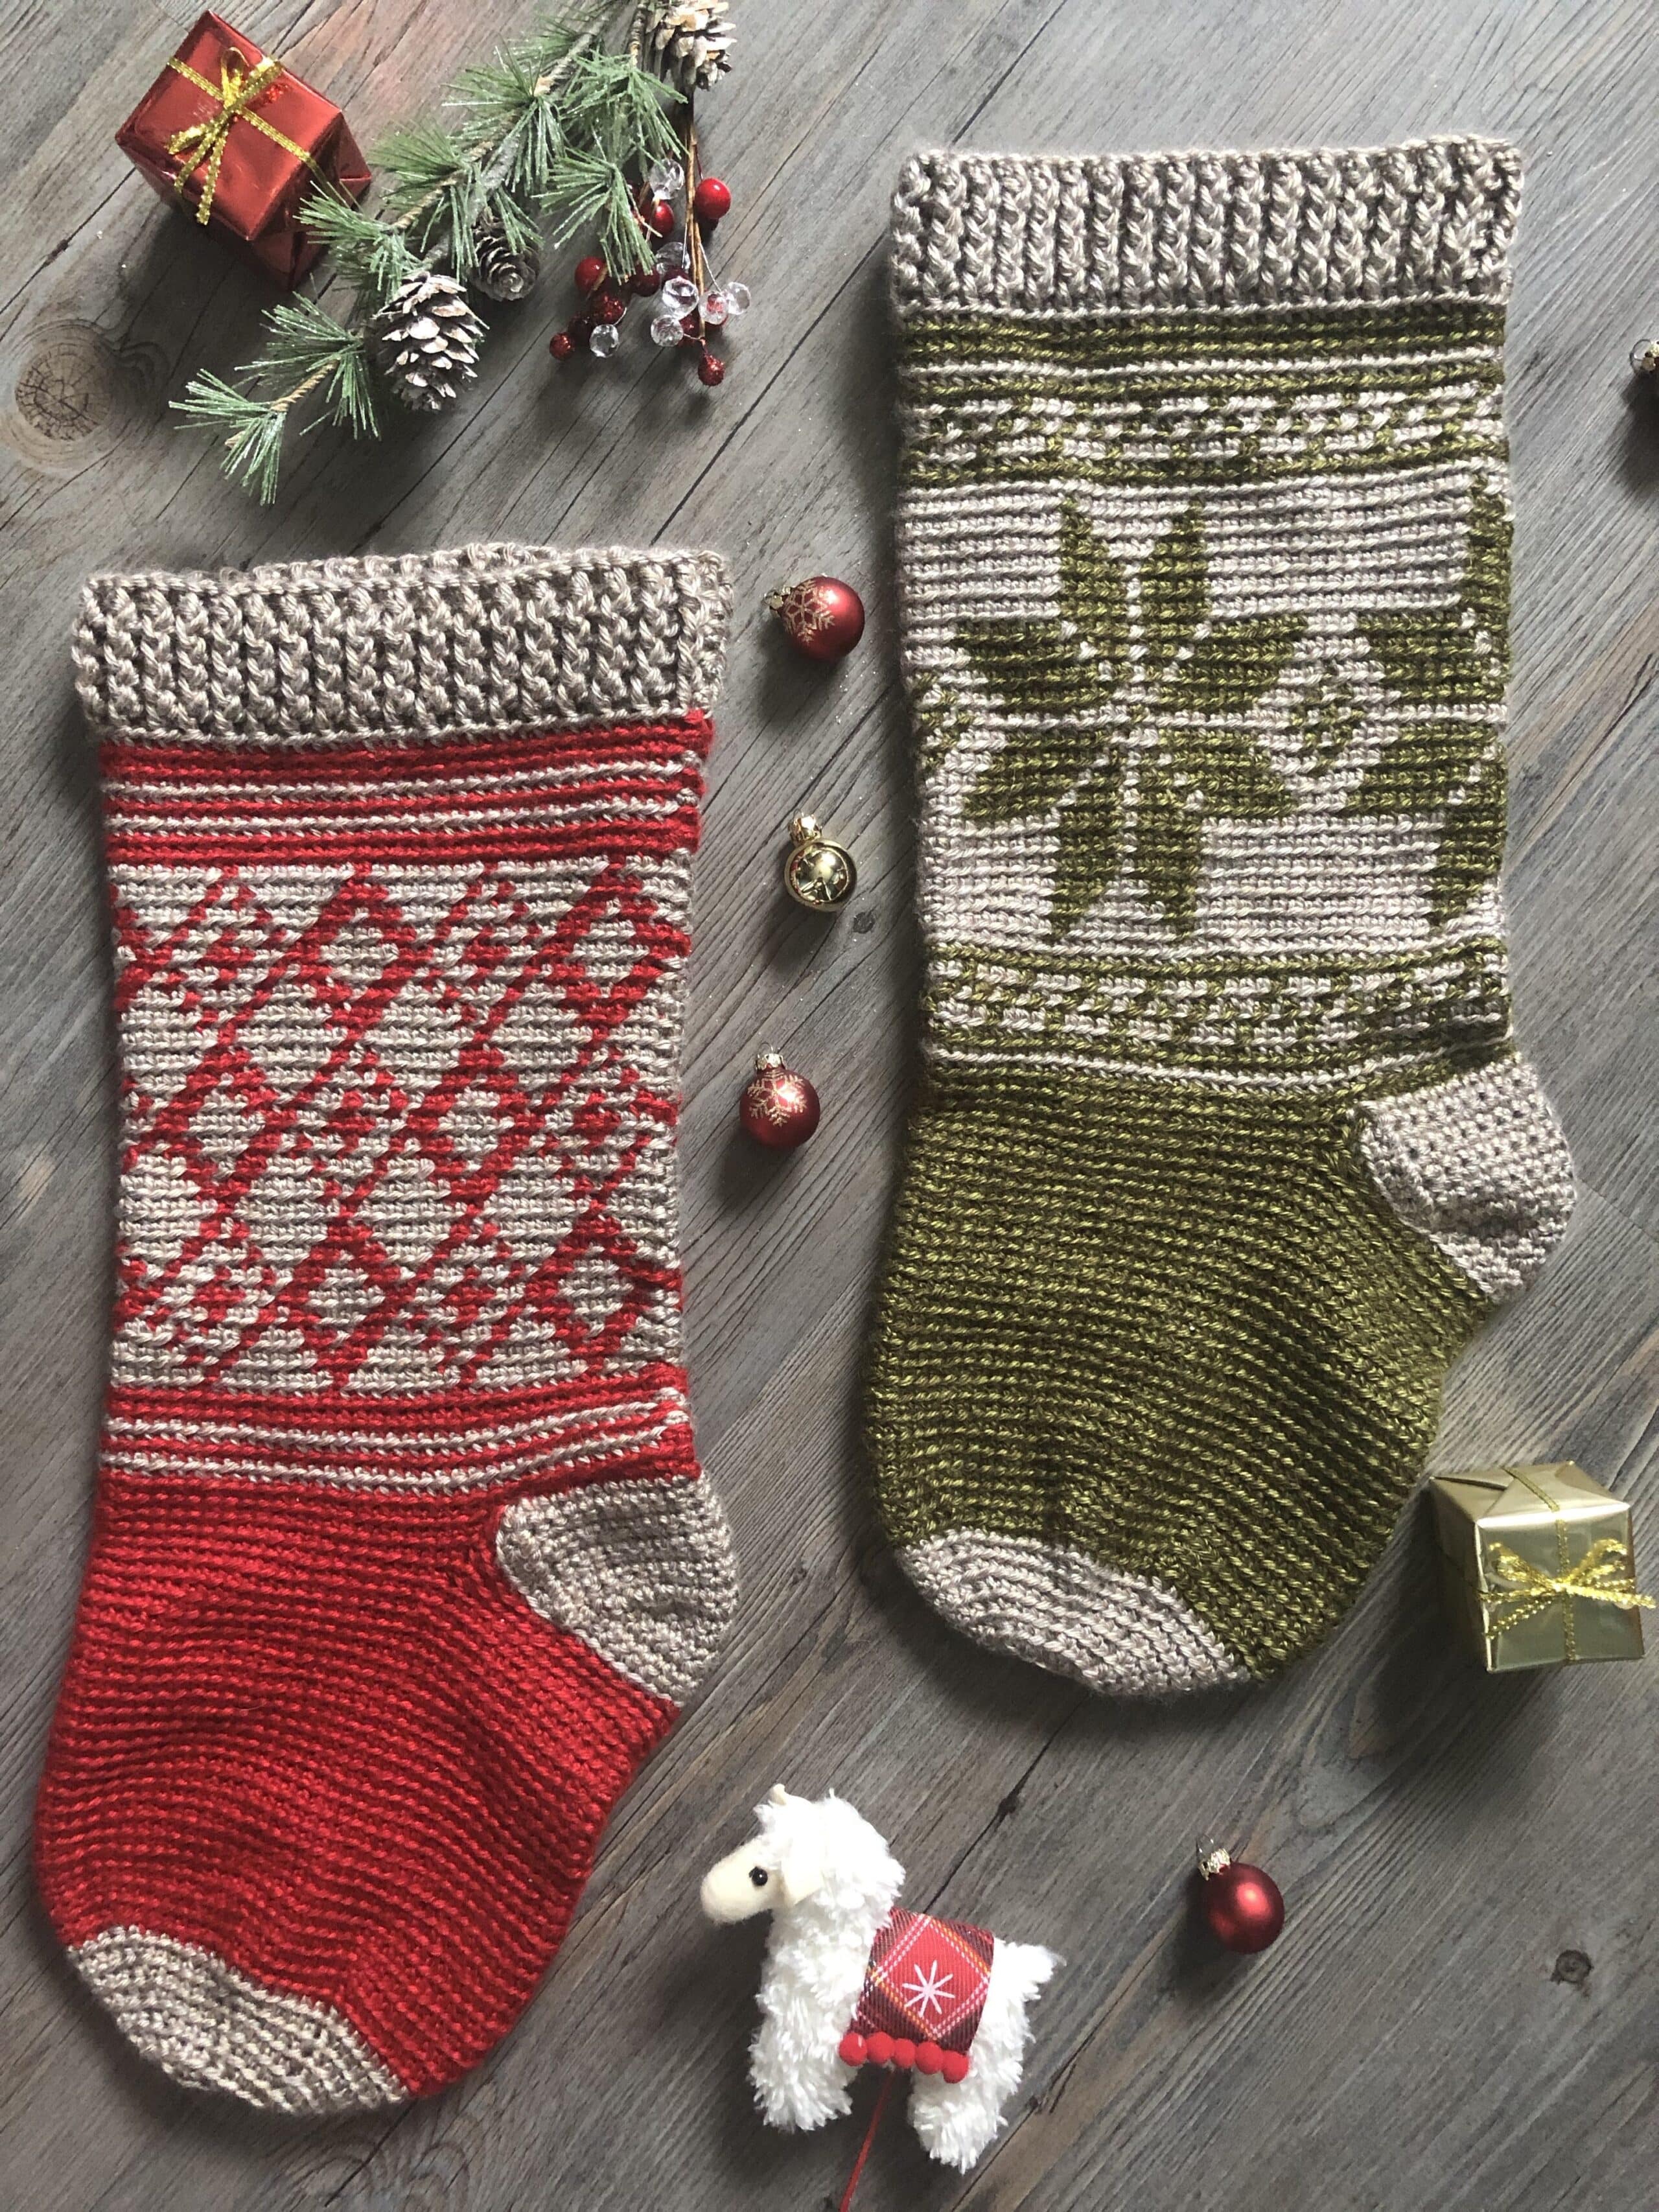
I love large Christmas stockings! I love the look of them when they are hung. If you are looking for a large crochet Christmas stocking this might be the one for you. It is quite roomy on the inside, perfect for adding small gifts come Christmas time!
Other stockings on my blog include this Home for Christmas Stocking made with a super bulky weight yarn: Home for Christmas Stocking – Free Crochet Pattern.
Colour work and construction:
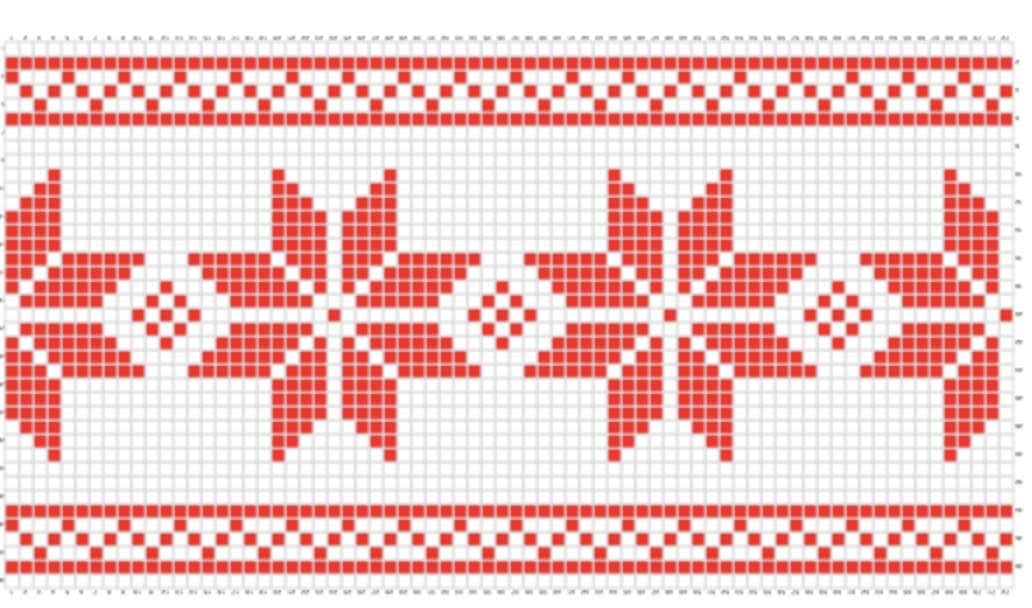
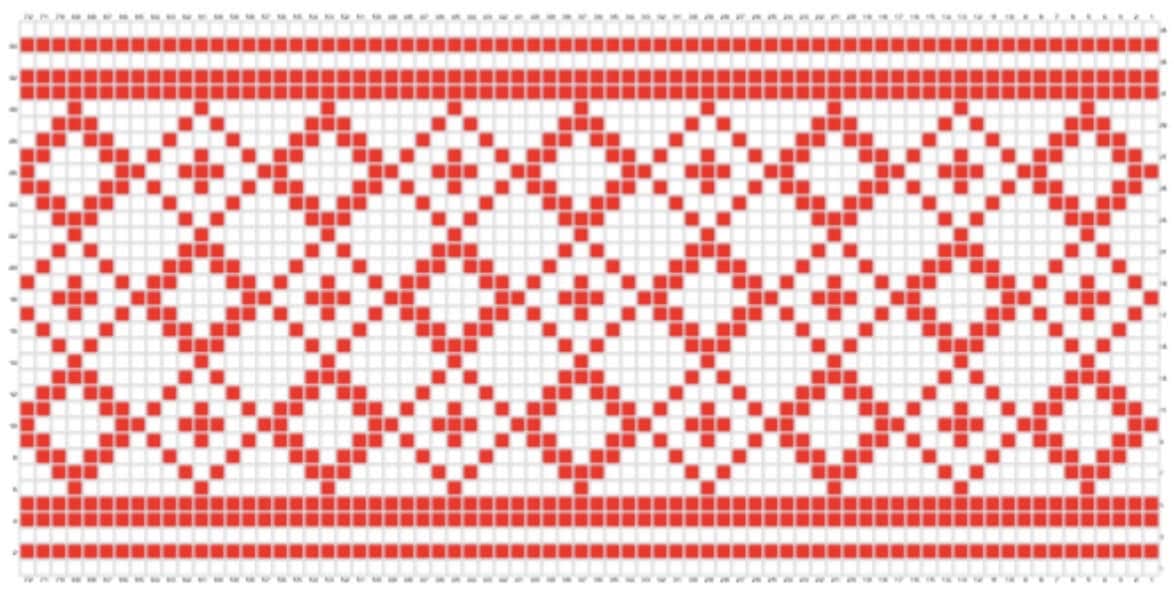
The colour work in this stocking is primarily worked in the cuff which makes it easier to work. There is no need to worry about increase/decrease stitches, you can simply work the chart below as presented.
The colour work is worked entirely as per the chart below. More detailed written instructions are included for the rest of the stocking. Because the colour work is worked from the chart it will be beneficial for you to print the chart either here, from my blog, or you may purchase the PDF from the shops linked below. For each stocking you only have to work on of the charts provided!
Lion Brand Heartland Yarn:
For my stocking I used the Heartland yarn by Lion Brand yarns which is a 100% acrylic, however you may substitute the yarn for another worsted weight yarn of your choice. I have also paired it with a 6 mm crochet hook. In my tutorial I am using a Furls Crochet hook called the Streamline in Ebony. You can find out more about their beautiful hooks here: Furls Crochet.
PDF Copy:
Below you will find the pattern written out in full followed by a free video tutorial however if you would like to show this pattern some love, save it to your library or purchase a convenient PDF copy you may do so through either of my Etsy or Ravelry shops linked below:
Click here for the Comfort and Joy Crochet Christmas Stocking on Etsy
Click here for the Comfort and Joy Crochet Christmas Stocking on Ravelry
Thank you so much for stopping by and I look forward to seeing you again!
Until then, happy crocheting!
Sarah

Comfort and Joy Crochet Christmas Stocking:
Skill Level: Intermediate
Gauge: 17 sts x 20 rows of sc = 4 inches
Finished Size: 7.5 x 20 inches laid flat
Hook: Size J/8 (6.0 mm) Hook. Adjust hook size if necessary to obtain correct gauge.
Notions: Yarn Needle, stitch marker, Christmas Bauble with 10 inch circumference OR some fibrefill.
Stitches and Abbreviations:
Blo – Back Loop Only
Bpdc – Back Post Double Crochet
Ch – Chain
Fpdc – Front Post Double Crochet
Rpt – Repeat
Sc – Single Crochet
Sc2tog – Single Crochet Two Stitches Together
Sc3tog – Single Crochet Three Stitches Together
Sk – Skip
Sl St – Slip Stitch
Yo – Yarn Over
Pattern Notes:
- Pattern is written in American English terms.
- Pattern is worked in rounds.
- Heel is worked in rows.
- Ch 1 at beginning of round does not count as stitch.
- Ch 3 at beginning counts as a stitch.
- Weave in ends as needed.
- Do not turn at the end of each round.
- When colour is not in use, carry it behind the working yarn.
Free Crochet Pattern:
Cuff (Worked in rounds):
With Colour B, Ch 72, without twisting chain, sl st in the first st to make a ring.
Rnd 1: Ch 3 (Counts as dc), dc in the next st and in each st around; join with a sl st in the top of ch-3. Do not turn. (72 sts)
Rnd 2: Ch 3, * fpdc around the next st, bpdc around the next st; rpt from * around, join with a sl st in the top of the ch-3. (72 Sts)
Rnds 3-5: Repeat rnd 2. Switch to colour A.
Continue with colour A:
Rnds 6-7: Working in the blo, ch 1, * sc in each st all the way around; Join with a sl st in the first st. Switch to colour B at the end of round 5. (72 sts)
Rnds 8 – 46: Continue working in the blo, work either of the graphs below beginning at row 1. Each square on the graph is equivalent to one sc, change the yarn colour as the need arises by completing the stitch prior with the new colour yarn (i.e. In the stitch prior to the stitch worked in the new colour, with colour A insert your hook in the next st and draw up a loop. Drop colour A, pick up colour B and draw through the two loops on your hook completing the stitch, work the next st in the new colour). Carry the non working yarn in behind the working yarn. Join with a sl st in the first st at the end of each round. Join Colour A in last st.
Rnds 47-48: With colour A and working in the blo, ch 1, sc in each st all the way around; join with a sl st in the first st. (72 Sts). Fasten off colour A.
Heel Flap (Worked in rows):
Find the centre stitch at the back of the stocking (This will be the stitch where you joined at the end of each round). From that stitch count 10 sts to the right and join colour B with a sl st.
Row 1: With colour B and working through both loops, sc in the same st as joining and in each of the next 20 sts; Turn leaving remaining sts unworked. (21 sts)
Rows 2-8: Ch 1, sc in each across; Turn. (21 sts)
Heel Shaping:
Row 9: Ch 1, sc in each of the next 16 sts; turn leaving remaining sts unworked. (16 sts)
Row 10: Ch 1, sc in each of the next 11 sts; turn leaving the remaining sts unworked. (11 sts)
Row 11: Ch 1, sc in each of the next 11 sts, sc in the next st 2 rows below, sl st in the next st; turn. (12 sc)
Row 12: Sk the first sl st, ch 1, sc in each of the next 12 sts, sc in the next st 2 rows below, sl st in the next st; turn. (13 sc)
Row 13: Sk the first sl st, ch 1, sc in each of the next 13 sts, sc in the next st 2 rows below, sl st in the next st; turn. (14 sc)
Row 14: Sk the first sl st, ch 1, sc in each of the next 14 sts, sc in the next st 2 rows below, sl st in the next st; turn. (15 sts)
Row 15: Sk the first sl st, ch 1, sc in each of the next 15 sts, sc in the next st 2 rows below, turn. (16 sc)
Row 16: ch 1, sc in each of the next 16 sts, sc in the next st 2 rows below; continue working along the side of the heel working 8 sts across, sl st in the next st of sock body, turn leaving remaining sts unworked (25 sts)
Row 17: ch 1, sk the first sl st, sc in each of the next 25 sts, working alongside of the heel, work 8 sc, sl st into next st on sock body; fasten off colour B. (33 sts).
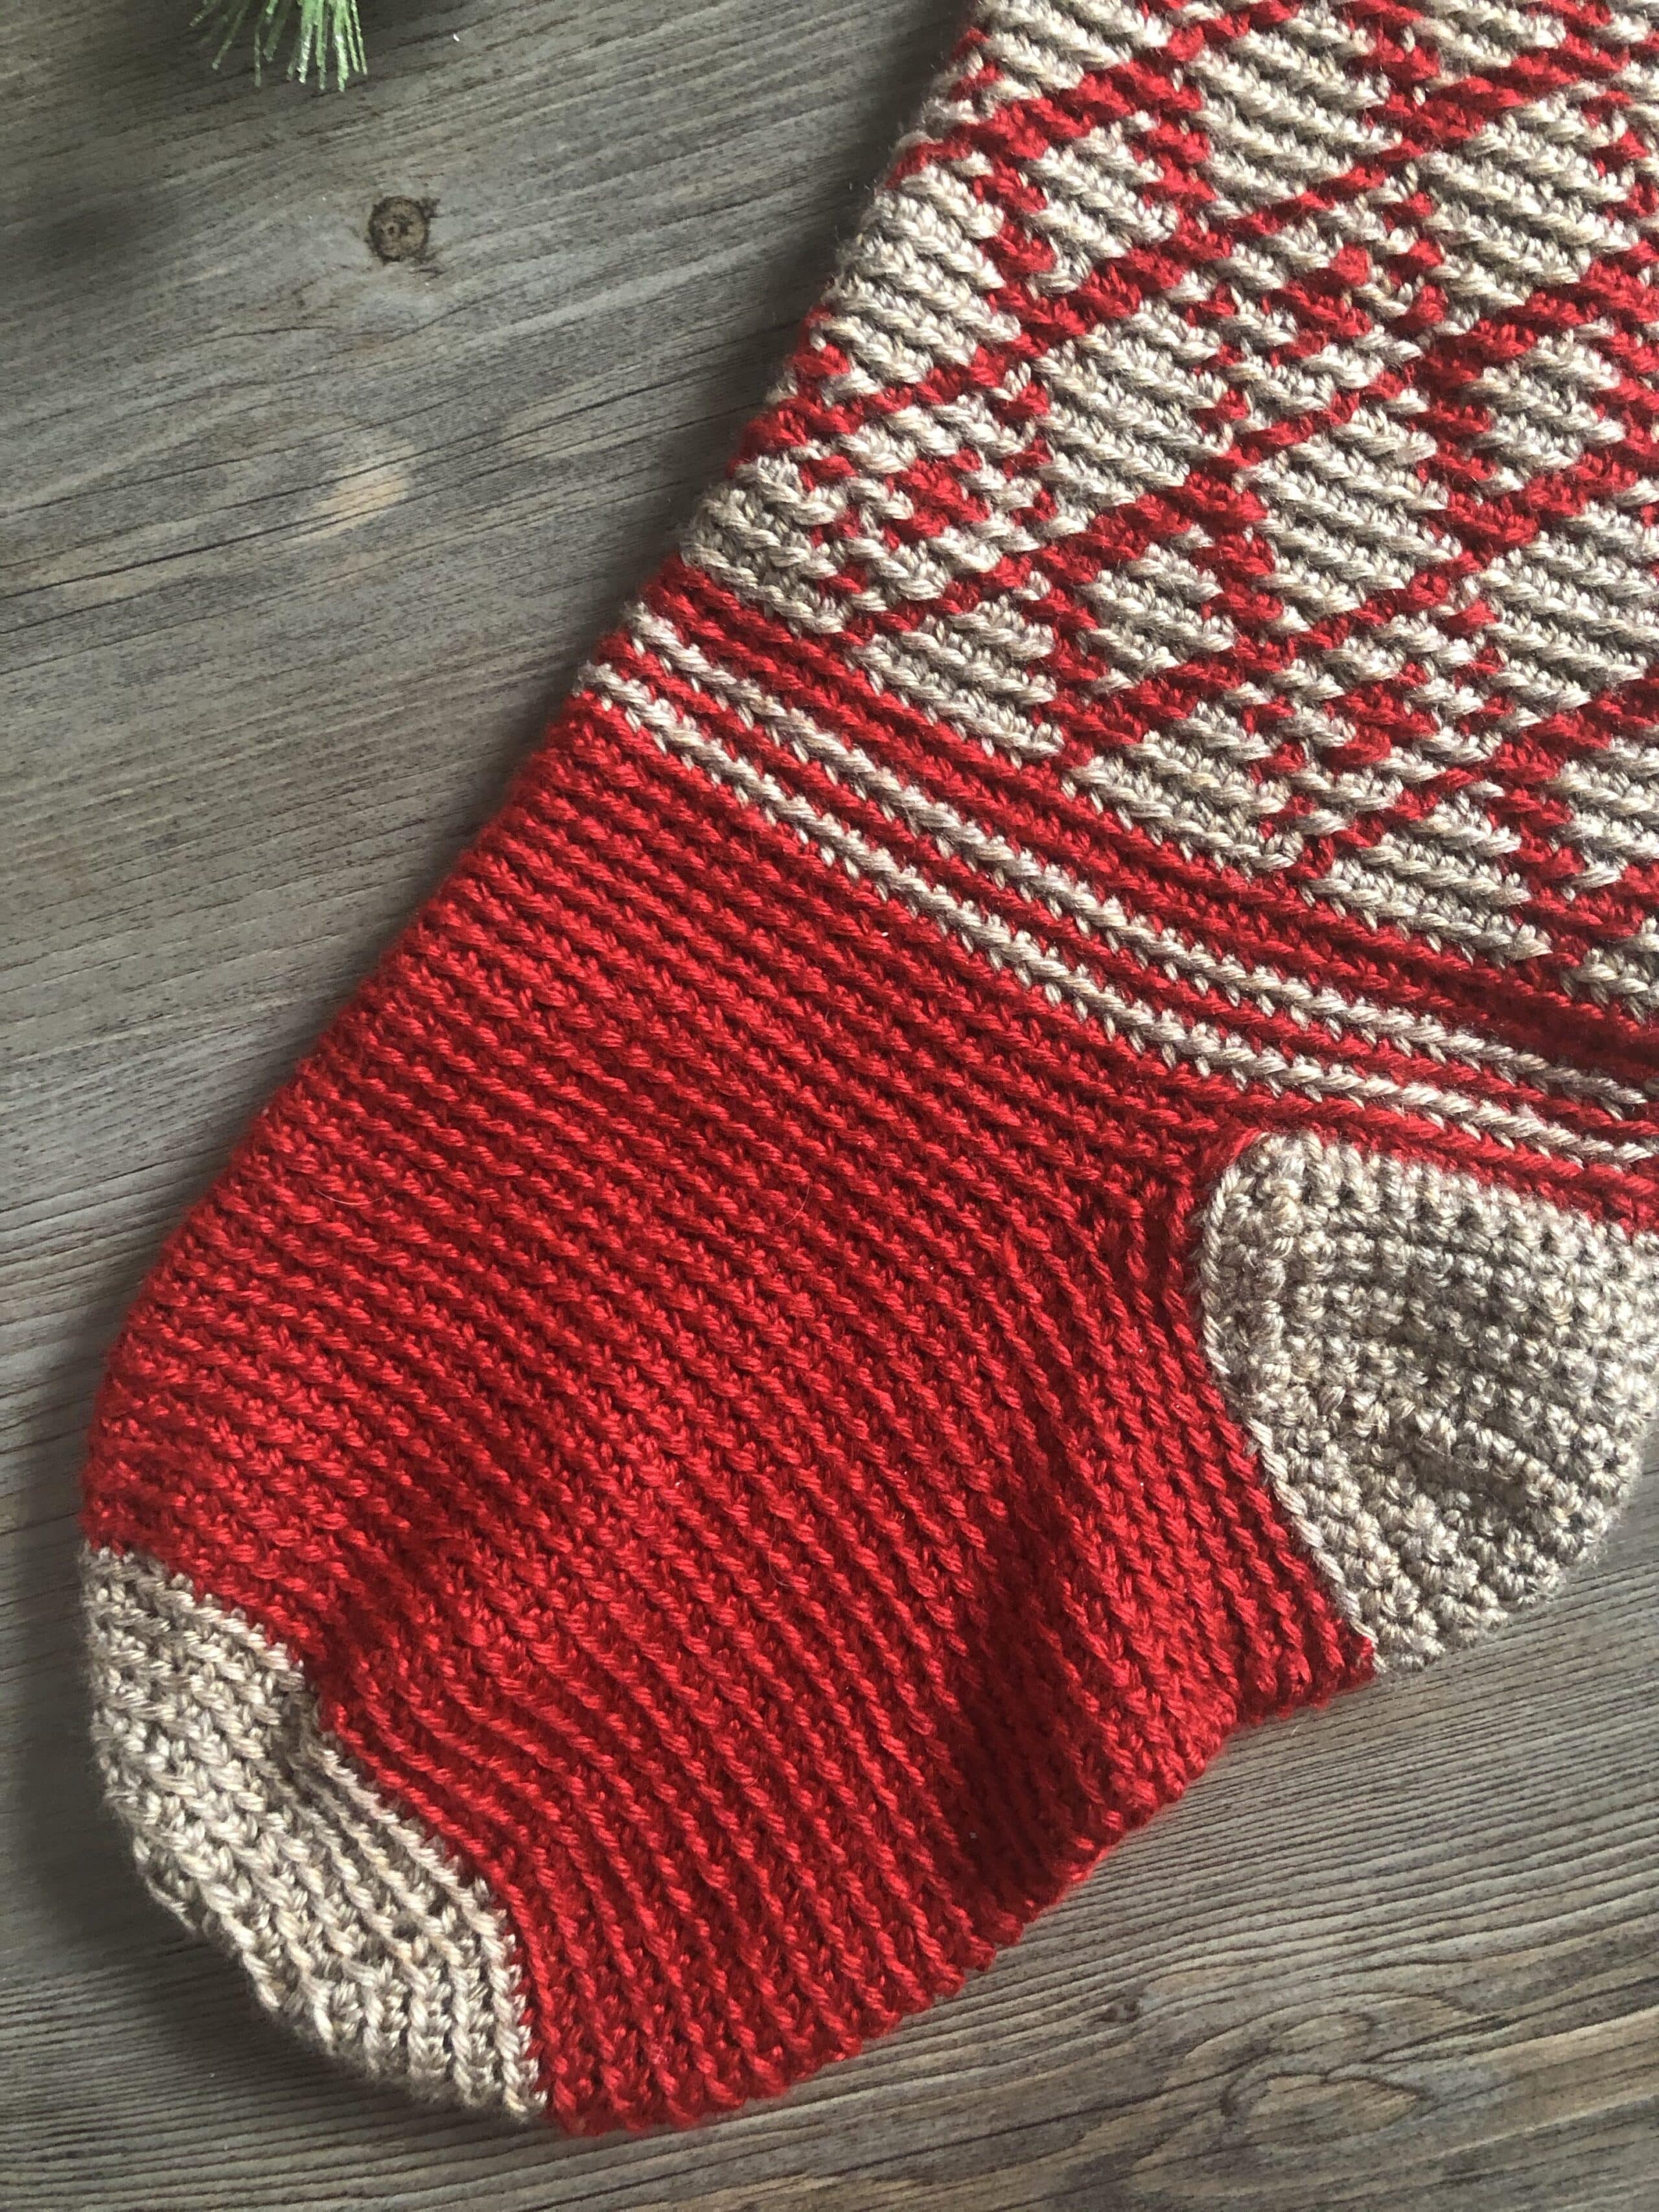
Foot (Worked in Rounds):
Find the Center back of heel and join colour A with a sl st.
Rnd 1: With colour A, ch 1, in the blo sc in each of the next 16 sts, sc3tog over next sc, sl st, next sc, sc in each of the next 46 sts, sc 3 tog in the next sc, sl st, sc, sc in the final 15 sts. Join with a sl st. (79 sts)
Rnd 2: Ch 1, in blo sc in each of the next 15 sts, sc3tog, sc in each of the next 44 sc, sc3tog, sc in each of the final 14 sts, join with a sl st. (75 sts)
Rnd 3: Ch 1, in blo sc in each of the next 14 sts, sc3tog, sc in each of the next 42 sts, sc3tog, sc in each of the next 13 sts; join with a sl st. (71 sts)
Rnds 4-28: Ch 1, sc in each st all the way around, changing to colour B in the last st; join with a sl st in the first st. (71 sc)
Toe (Worked in rounds):
Rnd 1: Ch 1,* sc in each of the next 8 sts, sc2tog; rpt from * all the way around, join in the first st with a sl st. (65 sts)
Rnd 2: Ch 1,* sc in each of the next 7 sts, sc2tog; rpt from * all the way around, join in the first st with a sl st. (58 sts)
Rnd 3: Ch 1,* sc in each of the next 6 sts, sc2tog; rpt from * all the way around, join in the first st with a sl st. (51 sts)
Rnd 4: Ch 1,* sc in each of the next 5 sts, sc2tog; rpt from * all the way around, join in the first st with a sl st. (44 sts)
Rnd 5: Ch 1,* sc in each of the next 4 sts, sc2tog; rpt from * all the way around, join in the first st with a sl st. (37 sts)
Rnd 6: Ch 1,* sc in each of the next 3 sts, sc2tog; rpt from * all the way around, join in the first st with a sl st. (30 sts)
Rnd 7: Ch 1,* sc in each of the next 2 sts, sc2tog; rpt from * all the way around, join in the first st with a sl st. (23 sts)
Rnd 8: Ch 1,* sc in each of the next 1 sts, sc2tog; rpt from * all the way around, join in the first st with a sl st. (16 sts)
Rnd 9: Ch 1, sc in each st around; join with a sl st. (16 sts)
Fasten off leaving a long tail. Using the tail sew the toe of the sock closed. Fasten off and weave in ends.
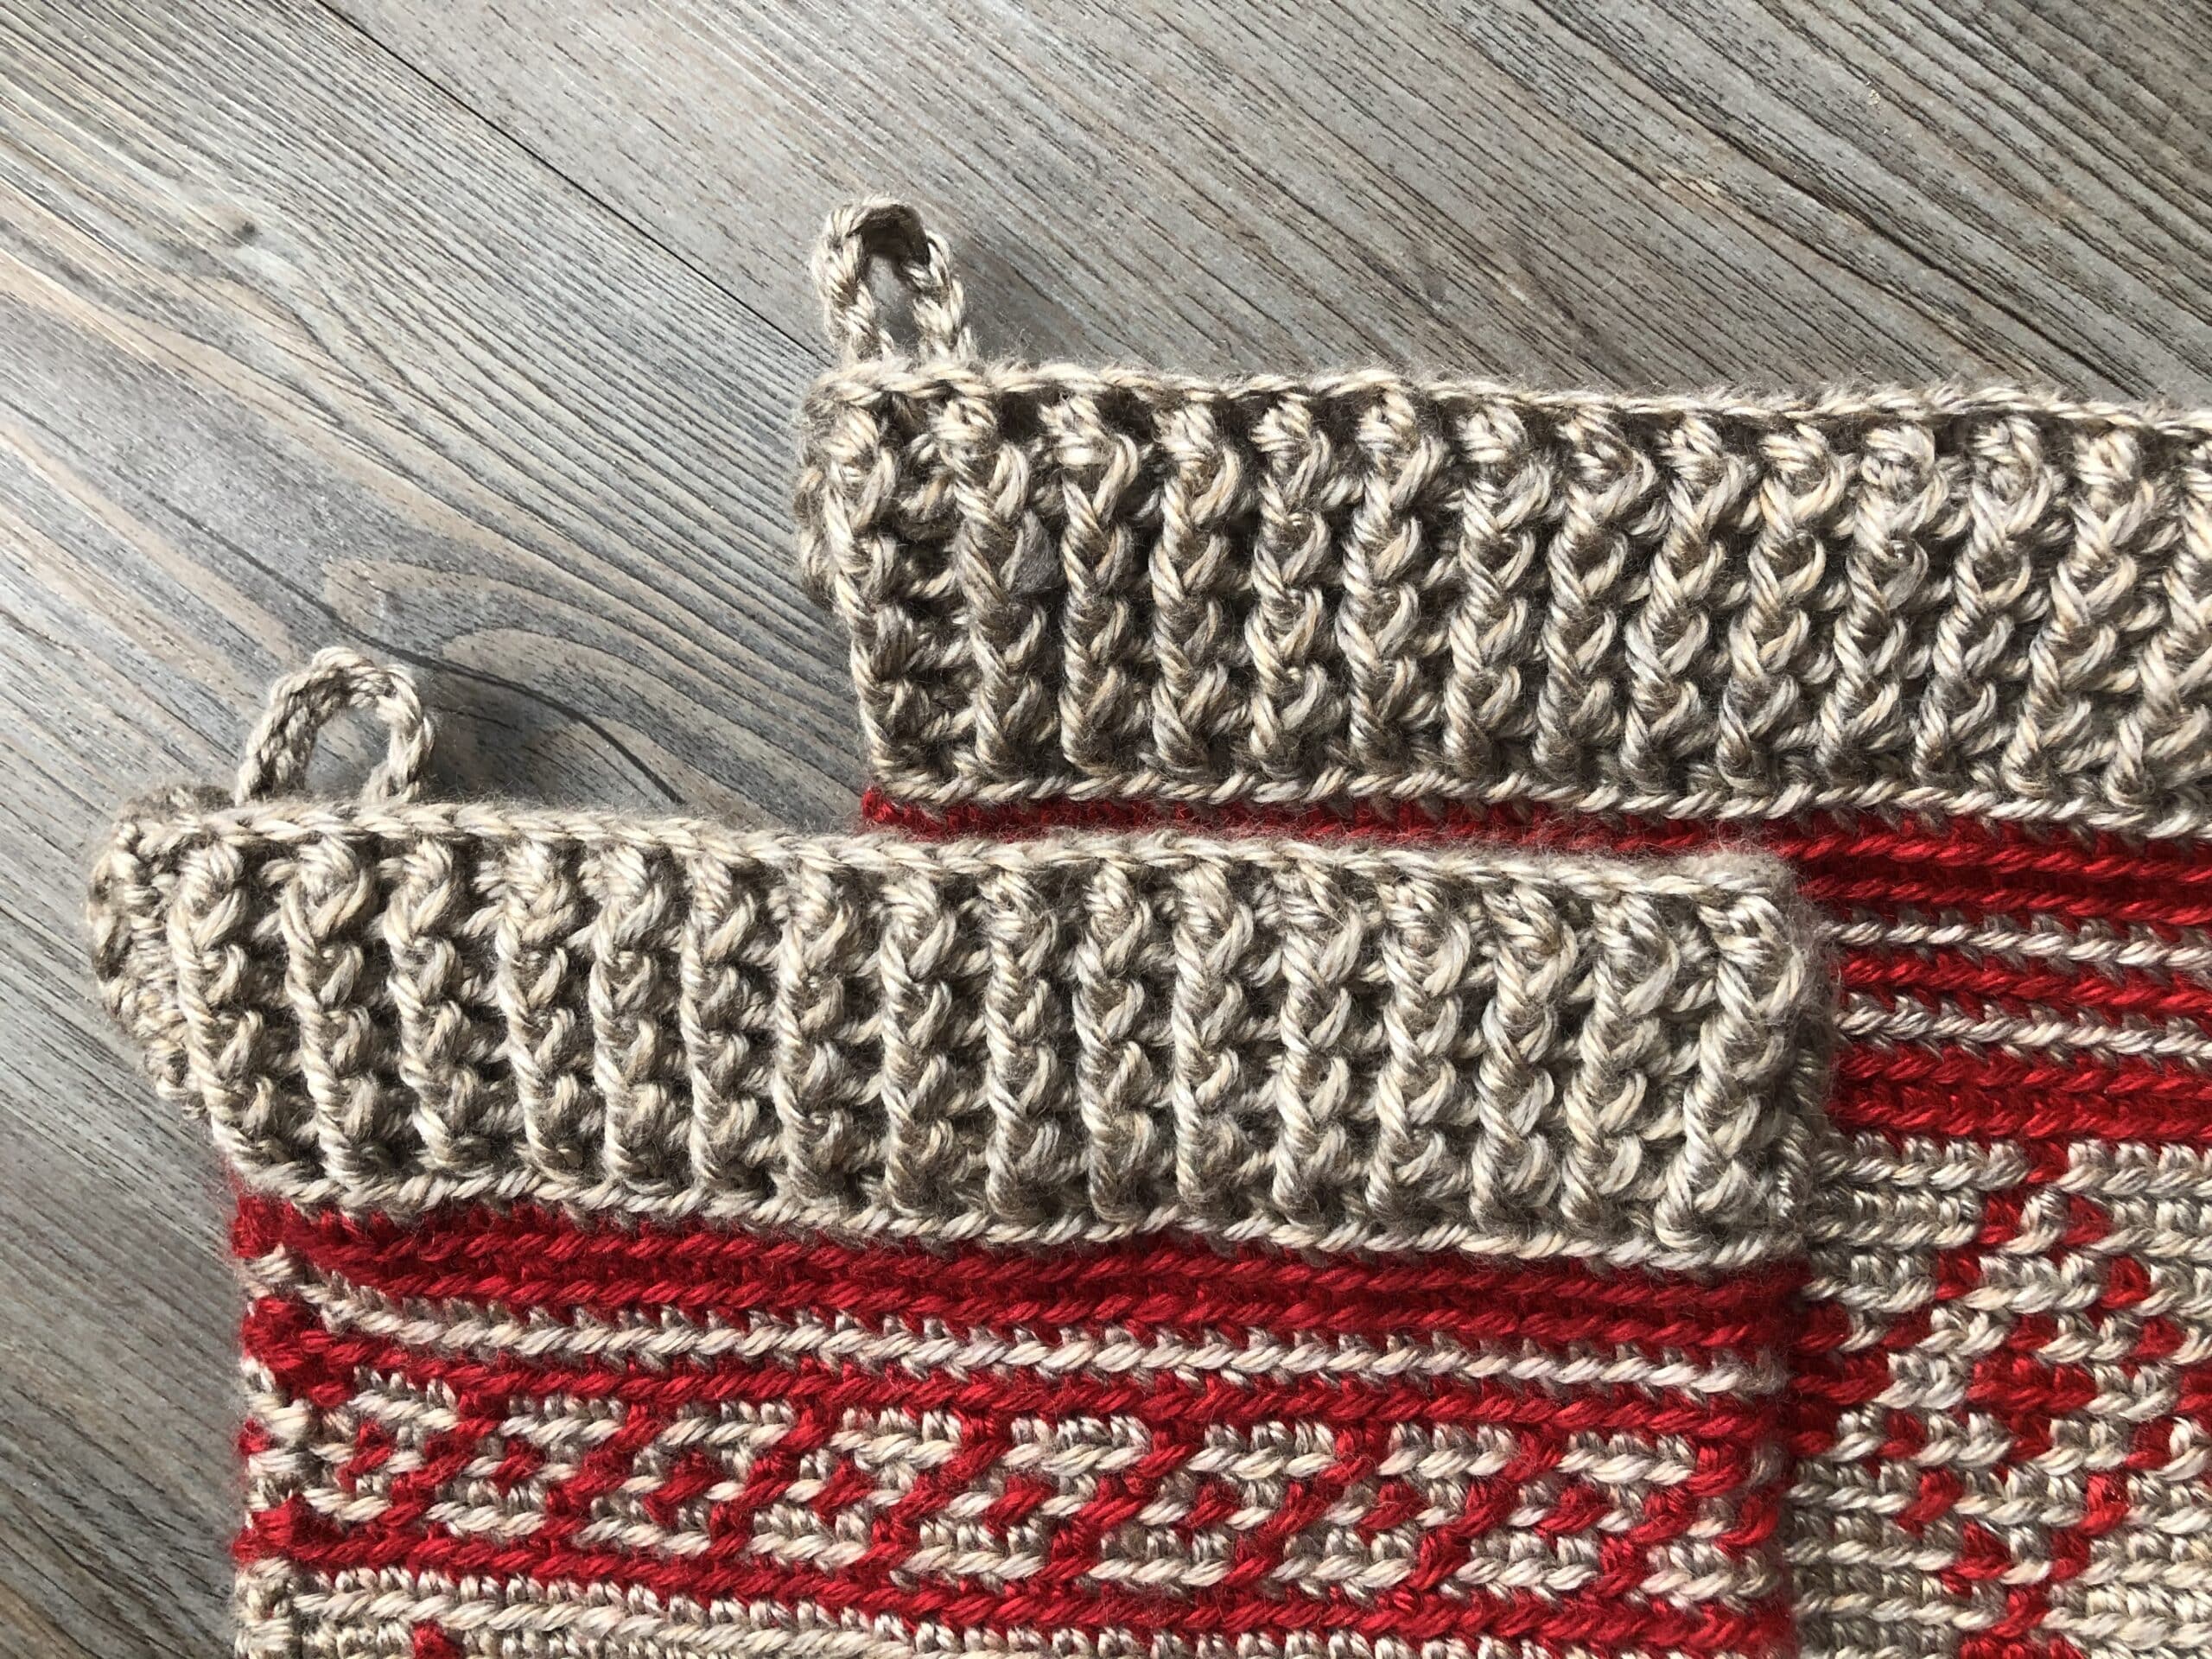
Hanger:
Find centre back of stocking and with colour B join yarn with a sl st on the inside of the cuff (Make sure it is secure!). Ch 15, join once again on the inside of the cuff. Turn, ch 1, sl st in each st all the way across and join once again on the inside of the cuff. Fasten off and weave in ends.


I made two of this large stocking pattern and it was such a hit! Now after Christmas I’m continuing to make one for every family member to be ready for next year.
For the two who got the stocking this Christmas, it was also the perfect loot bag for them to carry away all their new goodies!
I LOVE the comfort and joy patterns. I made one of each for my college kids and sent them to them away at college filled with treats. Have you considered making a tree skirt pattern with the prints to match? Thank you!
Hey, beautiful stockings! I’m just getting started on making one, but I’m a bit confused why in rnd6-8 there’s an instruction for round 5?
Hello! Thanks for reaching out and for your question. I’m not sure I am understanding what you are referring to. Could you please elaborate? Thanks!